No edit summary |
No edit summary |
||
| Line 128: | Line 128: | ||
| − | ===Rush=== |
+ | ===Rush Large=== |
In the ''Battle of Hannut'', day three uses 64 player Rush as its ruleset. There are four stages for eight destructible objectives in total, arranged similarly to the Breakthrough gametype. |
In the ''Battle of Hannut'', day three uses 64 player Rush as its ruleset. There are four stages for eight destructible objectives in total, arranged similarly to the Breakthrough gametype. |
||
| Line 134: | Line 134: | ||
In the first sector, the German attackers deploy from behind the hedgerows in the map's Far East, assaulting directly eastwards across open terrain or using the flanks around Main Road - East and the riverbed. Objective A is the nearest, located on the southern edge of Tank Wrecks, where the artillery gun has been emplaced around a ring of trenches. Objective B is further back, protected by a belt of fortifications along the berm dividing Tank Wrecks from the adjacent Burning Field. The objective itself is within the northeastern corner of the field. |
In the first sector, the German attackers deploy from behind the hedgerows in the map's Far East, assaulting directly eastwards across open terrain or using the flanks around Main Road - East and the riverbed. Objective A is the nearest, located on the southern edge of Tank Wrecks, where the artillery gun has been emplaced around a ring of trenches. Objective B is further back, protected by a belt of fortifications along the berm dividing Tank Wrecks from the adjacent Burning Field. The objective itself is within the northeastern corner of the field. |
||
| − | The Germans come armed with mechanized support to carry the infantry across the open ground, in the form of two tanks, two halftracks, a Kubelwagen and a towable Pak 40. The British field a tank and |
+ | The Germans come armed with mechanized support to carry the infantry across the open ground, in the form of two tanks, two halftracks, a Kubelwagen and a towable Pak 40. The British field a tank and M3 halftrack of their own, in addition to significant static defenses - two 6-Pounders and a Vickers gun cover the eastward approach up to Burning Field, with another HMG set up at a roadblock near the Grapevines intersection. |
====Sector 2==== |
====Sector 2==== |
||
| − | The next phase falls within the south end of the Village, with objectives located on opposite banks of the barren riverbed. |
+ | The next phase falls within the south end of the Village, with objectives located on opposite banks of the barren riverbed. South of the two is objective A, located in the walled garden area behind the lone house on the Bridge Conquest flag. Approach to this flag from the river is covered by an HMG. North up the main road is objective B, which is inside the barn on the south edge of the Village proper. The large wall the runs parallel to the main road acts as defensive line, with an AT gun, stationary MG, and firing steps allowing defenders to shoot over the top. |
====Sector 3==== |
====Sector 3==== |
||
| + | The attackers swing northwards, seeking to clear the Village completely. Objective A is on the western edge of the settlement, in the farming compound comprised of a barn and two other smaller structures. Defenders can reach this flag by skirting the edges of the Village to the south or north. Objective B is in the Church grounds, specifically in the southwest corner of the graveyard. |
||
| + | |||
====Sector 4==== |
====Sector 4==== |
||
| + | The final phase takes place at Hill Farm near the British Conquest deployment. Objective A is in the barn on the southern edge of the area, and objective B is on the north side in a small depression astride the Western Road known as Outside Farm. |
||
| + | |||
===Final Stand=== |
===Final Stand=== |
||
| Line 200: | Line 204: | ||
====C: Water Mill==== |
====C: Water Mill==== |
||
This objective capture zone is similar to Conquest. |
This objective capture zone is similar to Conquest. |
||
| + | |||
| + | |||
| + | ==Domination== |
||
| + | ===A: === |
||
| + | ===B: === |
||
| + | ===C: === |
||
| + | |||
| + | |||
| + | ==Team Deathmatch== |
||
Revision as of 18:05, 5 March 2019
| This article is a stub. It is short and in need of fortification. Why not help out? |
Arras is a map featured in Battlefield V. It was first seen in the Gamescom trailer.
It takes place during the Battle of Arras on May 21st 1940. With the Germans already having reached the English Channel on May 19th, a Franco-British counterattack spearheaded by armored units was made against the southern flank of the German front, with the intention of halting or otherwise stalling them from completing the encirclement from the southwest. Although initially promising the attack was repulsed within 24 hours. This and other failed counteroffensives ultimately left the majority of the British Expeditionary Force, along with the French First Army, trapped in a pocket centered around the seaside town of Dunkirk.
Overview
In the light of a fine morning in late spring stands the quaint farming community of Arras. The rural village, located centrally on the map, consists of nearly two dozen buildings packed closely together along cobblestone streets, overlooked by a grand stone church. Around the map's periphery, and stretching out of bounds across the horizon, are a series of neatly parcelled canola fields - their vibrant yellow flowers standing waist high, giving the map a striking palette while also offering substantial visual cover for infantry. The fields are separated by modest hedgerows or islands of forestry, as well as rural roads and pathways that circle the village exterior, connecting farmhouses and agricultural outbuildings standing otherwise isolated from the central block. The terrain is undulating, with the village standing on a slight hill, with the surrounding open fields rising and dipping at random. Ditches line the dirt road sides, and in the south a shallow river cuts across the map's waist.
Despite its visual splendour, Arras has already been scarred by war with shell craters, tank wrecks and scorched fields around the eastern edge. Set against a backdrop of German tanks roaming the adjacent hills en masse, Arras may well arrive at the same fate as nearby towns, uniformly devoured by smoke, as the entire village area can be effectively levelled in the course of a game.
In aesthetics and layout, Arras intends to evoke Soissons from Battlefield 1, or Harvest Day from Battlefield: Bad Company.[2]
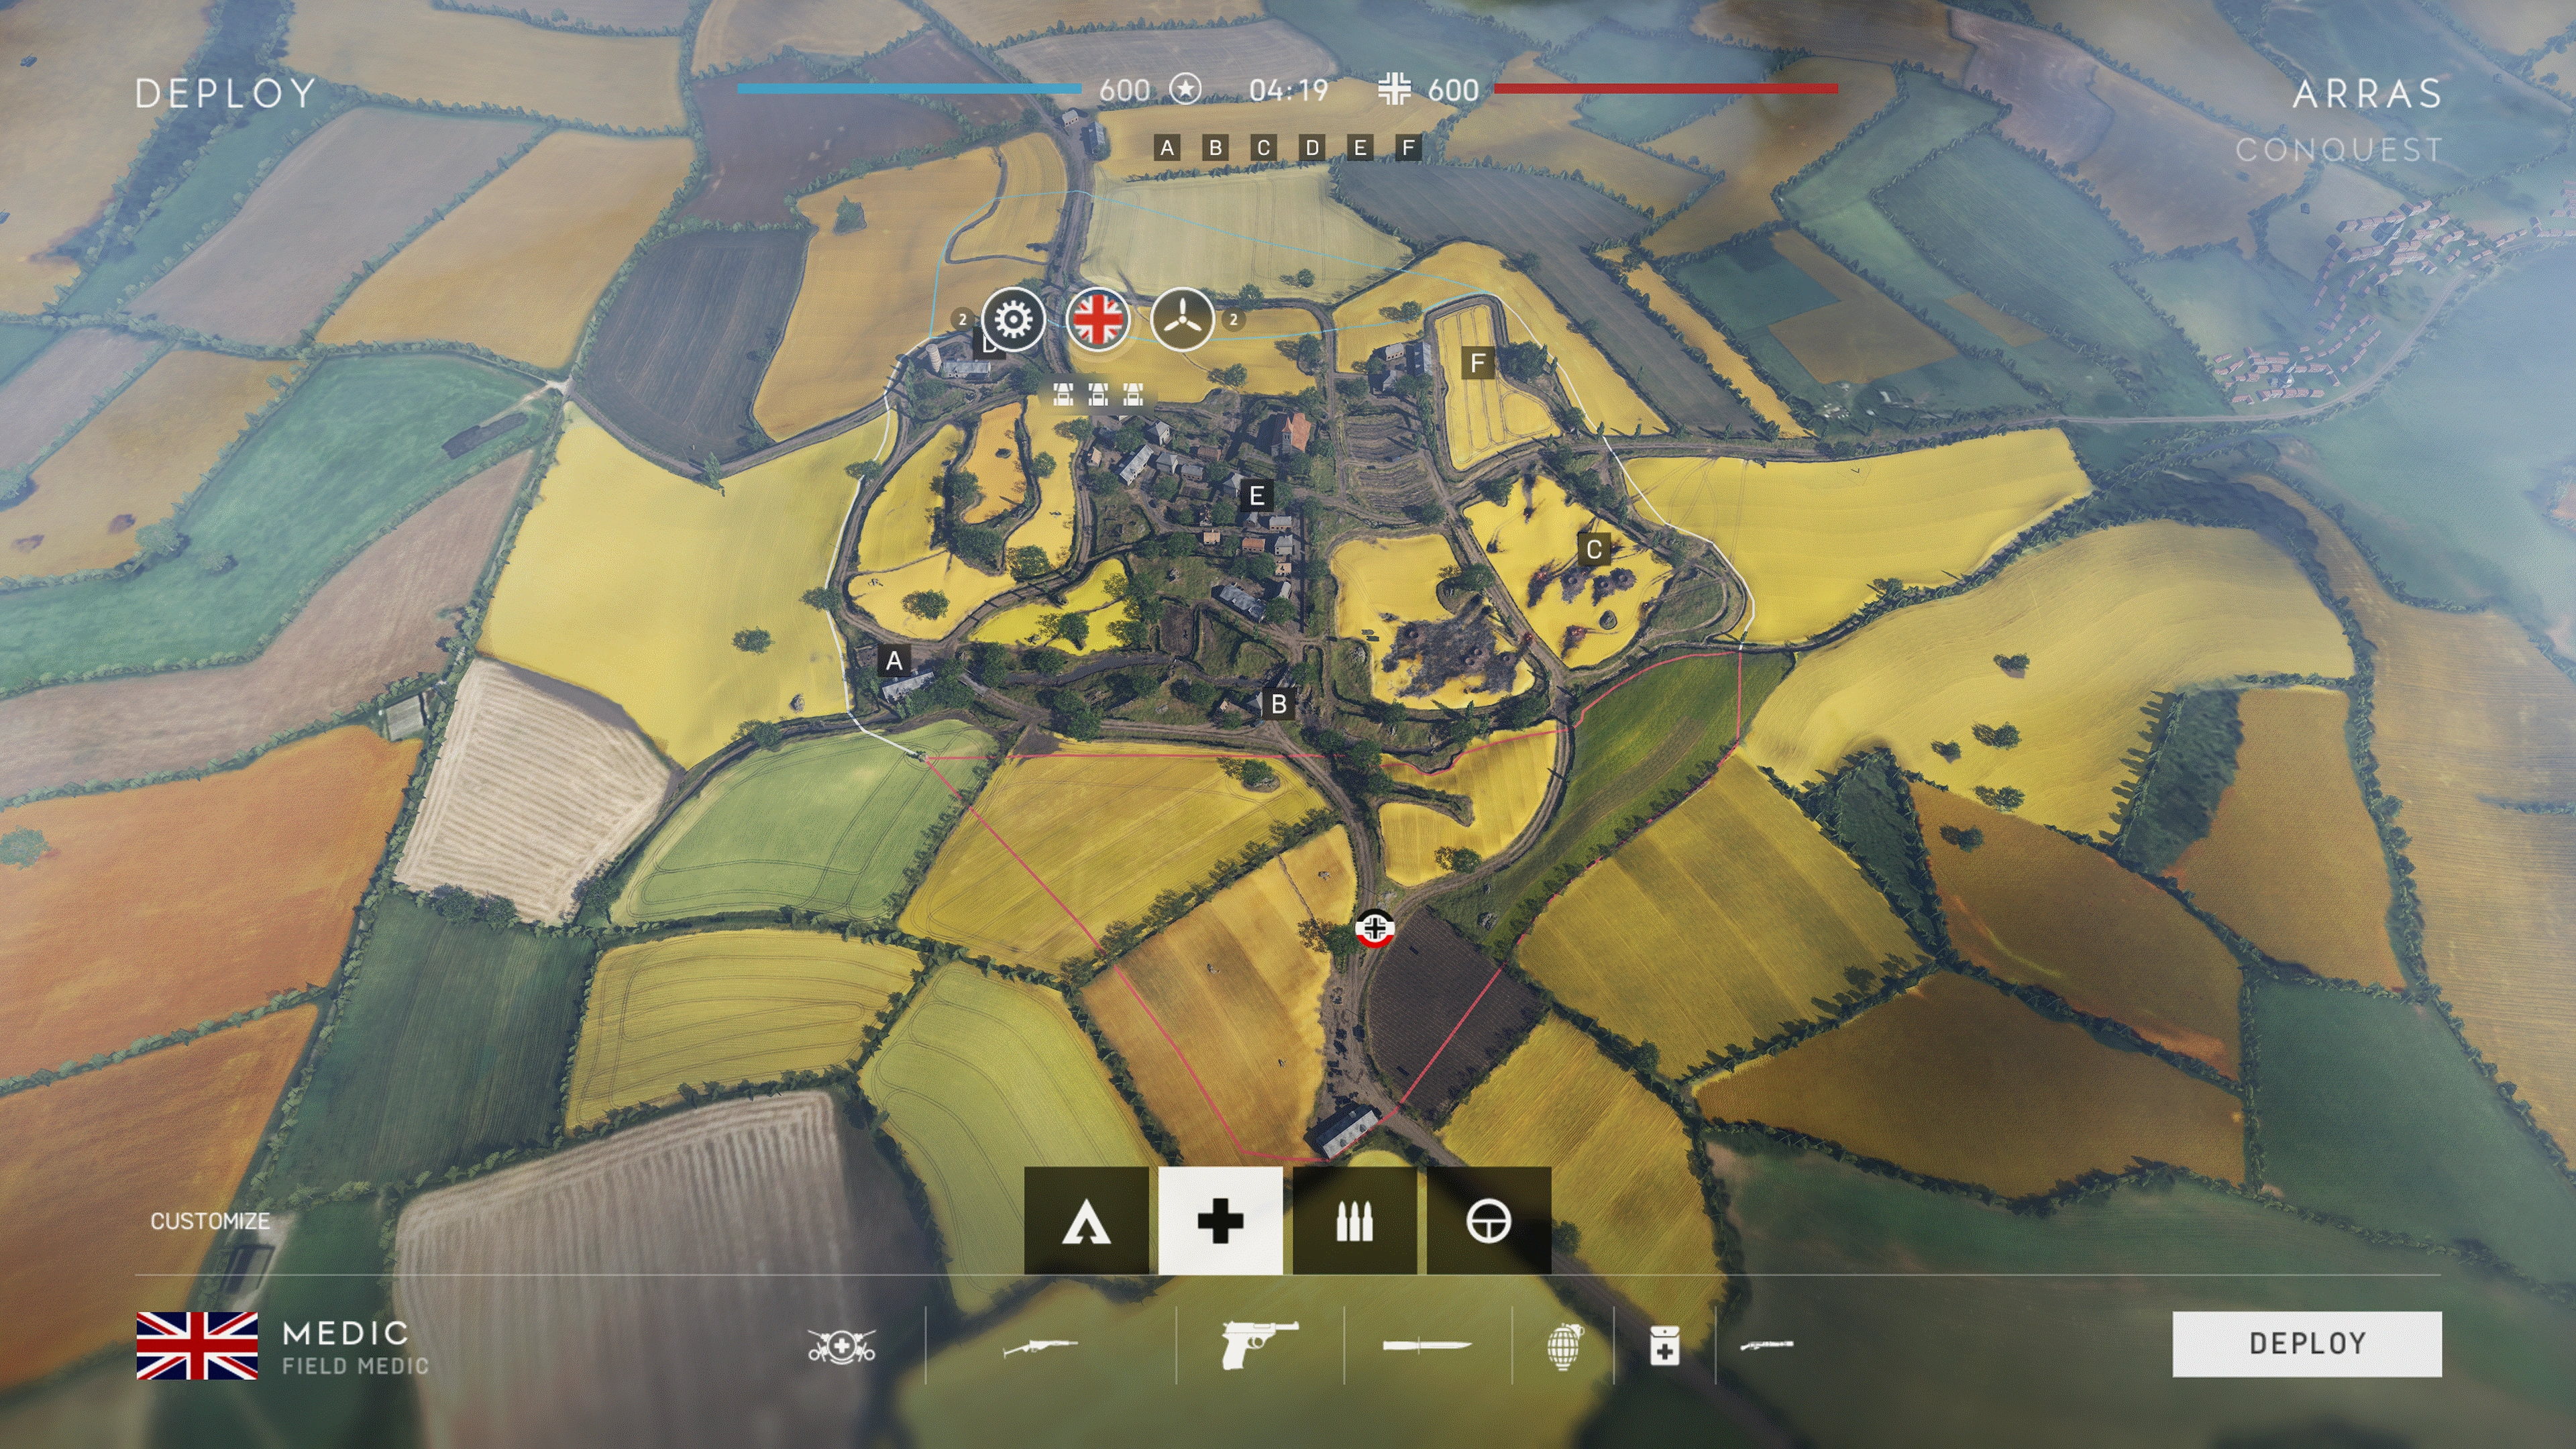
Flag Layout
Conquest

In Conquest, Arras is divided into six flags, arranged into three groups of two, forming three lanes across the width of the battlefield. The peripherally located A, B, C, D and F flags stand around the centrally located Village flag of E. Around these former objectives, combat can occur at a variety of ranges - long sight lines across the open canola fields, which are generally free of obstacles and supported by an unrestricted road network, encourage vehicular combat and sniping, although steep elevation changes, thickets of vegetation and isolated structures can force engagements at closer ranges. Even when inside the Village, combat is generally at close quarters but the high ground surrounding the church and its belltower extend this somewhat. The constricted nature of the town does generally deter vehicles, however aircraft have free range over the map.
The map offers significant opportunities for building Fortifications. In the outer fields, this ranges from simple foxholes and dirt fighting positions to extensive trench networks between and through objectives, and even includes anti-tank gun positions in non-obvious areas. In the village, the theme continues in the form of barricades, which can block off routes to both infantry and vehicles, as well as rebuild cover after the houses have been destroyed.
++TICKETS++ Rather than being behind each team's spawns, the map's aircraft resupply airhooks are at the map sides, to the east of Tank Wrecks and the west of Hill Farm, respectively.
The mode supports one tank and two gun carrier call-ins of the Squad Reinforcement system.[3]
Equipment
| Light vehicle(s) | |
| Half-track(s) | |
| Tank(s) |
2 Panzer 38t/Panzer IV/Flakpanzer IV/Tiger I/Sturmgeschütz IV |
| Fixed-wing aircraft | |
| Emplacement(s) | |
| Light vehicle(s) | |
| Half-track(s) |
2 M3 |
| Tank(s) |
2 Staghound T17E1/Valentine Mk VIII/Valentine AA Mk I/Churchill Mk VII/Churchill Gun Carrier/Valentine Archer |
| Fixed-wing aircraft |
2 Spitfire Mk VA/Spitfire Mk VB/Mosquito Mk II/Blenheim Mk I/Blenheim Mk IF |
| Emplacement(s) | |
| Neutral | |
| Light vehicle(s) | |
Deployments
German Deployment=
Both teams have only a single spawn point. The Germans deploy from a fork in the road in the Far South, with the left bearing taking them to the nearest capture point of Bridge, the other curving northeast towards Tank Wrecks. The base has a static Flak 38 to defend against aircraft.
British Deployment
Opposing them are the British, who deploy from a similarly arranged three-point junction in the Far North - their roads take them west, south and east towards Hill Farm, the Village, and Field, respectively. The unobstructed, large open field north of the Village known as Northern Field gives light vehicles quick access to the easternmost objectives. The British HQ has a Flak gun of its own, set up along the main road south.
A: Water Mill
Water Mill is found in the map's southwest corner, and consists of a farming compound next to a shallow river, forded by a narrow arched bridge. A single large structure houses the eponymous mill and overlooks the open, muddy yard from the south. The flag is found in the middle of the yard, which is mostly devoid of cover save for a truck and trailer, as well as a perimeter wall of dry stone, although the position can be reinforced with fortifications, consisting of a high sandbag wall reinforced with tank blockers, and Czech hedgehogs at the bridge end. To the north is the Slope and West Field - situated on high ground, defenders of a flag in traction will spawn here in relative cover, and may flank the flag along western edge where a dirt ridge and hedgerow provides defilade.
Ammo and Health Caches can be built in the yard north of the Water Mill building, along with a Vehicle Repair Station. Additionally, a light vehicle spawns here when the flag is taken. A full anti-tank emplacement, with sandbags, tank traps and overhead netting can be built on the Slope, overlooking the bridge and flag capture radius from the West Field heights.
B: Bridge
Another Bridge over the stream is found east of Water Mill, and is the closest capture point to the German HQ. Consisting of little more than a narrow stone arched bridge and an accompanying house, the area is fairly sparse. A high stone wall on the edge of a sharp incline blocks line of sight from the north into the house's adjacent yard area, as well as to the west. Players can hide in the riverbank and capture the flag in defilade from the southern roadway, and the bridge itself can be destroyed to hinder enemy movement.
Only a Health Supply Station can be constructed here, in the yard along the house's outer wall. The road west can be blocked with sandbags and tank traps, as can the bridge itself so long as it remains standing. If destroyed, an engineer bridge can be built in its place.
C: Tank Wrecks
The aftermath of a significant armored clash in found in the open fields along the map's east side, where dozens of smouldering tank hulks litter the heavily cratered farmland. Although the wrecks and numerous they are somewhat spread out, and concentrated around the field's eastern edge - as they provide the majority of cover, players on foot will have to move tactically in order to reach the capture zone. Patches of burning crops reduce available cover and present a potential environmental hazard. Furthermore, the flag's location at the map center is at a lower elevation than the surrounding perimeter, granting superior fighting positions on the edges of the radius. The area is bordered to the west by a raised roadway known as Artillery, separating the adjacent Burning Field. On the north and east side, a long ditch runs the length of the field, obscured on both sides by hedges, allowing infantry to bypass the more exposed area. This ditch and the Main Road East partitions the Tank Wrecks field from the so-called Eastern Field, the site of objective F, to the north.
The flag spawns a halftrack and Kettenkrad once captured. Ammo and Health Stations can be built amongst the wrecks next to the flag itself, while a Vehicle Repair Station can be constructed on the Artillery road overlooking the flag to the east. In the capture zone, fortifications are limited to low dirt barricades and limited trench and sandbag complexes. The edges of the field can be more extensively developed.
D: Hill Farm
Located directly outside the British spawn in the northwest corner, Hill Farm is another isolated farming homestead, consisting of a house on the north side, and a barn and a grain silo on the south side. It is the nearest flag to the British deployment. The position sits atop a slight hillock that descends to the north and south, the latter of which giving way to open fields cuts across by shallow ditches which provide a covered route partway to Village or Water Mill. Inside the capture zone itself, a narrow yard separates the barn and house structures, which are the main sources of cover in the area.
A health station can be constructed on the bottom floor of the barn building. The eastern approach into the objective can be heavily fortified with two defensive lines, each containing sandbags, barbed wire and tank traps. Similar fortifications can be erected on the south side, where dirt barricades and two Vickers guns can be set up to cover the low ground of the West Field.
E: Village
The centerpiece of the map, the Village, consists of a dozen single and multistorey houses arranged along two roads, Main Road and Main Road West, which intersect at the Village Center. Structures are overgrown with vines and packed tightly together amongst varying elevations of partitioned gardens, resulting in close-quarters fighting. The Village can be split into four main areas - South, West, Center and Church. The West side consists of more open compounds with farming style structures, and includes the Ruins on the southwest side as well as the Cafe southeast of the church. The south side follows the Main Road north from Bridge - once past the larger outbuildings of Bridge Hill, the walled compounds become smaller and houses more closely packed together, characteristic of the Gardens and Wine Store landmarks, which are separated from the Village Center by the Back Street.
The Village Center is the location of the flag itself, the relatively small capture area covering only a small portion of the northeast side of the settlement. It includes an open cobblestone plaza, found opposite the Main Road junctions and the across from the Church, as well as a small gated garden and associated buildings further west.
Although outside the capture radius, the high ground of the Church can be used to control the Village and its surroundings, as players can fight from the interior as well as the belltower, the tallest point on the map - this can in turn be toppled by shellfire.
Ammo and Health stations can be built in the Back Street, south of the flag's zone of control. The area can be heavily fortified - the main streets and alleys blocked with barbed wire and tank traps. To bypass these blockages, new infantry routes through buildings created by knocking down the ubiquitous, high garden walls that surround each pocket or compound, as well as the dividing walls of buildings. In turn, destroyed walls can be replaced with sandbag redoubts, allowing a devastated village area to be rebuilt again. The Church exterior can also be heavily fortified with cover positions, as well as obstacles blocking the stairs access to the high ground position. An AT gun can be built on the edge of the Burning Field on the eastern outskirts of town.
F: Field
The northeast side of the map is comprised of largely featureless field of canola blooms. The flag itself is in the middle of this field, which is bordered to the west by a walled compound containing three buildings, the Vineyard - the field itself is directly overlooked by the largest of the three, a two-storey barn structure, on the west side. Directly across the width of the field on the east side, a rocky outcrop of trees known as the Eastern Hill offers the second-most significant covered area in the vicinity. The field can be transformed via Fortifications with a series of three trench lines cut through the capture zone, allowing infantry to capture the flag from relatively safe, if obvious, positions. If the trenches are unfinished, lying prone in the field can prevent infantry players from being discovered while capturing.
The flag spawns a halftrack and a light vehicle upon capture. An ammo station can be built inside the Vineyard's barn west of the flag, and health can be retrieved from a similarly constructed station near the Eastern Hill. A Vehicle Repair Station is found on outside the southwest corner of the field, but must be built first before it can be used.
Grand Operations
Arras is the second map in the Battle for France Grand Operation, following Twisted Steel, as well as the Battle of Hannut Grand Operation added with Lightning Strikes during which it comes after Panzerstorm. In Battle for France, day three uses a unique version of the Frontlines game type while in Battle of Hannut it is Rush Large. For both operations, day four uses the same layout for Final Stand.
Frontlines
In the Battle for France, the third day of Operations uses the Frontlines game type. Teams compete to capture a single central objective, the losing side being pushed into a defensive battle around their three base objectives.
This time, each team has access to two planes and two Kettenkrads, with an additional one tank and two gun-carrying halftracks available as Squad Reinforcements. Each deployment also contains an AA gun - these are located at the end of the East Road for the Germans, and west of West Fields for the British.
German Headquarters
If the Germans are pushed back from the central capture point, their base objectives become vulnerable to British demolitions, while their deployment point relocated further down the East Road. Of their three objectives, the northernmost one is in the middle of the farming compound of Vineyard, parallel with the Eastern Fields. B is the closest to the village, located on the far side of the Groves - this objective is surrounded by a pre-built trenchline off from the main road. Objective C is in the northeastern corner of the Tank Wrecks field, and has the longest and most open approach for attackers.
A: Village
The single control point falls within the Village in the map center, with the capture zone, being a rough right-angle triangle, covering much of the urban block south and west of the main road intersection. The flag can be seized as far south as the riverbank and Bridge Hill, and as far west as the large barn. The Church is not part of the capture zone.
Some thirteen structures are included in the area in addition to large sections of dividing wall - the terrain characterises the battle as close-quarters street fighting. With explosives and air support, much of the village can be reduced to rubble, opening up sightlines considerably in the process. Heavy Machine Gun emplacements are set up at either end of the Main Road to lock down the most direct route through the flag, with further emplacements scattered throughout the town. Neutral AA guns can be found on the extreme north and south limits of the sector.
Using their forward spawns, the Germans deploy from the Vineyard, and the British from West Fields.
British Headquarters
If the British fail to control the village, they are routed westwards to the fields past Hill Farm, and their three base objectives become open to attack. Effectively the reverse of the German headquarters sector, the sites are arranged south to north alphabetically. Objective A is by the Water Mill to the south. It is the most isolated from both attackers and defenders in terms of distance. Objective B is in the center of the Western Fields, dug in around a horseshoe trench. Objective C is in the courtyard of Hill Farm.
Rush Large
In the Battle of Hannut, day three uses 64 player Rush as its ruleset. There are four stages for eight destructible objectives in total, arranged similarly to the Breakthrough gametype.
Sector 1
In the first sector, the German attackers deploy from behind the hedgerows in the map's Far East, assaulting directly eastwards across open terrain or using the flanks around Main Road - East and the riverbed. Objective A is the nearest, located on the southern edge of Tank Wrecks, where the artillery gun has been emplaced around a ring of trenches. Objective B is further back, protected by a belt of fortifications along the berm dividing Tank Wrecks from the adjacent Burning Field. The objective itself is within the northeastern corner of the field.
The Germans come armed with mechanized support to carry the infantry across the open ground, in the form of two tanks, two halftracks, a Kubelwagen and a towable Pak 40. The British field a tank and M3 halftrack of their own, in addition to significant static defenses - two 6-Pounders and a Vickers gun cover the eastward approach up to Burning Field, with another HMG set up at a roadblock near the Grapevines intersection.
Sector 2
The next phase falls within the south end of the Village, with objectives located on opposite banks of the barren riverbed. South of the two is objective A, located in the walled garden area behind the lone house on the Bridge Conquest flag. Approach to this flag from the river is covered by an HMG. North up the main road is objective B, which is inside the barn on the south edge of the Village proper. The large wall the runs parallel to the main road acts as defensive line, with an AT gun, stationary MG, and firing steps allowing defenders to shoot over the top.
Sector 3
The attackers swing northwards, seeking to clear the Village completely. Objective A is on the western edge of the settlement, in the farming compound comprised of a barn and two other smaller structures. Defenders can reach this flag by skirting the edges of the Village to the south or north. Objective B is in the Church grounds, specifically in the southwest corner of the graveyard.
Sector 4
The final phase takes place at Hill Farm near the British Conquest deployment. Objective A is in the barn on the southern edge of the area, and objective B is on the north side in a small depression astride the Western Road known as Outside Farm.
Final Stand
Should the battle reach a stalemate, a fourth day of fighting occurs during which each team makes their Final Stand. Fires from the surrounding fields fill the air with smoke, giving the map a hazy, overcast atmosphere.
Deployments
The German team deploys along a line south of the river, ahead of their Conquest deployment. While the main concentration is roughly parallel with the Bridge objective area, some team members can spawn as far east as the south edge of Tank Wrecks, along the map's outer boundary.
The British team spawns on the northwest side amongst the West Fields, south of Hill Farm, near the map edge. This allows them to reach the Village slightly faster than the Germans.
Battle
Artillery firing in a box barrage drives both teams towards the Village at the map center. The British may have an early advantage as their spawn allows them to more easily occupy the high ground near the church. However, the zone shrinks quite quickly and may not focus on the church at all, instead confining battle to the central housing block or the Wine Store off the main road, for example. The environment generally favours close quarters weapons, with an added emphasis on cover destruction.
There are no buildable caches in Final Stand, requiring all ammunition and medical resupply duties to be carried out by teammates.
Outcomes
If the British defenders manage to ultimately win the Battle for France, their victory is considered symbolic at best - their commanders acknowledge that their position on the continent is untenable, and the evacuation from Europe continues as planned. The Germans, having completed their Conquest of Belgium, Holland and Norway, are left effectively unopposed as the masters of Europe, with the casualties of a botched operation serving only to tarnish an otherwise astonishing, decisive victory over France.
Breakthrough
The attackers are allocated two transport vehicles at all stages.
Sector 1
The attackers begin the fight with two tanks, although these are removed from play in sectors two and three.
Sector 2
Sector 3
Sector 3
Frontlines
Vehicular loadout for each side consists of one tank and transport vehicle. Another tank and two gun carrier halftracks can be brought in with reinforcement points.
German Headquarters
A:
B:
C:
D:
E:
British Headquarters
Squad Conquest
Arras was available in Squad Conquest, alongside Rotterdam and Hamada, from January 17th to 30th, 2019.
The layout for Arras is roughly triangular, with bigger open ground, and is limited to the southwest portion only. A single tank is available for both teams.
Deployments
German Deployment
The Germans deploy near the Bridge.
British Deployment
The British deploy in the fields heading for the Water Mill.
Flags
A: Bridge
The entire house and its yard are the capture zones. This is the closest objective to the Germans.
B: Ruins
This objective sits west of the village, and is the central zone for this mode. A health and ammo pickup can be built.
C: Water Mill
This objective capture zone is similar to Conquest.
Domination
A:
B:
C:
Team Deathmatch
Developer Notes
Make your way to center to fight over the ever-contested village and climb up the tower of the church to get a good overview of the action. Or jump in your tank and drive across the fields and take control over the eastern open areas. If you find yourselves in the middle of the canola fields, just crouch down among the flowers and disappear from enemy view. Arras features both tanks and planes as well as jeeps and bikes." — Battlefield V Launch Notes
Gallery
")
")
")
")
| ||||||||||||||||||||||||||