(Nop sir Undo revision 219711 by 5.149.99.17 (talk)) |
(→Description: clean up, typos fixed: Russian’s → Russian's) |
||
| (5 intermediate revisions by 4 users not shown) | |||
| Line 9: | Line 9: | ||
|modes = [[Rush]], [[Conquest]], [[Squad Rush]] |
|modes = [[Rush]], [[Conquest]], [[Squad Rush]] |
||
|combat = Mainly Vehicular Warfare |
|combat = Mainly Vehicular Warfare |
||
| − | |map = [[File:AtacamaDesert map.png|300px |
+ | |map = [[File:AtacamaDesert map.png|300px]] |
| + | |war = [[Second Russo-American War]] |
||
| ⚫ | |||
| + | |console = PC, PlayStation 3, Xbox 360 |
||
| − | <youtube width="200" height="25">http://www.youtube.com/watch?v=oifKEZpwY2M</youtube>}} |
||
| ⚫ | |||
| + | [[File:Bad Company 2 Atacama Desert Loading Theme|200px]]}} |
||
| ⚫ | '''Atacama Desert''' is a map featured in ''[[Battlefield: Bad Company 2]]'' and was one of the first offensives made by the [[Russian Army]] during their South America campaign. It is also one of the largest Conquest maps in ''Battlefield: Bad Company 2'', with [[Heavy Metal]] being the largest, by far. The fighting in the Atacama occurred for most of the war in many different areas, prominently armor and air battles, as Russia attempted to push inland and the US attempted to push them back to the coast. The map featured in the game is the initial invasion of South America, through the Atacama. |
||
| − | |||
| ⚫ | '''Atacama Desert''' is a |
||
==Description== |
==Description== |
||
| − | A Russian Naval Group is preparing a massive amphibious assault. Defending the shore are 3 US fortifications and a string of artillery defenses. Should the |
+ | A Russian Naval Group is preparing a massive amphibious assault. Defending the shore are 3 US fortifications and a string of artillery defenses. Should the Russian's establish a beachhead and overrun US positions, they will be free to advance further inland. With weather deteriorating and sandstorms approaching, US Command has consolidated all available forces to meet the Russian threat. As a result of the open ground, a large-scale armor battle supported by attack helicopters seems likely. |
===Russian Battleplan=== |
===Russian Battleplan=== |
||
| − | |||
For this battle the Russian Army would commit 250 soldiers in a combined land-air assault against the still unaware American base in an attempt to wipe out all American Mortar and SAM sites in order to provide a safe landing site for the main invasion force. The strategy was to swiftly move the force into a nearby town, supported by Russian armor and helicopter units. After this area was secured all forces were to push forward into the dry river bed and set up a command post in a long deserted tanker. If this could be achieved the remaining Russian forces would push into not only the other coastal town site but force the Americans back into their base for a final and fatal blow to wipe the American forces out or force them to retreat inland. |
For this battle the Russian Army would commit 250 soldiers in a combined land-air assault against the still unaware American base in an attempt to wipe out all American Mortar and SAM sites in order to provide a safe landing site for the main invasion force. The strategy was to swiftly move the force into a nearby town, supported by Russian armor and helicopter units. After this area was secured all forces were to push forward into the dry river bed and set up a command post in a long deserted tanker. If this could be achieved the remaining Russian forces would push into not only the other coastal town site but force the Americans back into their base for a final and fatal blow to wipe the American forces out or force them to retreat inland. |
||
| Line 55: | Line 55: | ||
====B: Stranded Ship==== |
====B: Stranded Ship==== |
||
| − | At the Stranded ship, there is a [[UAV-1]] station on the broken-off bridge. Two [[Quad Bike]]s will spawn here, one at either end of the point along the tanker. There is also a [[9M133 Kornet]] AT launcher, and a [[ZU-23-2]] AA gun on top of the broken-off |
+ | At the Stranded ship, there is a [[UAV-1]] station on the broken-off bridge. Two [[Quad Bike]]s will spawn here, one at either end of the point along the tanker. There is also a [[9M133 Kornet]] AT launcher, and a [[ZU-23-2]] AA gun on top of the broken-off midsection. The control point is between the broken-off bridge and midsection of the ship, with some crates strewn about for cover. |
====C: Eastern Island==== |
====C: Eastern Island==== |
||
| Line 84: | Line 84: | ||
===Bases=== |
===Bases=== |
||
====US Deployment==== |
====US Deployment==== |
||
| − | At the deployment zone, an M1A2 Abrams, a HMMWV with a TOW launcher and |
+ | At the deployment zone, an M1A2 Abrams, a HMMWV with a TOW launcher and an AH-64 Apache spawn regularly, appearing 10 seconds (or so) after the previous vehicle was destroyed. The only exit to the US Deployment zone is a ramp, which usually comes under frequent fire from a RU BMD-3 at the start of the game. |
====Flag A - Eastern Island==== |
====Flag A - Eastern Island==== |
||
| Line 146: | Line 146: | ||
===Bases=== |
===Bases=== |
||
====Attacker Deployment==== |
====Attacker Deployment==== |
||
| + | {{Multiple image |
||
| − | {{Nocaption|image=[[File:Atacama_Desert_RU_Base.png|175px]]}} |
||
| + | | direction = vertical |
||
| ⚫ | |||
| + | | align = right |
||
| + | | width = 175 |
||
| + | | image1 = Atacama Desert RU Base.png |
||
| + | }} |
||
| ⚫ | |||
====Eastern Island==== |
====Eastern Island==== |
||
| + | {{Multiple image |
||
| ⚫ | |||
| + | | direction = vertical |
||
| − | {{Nocaption|image=[[File:Atacama_Desert_Eastern_Island.png|175px]]}} |
||
| + | | align = right |
||
| − | |||
| + | | width = 175 |
||
| ⚫ | |||
| + | | image2 = Atacama Desert Eastern Island.png |
||
| + | }} |
||
=====US Control===== |
=====US Control===== |
||
The American defenders will have to defend 2 M-COM stations; one in the East by the main road, relatively in the open, and another in a blue 2-story building that can be destroyed by [[Destruction 2.0]]. Defenders will have one VADS AA gun, two XM-306 Auto GL's with ballistic shields, and multiple [[XM312]] with ballistic shields and mounted inside buildings. |
The American defenders will have to defend 2 M-COM stations; one in the East by the main road, relatively in the open, and another in a blue 2-story building that can be destroyed by [[Destruction 2.0]]. Defenders will have one VADS AA gun, two XM-306 Auto GL's with ballistic shields, and multiple [[XM312]] with ballistic shields and mounted inside buildings. |
||
=====RU Control===== |
=====RU Control===== |
||
| − | The Russian attackers will have 2 [[Quad Bike]]s, one [[Cobra 4WD]], one [[Mil Mi-24 Hind]] and one [[UAV-1]] at their disposal once the 2 M-COM Stations have been destroyed. This base will be conserved for the attackers' use until the 2 M-COM stations at the Western Island have been destroyed. |
+ | The Russian attackers will have 2 [[Quad Bike]]s, one [[Cobra 4WD]], one [[Mil Mi-24 Hind]] and one [[UAV-1]] at their disposal once the 2 M-COM Stations have been destroyed. This base will be conserved for the attackers' use until the 2 M-COM stations at the Western Island have been destroyed.{{Clear}} |
====Stranded Ship==== |
====Stranded Ship==== |
||
| + | {{Multiple image |
||
| ⚫ | |||
| + | | direction = vertical |
||
| − | {{Nocaption|image=[[File:Atacama_Desert_Stranded_Ship.png|175px]]}} |
||
| + | | align = right |
||
| ⚫ | The American defenders will have to defend 2 M-COM stations; one in the Eastern, stern end of the boat, within the open hull, and on the center part of the boat, within the top, South room, like in [[Squad Rush]]. There will be a VADS on a sunken container out towards the desert, as well as an [[XM312]] with a ballistic shield on the North-western part of the stern. This [[XM312]] will respawn even once the Stranded Ship is captured. |
||
| + | | width = 175 |
||
| ⚫ | |||
| + | | image2 = Atacama Desert Stranded Ship.png |
||
| + | }} |
||
| ⚫ | The American defenders will have to defend 2 M-COM stations; one in the Eastern, stern end of the boat, within the open hull, and on the center part of the boat, within the top, South room, like in [[Squad Rush]]. There will be a VADS on a sunken container out towards the desert, as well as an [[XM312]] with a ballistic shield on the North-western part of the stern. This [[XM312]] will respawn even once the Stranded Ship is captured.{{Clear}} |
||
====Western Island==== |
====Western Island==== |
||
| + | {{Multiple image |
||
| ⚫ | |||
| + | | direction = vertical |
||
| − | {{Nocaption|image=[[File:Atacama_Desert_Western_Island.png|175px]]}} |
||
| + | | align = right |
||
| + | | width = 175 |
||
| ⚫ | |||
| + | | image2 = Atacama Desert Western Island.png |
||
| + | }} |
||
=====US Control===== |
=====US Control===== |
||
To defend the island, the US will have a VADS, an XM307 auto-GL on the second floor balcony of a house that overlooks the ship, and a XM312 in the balcony of a house that overlooks Alpha. |
To defend the island, the US will have a VADS, an XM307 auto-GL on the second floor balcony of a house that overlooks the ship, and a XM312 in the balcony of a house that overlooks Alpha. |
||
=====RU Control===== |
=====RU Control===== |
||
| − | The Russian attackers will have 3 [[T-90]] MBTs and one [[Cobra 4WD]] at their disposal to mount the final assault on the last 2 M-COM stations. |
+ | The Russian attackers will have 3 [[T-90]] MBTs and one [[Cobra 4WD]] at their disposal to mount the final assault on the last 2 M-COM stations.{{Clear}} |
====Last Stand==== |
====Last Stand==== |
||
| + | {{Multiple image |
||
| ⚫ | |||
| + | | direction = vertical |
||
| − | {{Nocaption|image=[[File:Atacama_Desert_Last_Stand.png|175px]]}} |
||
| + | | align = right |
||
| ⚫ | The American defenders will have to defend 2 M-COM stations; one at the East in the third of a series of a 3 warehouses, behind a small wall of concrete blocks, and one in the small warehouse behind more concrete blocks to the west. They will have 3 [[M1A2 Abrams]] MBTs and multiple emplacements to help defend against the enemy armor and air vehicles. |
||
| + | | width = 175 |
||
| ⚫ | |||
| + | | image2 = Atacama Desert Last Stand.png |
||
| + | }} |
||
| ⚫ | The American defenders will have to defend 2 M-COM stations; one at the East in the third of a series of a 3 warehouses, behind a small wall of concrete blocks, and one in the small warehouse behind more concrete blocks to the west. They will have 3 [[M1A2 Abrams]] MBTs and multiple emplacements to help defend against the enemy armor and air vehicles.{{Clear}} |
||
==Outcome== |
==Outcome== |
||
| Line 186: | Line 210: | ||
Even though they were caught off guard, the US Army forces managed to drive off the Russian amphibious forces and American artillery defenses managed to destroy the Russian naval battle group, with ballistic rocket volleys fired from the coast at the Russian ships, forcing them to retreat. Afterwards, US Command will use similar tactics to capture the Port of Arica. |
Even though they were caught off guard, the US Army forces managed to drive off the Russian amphibious forces and American artillery defenses managed to destroy the Russian naval battle group, with ballistic rocket volleys fired from the coast at the Russian ships, forcing them to retreat. Afterwards, US Command will use similar tactics to capture the Port of Arica. |
||
| − | == |
+ | ==Gallery== |
| − | |||
<gallery widths="125"> |
<gallery widths="125"> |
||
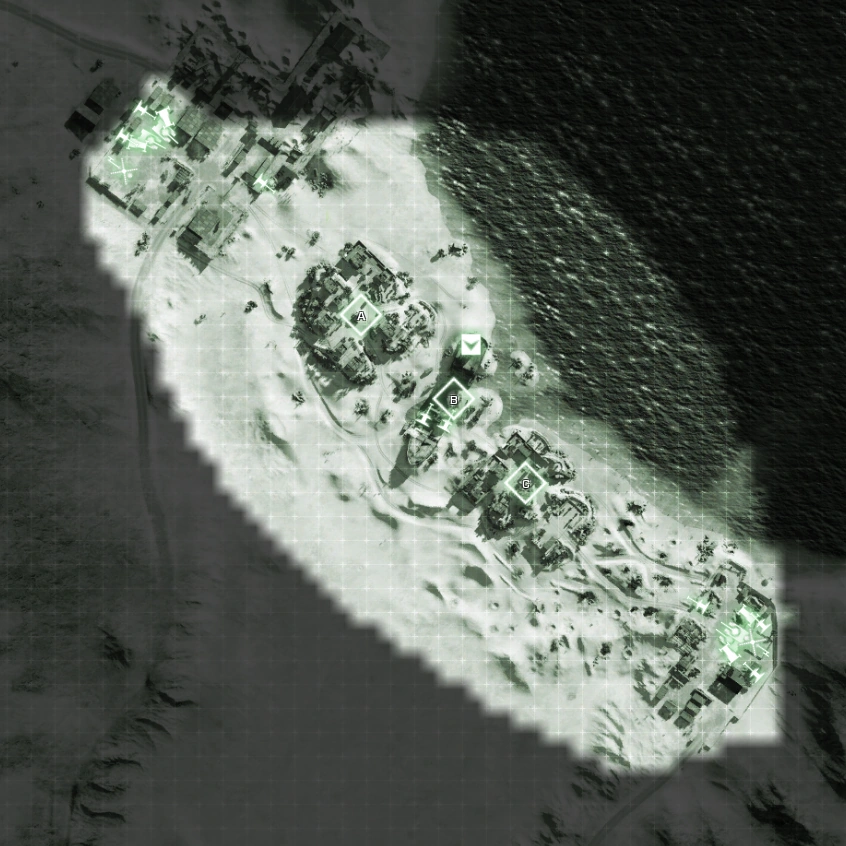
AtacamaDesert map.png|Birds eye view of the Battle of Atacama Desert. |
AtacamaDesert map.png|Birds eye view of the Battle of Atacama Desert. |
||
| Line 194: | Line 217: | ||
==Trivia== |
==Trivia== |
||
| − | |||
*The loading screen for the map shows the battle taking place on the coast of an inland lake in the Atacama, rather than the presumed coast of Chile. This makes no sense, as there would be no way for the Russian fleet to access the lake and an amphibious invasion would be useless, as the Russians could simply advance from the surrounding land. It is presumed that this is a mistake by DICE. |
*The loading screen for the map shows the battle taking place on the coast of an inland lake in the Atacama, rather than the presumed coast of Chile. This makes no sense, as there would be no way for the Russian fleet to access the lake and an amphibious invasion would be useless, as the Russians could simply advance from the surrounding land. It is presumed that this is a mistake by DICE. |
||
*If you destroy the rocket launchers on the coastline while the game is still running, the rockets will still be launched on the Russian ships. |
*If you destroy the rocket launchers on the coastline while the game is still running, the rockets will still be launched on the Russian ships. |
||
*There is a sand castle with a Swedish flag located on a tiny island next to the crashed cruiser ship. This is a reference to an easter egg which was featured in ''[[Battlefield 1943]].'' |
*There is a sand castle with a Swedish flag located on a tiny island next to the crashed cruiser ship. This is a reference to an easter egg which was featured in ''[[Battlefield 1943]].'' |
||
| − | |||
{{Maps/BFBC2}} |
{{Maps/BFBC2}} |
||
| − | [[Category:Maps]] |
+ | [[Category:Maps of Battlefield: Bad Company 2]] |
| − | [[Category:Battlefield: Bad Company 2 Maps]] |
||
Revision as of 19:59, 17 May 2019
Atacama Desert is a map featured in Battlefield: Bad Company 2 and was one of the first offensives made by the Russian Army during their South America campaign. It is also one of the largest Conquest maps in Battlefield: Bad Company 2, with Heavy Metal being the largest, by far. The fighting in the Atacama occurred for most of the war in many different areas, prominently armor and air battles, as Russia attempted to push inland and the US attempted to push them back to the coast. The map featured in the game is the initial invasion of South America, through the Atacama.
Description
A Russian Naval Group is preparing a massive amphibious assault. Defending the shore are 3 US fortifications and a string of artillery defenses. Should the Russian's establish a beachhead and overrun US positions, they will be free to advance further inland. With weather deteriorating and sandstorms approaching, US Command has consolidated all available forces to meet the Russian threat. As a result of the open ground, a large-scale armor battle supported by attack helicopters seems likely.
Russian Battleplan
For this battle the Russian Army would commit 250 soldiers in a combined land-air assault against the still unaware American base in an attempt to wipe out all American Mortar and SAM sites in order to provide a safe landing site for the main invasion force. The strategy was to swiftly move the force into a nearby town, supported by Russian armor and helicopter units. After this area was secured all forces were to push forward into the dry river bed and set up a command post in a long deserted tanker. If this could be achieved the remaining Russian forces would push into not only the other coastal town site but force the Americans back into their base for a final and fatal blow to wipe the American forces out or force them to retreat inland.
Conquest
Equipment
|
|
| |||||||||||||||||||||||
Flags
|
US Deployment
In the US Deployment zone there are two M1A2 Abrams tanks, a HMMWV, a Quad Bike and an AH-64 Apache. There are also two BGM-71 TOW missile launchers - one at the rear and one in front, and a ZU-23-2 AA gun
RU Deployment
In the Russian Deployment zone, there are 2 T-90 MBTs, a Cobra 4WD, a Quad Bike and a Mi-28 Havoc. There are also two 9M133 Kornet AT launchers - one at the rear and one in front, and a ZU-23-2 AA gun
A: Western Island
In the Western island, there is one Quad Bike and one M1A2 Abrams. The control point is right in the middle next to a tree, a supply crate (cannot be used like in singleplayer), and a destroyed M939 Truck.
B: Stranded Ship
At the Stranded ship, there is a UAV-1 station on the broken-off bridge. Two Quad Bikes will spawn here, one at either end of the point along the tanker. There is also a 9M133 Kornet AT launcher, and a ZU-23-2 AA gun on top of the broken-off midsection. The control point is between the broken-off bridge and midsection of the ship, with some crates strewn about for cover.
C: Eastern Island
At the Eastern Island, there is a T-90 MBT and a Quad Bike. The control point is next to a makeshift wall of indestructible concrete blocks near the green and beige two-story house.
Onslaught
Atacama Desert is one of the 4 maps featured in Onslaught mode. The time of day has been changed to an early dawn. The battle that takes place seems to be an American counterattack on Atacama Desert.
Equipment
|
|
| |||||||||||||||||||||||||||
Bases
US Deployment
At the deployment zone, an M1A2 Abrams, a HMMWV with a TOW launcher and an AH-64 Apache spawn regularly, appearing 10 seconds (or so) after the previous vehicle was destroyed. The only exit to the US Deployment zone is a ramp, which usually comes under frequent fire from a RU BMD-3 at the start of the game.
Flag A - Eastern Island
Once the timer is initiated, a BMD-3 and a BMD-3 AA will appear and place themselves in front of the island. The BMD-3 AA will always fire on the AH-64 Apache, unless no-one has entered the vehicle, while the BMD-3 will fire on any other units in the area, including the Apache. Once any squad member reaches the island and most of the initial enemies have been killed, a T-90 will appear and will advance up the path closest to the sea, and Russian paratroopers will advance from the beached freighter. After the flag has been captured, another T-90 will appear, coming from the eastern road.
When in US control, 2 M1A2 Abrams, a HMMWV with a TOW launcher and a HMMWV with an XM312 HMG will spawn at the base.
Flag B - Western Island
On the western island, a BMD-3, a T-90 and 2 Kornet Missile Launchers will compromise the first part of the RU defense. The BMD-3 will advance up a side road to the inland side of the island, while the T-90 will advance up the main road from the RU deployment. A flanking M1A2 will be able to easily attack the rears of the two tanks, as both tanks converge at the main entrance to the island. Once the flag begins to be captured, a Mi-28 Havoc will attack, but a Zu-32 AA gun is positioned on a green barracks building near the coast, allowing a good field of fire towards the RU deployment.
When in US control, a HMMWV with a TOW launcher and a HMMWV with an XM312 HMG will spawn here. Players should try and keep a M1A2 Abrams alive at the base, as the Russians gain a huge armor advantage at the next base
Flag C - RU Deployment
Once the US advance off of the western island, a T-90 MBT and a BMD-3 will advance out of the RU base. Both can be bypassed but will cause a lot of damage against the squad if allowed to survive for too long. Once the squad reach the flag another Mi-28 Havoc will attack, but this time it will spend a few seconds idle above the base before attacking, so a user of the TOW missile launcher can use the time to attack the cockpit of the helo. Russian paratroopers will regularly land behind the base, but placing a HMMWV or LMG-equipped Medic near the landing spot can eliminate the majority of them before they can land.
Ending
When the game ends, be it for a US victory (with all three flags taken) or a RU victory (with all four US squad members dead), the camera focuses on the abandoned freighter in the centre of the map.
Related Achievements and Trophies
The following achievements/trophies can be completed on this map.
| Image | Name | Criteria | Gamerscore | Trophy type |
|
Atacama Desert Conquered | Successfully complete Atacama Desert in Onslaught mode on any difficulty | 10 G | Bronze |
|
Atacama Desert Veteran | Successfully complete Atacama Desert in Onslaught mode on Hardcore difficulty | 20 G | Silver |
Rush
Equipment
|
|
| |||||||||||||||||||||||
Bases
Attacker Deployment

The Russian attackers start at the far South end of the map. They will have a Mil Mi-24 Hind available to them, 2 Cobra 4WDs, 3 Quad Bikes and a UAV station.
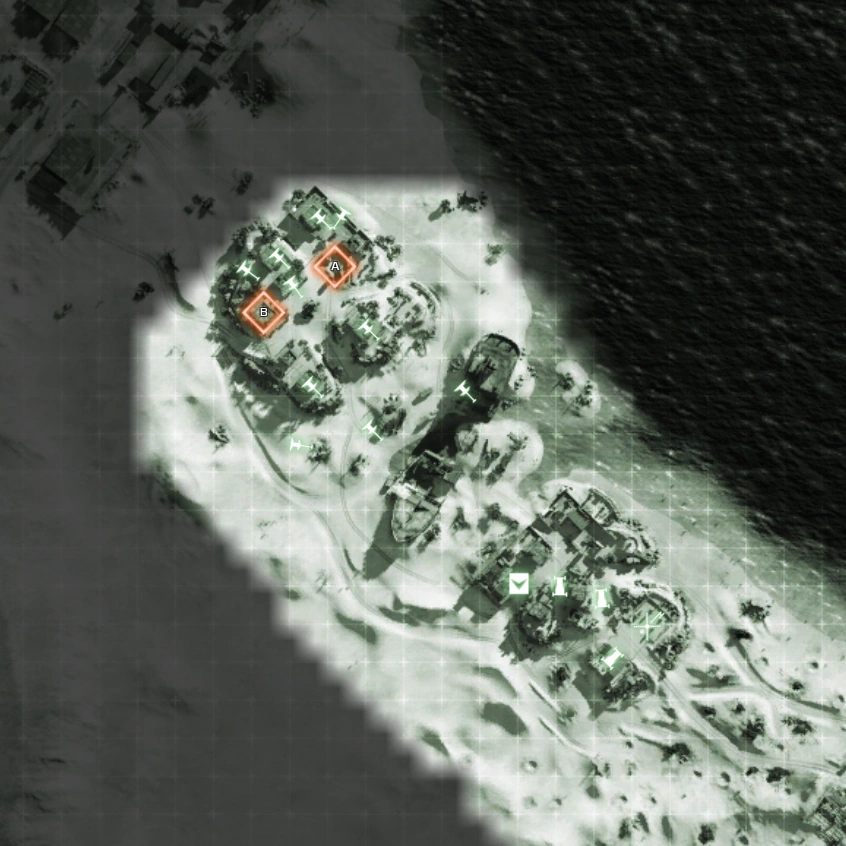
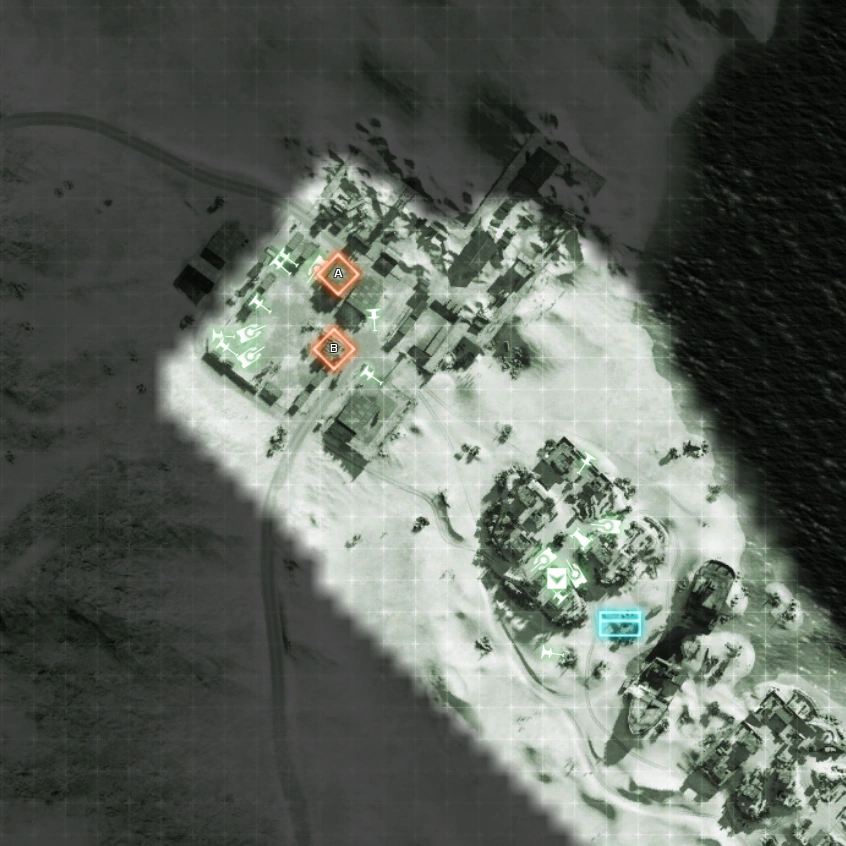
Eastern Island
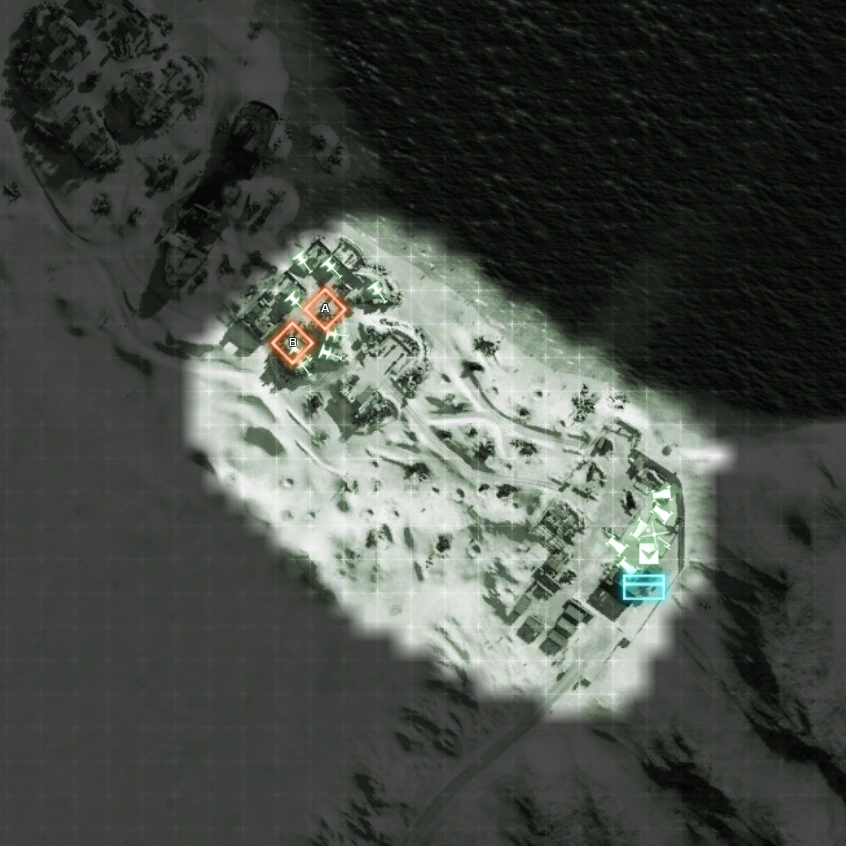
US Control
The American defenders will have to defend 2 M-COM stations; one in the East by the main road, relatively in the open, and another in a blue 2-story building that can be destroyed by Destruction 2.0. Defenders will have one VADS AA gun, two XM-306 Auto GL's with ballistic shields, and multiple XM312 with ballistic shields and mounted inside buildings.
RU Control
The Russian attackers will have 2 Quad Bikes, one Cobra 4WD, one Mil Mi-24 Hind and one UAV-1 at their disposal once the 2 M-COM Stations have been destroyed. This base will be conserved for the attackers' use until the 2 M-COM stations at the Western Island have been destroyed.
Stranded Ship
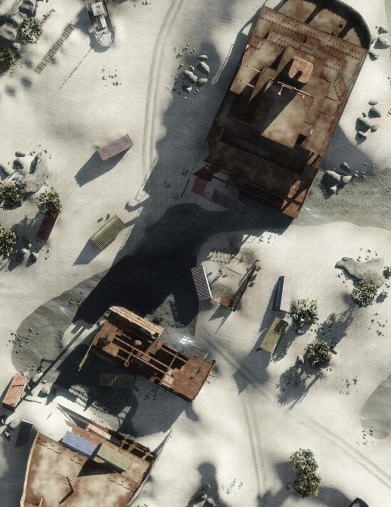
The American defenders will have to defend 2 M-COM stations; one in the Eastern, stern end of the boat, within the open hull, and on the center part of the boat, within the top, South room, like in Squad Rush. There will be a VADS on a sunken container out towards the desert, as well as an XM312 with a ballistic shield on the North-western part of the stern. This XM312 will respawn even once the Stranded Ship is captured.
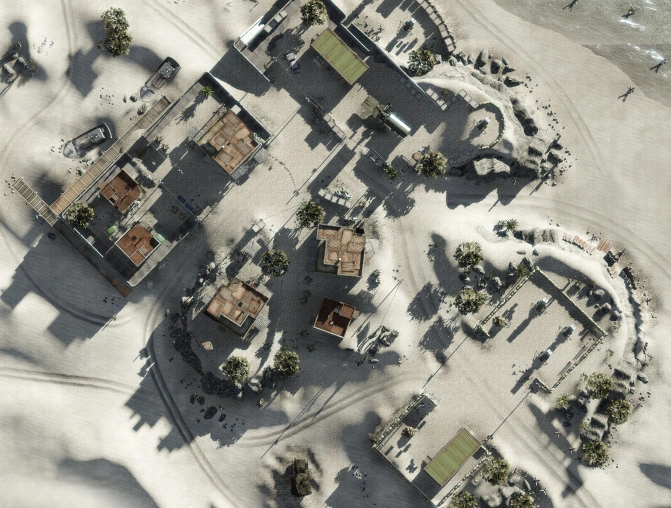
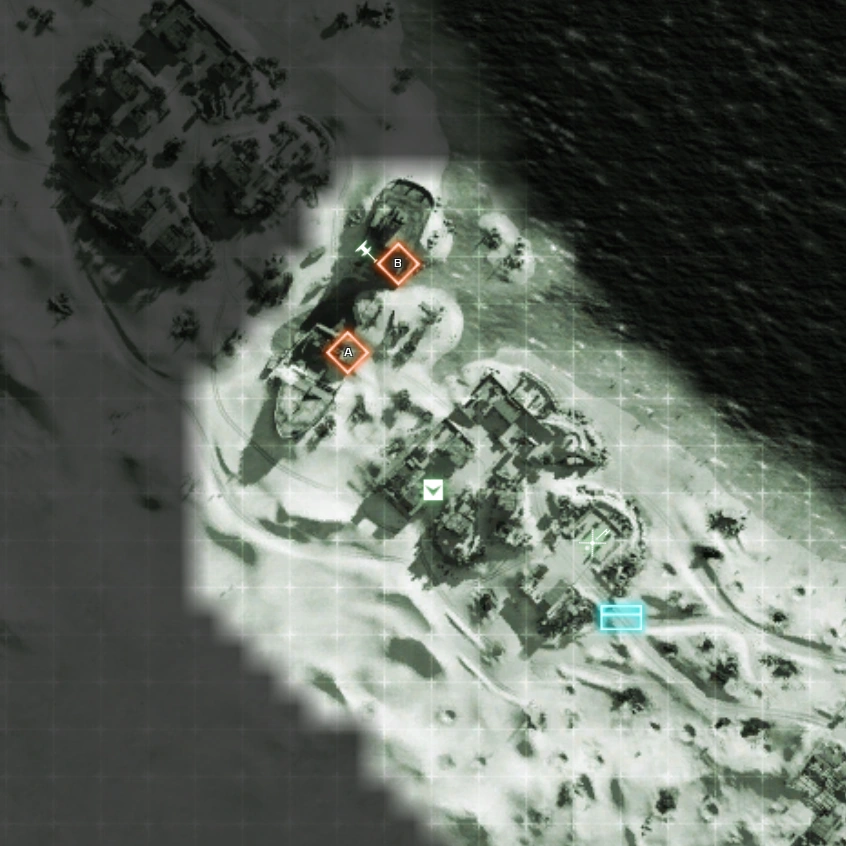
Western Island

US Control
To defend the island, the US will have a VADS, an XM307 auto-GL on the second floor balcony of a house that overlooks the ship, and a XM312 in the balcony of a house that overlooks Alpha.
RU Control
The Russian attackers will have 3 T-90 MBTs and one Cobra 4WD at their disposal to mount the final assault on the last 2 M-COM stations.
Last Stand
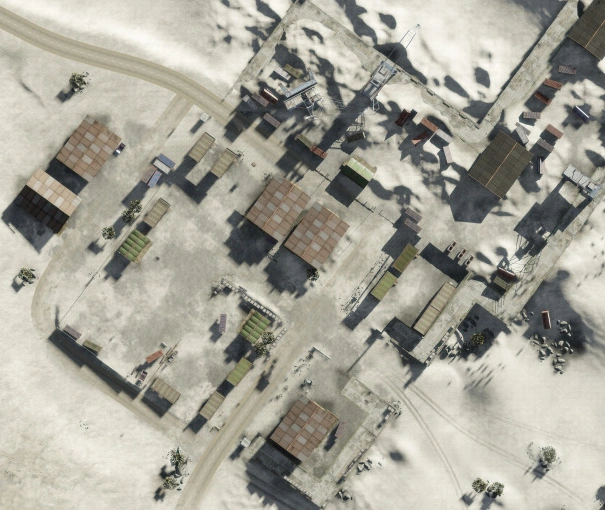
The American defenders will have to defend 2 M-COM stations; one at the East in the third of a series of a 3 warehouses, behind a small wall of concrete blocks, and one in the small warehouse behind more concrete blocks to the west. They will have 3 M1A2 Abrams MBTs and multiple emplacements to help defend against the enemy armor and air vehicles.
Outcome
Russian Victory

|
Caught completely off guard by this sudden attack, the US Army forces could only fight a holding action while the bulk of the occupying forces fell back to regroup with other American forces further inland. A force of 100 Americans fought desperately and valiantly to stave off the relentless Russian push for as long as possible. In the end all US soldiers defending the beach were either killed, destroyed, or forced out of the area, but not with out inflicting staggering casualties on the invaders. A Russian soldier watches 3 Su-25s bomb the shores, as 2 Mi-28s escort the landing crafts which hit the beach, bringing reinforcements into the fight.
US Victory
Even though they were caught off guard, the US Army forces managed to drive off the Russian amphibious forces and American artillery defenses managed to destroy the Russian naval battle group, with ballistic rocket volleys fired from the coast at the Russian ships, forcing them to retreat. Afterwards, US Command will use similar tactics to capture the Port of Arica.
Gallery
")
")
Trivia
- The loading screen for the map shows the battle taking place on the coast of an inland lake in the Atacama, rather than the presumed coast of Chile. This makes no sense, as there would be no way for the Russian fleet to access the lake and an amphibious invasion would be useless, as the Russians could simply advance from the surrounding land. It is presumed that this is a mistake by DICE.
- If you destroy the rocket launchers on the coastline while the game is still running, the rockets will still be launched on the Russian ships.
- There is a sand castle with a Swedish flag located on a tiny island next to the crashed cruiser ship. This is a reference to an easter egg which was featured in Battlefield 1943.
| ||||||||||||||||||||