No edit summary |
No edit summary |
||
| Line 96: | Line 96: | ||
A trio of [[FK 96]] guard the road and coastal approach to the spawn. |
A trio of [[FK 96]] guard the road and coastal approach to the spawn. |
||
| + | |||
| + | <gallery> |
||
| + | Fao Fortress British Deployment 01.png |
||
| + | Fao Fortress British Deployment 02.png |
||
| + | Fao Fortress British Deployment 03.png |
||
| + | </gallery> |
||
====Ottoman Empire Deployment==== |
====Ottoman Empire Deployment==== |
||
| Line 101: | Line 107: | ||
Their deployment too is defended by three [[FK 96]]s, emplaced around the ruins and oriented towards the surf. |
Their deployment too is defended by three [[FK 96]]s, emplaced around the ruins and oriented towards the surf. |
||
| + | |||
| + | <gallery> |
||
| + | Fao Fortress Ottoman Deployment 01.png |
||
| + | Fao Fortress Ottoman Deployment 02.png |
||
| + | Fao Fortress Ottoman Deployment 03.png |
||
| + | </gallery> |
||
===Flags=== |
===Flags=== |
||
| Line 107: | Line 119: | ||
A [[QF 1 AA]] gun is found west of the road from the flag itself. In addition to spawning a scout car, the flag provides a forward deployment location for the British team's tank. |
A [[QF 1 AA]] gun is found west of the road from the flag itself. In addition to spawning a scout car, the flag provides a forward deployment location for the British team's tank. |
||
| + | |||
| + | <gallery> |
||
| + | Fao Fortress Turtle Hill 01.png |
||
| + | Fao Fortress Turtle Hill 02.png |
||
| + | Fao Fortress Turtle Hill 03.png |
||
| + | </gallery> |
||
====Sunwada Redoubt==== |
====Sunwada Redoubt==== |
||
| Line 112: | Line 130: | ||
The sandbag fighting positions on the southeast side of the capture zone feature several usable [[Maxim MG|heavy machine guns]] that can direct fire against the smaller island or out to sea. A single scout car spawns at this flag. |
The sandbag fighting positions on the southeast side of the capture zone feature several usable [[Maxim MG|heavy machine guns]] that can direct fire against the smaller island or out to sea. A single scout car spawns at this flag. |
||
| + | |||
| + | <gallery> |
||
| + | Fao Fortress Sunwada Redoubt 01.png |
||
| + | Fao Fortress Sunwada Redoubt 02.png |
||
| + | Fao Fortress Sunwada Redoubt 03.png |
||
| + | Fao Fortress Sunwada Redoubt 04.png |
||
| + | Fao Fortress Sunwada Redoubt 05.png |
||
| + | </gallery> |
||
====Marsh Village==== |
====Marsh Village==== |
||
| Line 117: | Line 143: | ||
The three houses that make up the village each possess ladders for roof access, with the single room house on the east side toting a [[Maxim MG|machine gun]] nest orientated towards the river inlet. A scout car is available from this flag. |
The three houses that make up the village each possess ladders for roof access, with the single room house on the east side toting a [[Maxim MG|machine gun]] nest orientated towards the river inlet. A scout car is available from this flag. |
||
| + | |||
| + | <gallery> |
||
| + | Fao Fortress Marsh Village 01.png |
||
| + | Fao Fortress Marsh Village 02.png |
||
| + | Fao Fortress Marsh Village 03.png |
||
| + | Fao Fortress Marsh Village 04.png |
||
| + | Fao Fortress Marsh Village 05.png |
||
| + | </gallery> |
||
====Al Faw Battery==== |
====Al Faw Battery==== |
||
| Line 122: | Line 156: | ||
Two [[FK 96]] guns watch the two roads ramping up into the capture zone from opposite ends of the plateau. The steep hill can make tanks scaling the dunes slow and easy targets for the cannons, with the southern gun closer enough to the cliff edge to drop shells onto the structures of Marsh Village. A scout car and one [[horse]] are provided by the flag's capture, and a [[Tank Hunter]] kit can be picked up from inside the camouflaged gunpit. |
Two [[FK 96]] guns watch the two roads ramping up into the capture zone from opposite ends of the plateau. The steep hill can make tanks scaling the dunes slow and easy targets for the cannons, with the southern gun closer enough to the cliff edge to drop shells onto the structures of Marsh Village. A scout car and one [[horse]] are provided by the flag's capture, and a [[Tank Hunter]] kit can be picked up from inside the camouflaged gunpit. |
||
| + | |||
| + | <gallery> |
||
| + | Fao Fortress Al Faw Battery 01.png |
||
| + | Fao Fortress Al Faw Battery 02.png |
||
| + | Fao Fortress Al Faw Battery 03.png |
||
| + | Fao Fortress Al Faw Battery 04.png |
||
| + | Fao Fortress Al Faw Battery 05.png |
||
| + | Fao Fortress Al Faw Battery 06.png |
||
| + | </gallery> |
||
====Outer Courtyard==== |
====Outer Courtyard==== |
||
| Line 127: | Line 170: | ||
Gun emplacements in this area include an [[QF 1 AA|AA gun]] on a circular corner tower, located up the staircases to the north that lead into the highest segment of the fort, housing a row of artillery lumbers. Another [[QF 1 AA]] is located on the battlements above the main gate. A pair of [[FK 96]] guns are located at the tip of the northern bastion, defending a fairly open section of the fort's coastal perimeter. |
Gun emplacements in this area include an [[QF 1 AA|AA gun]] on a circular corner tower, located up the staircases to the north that lead into the highest segment of the fort, housing a row of artillery lumbers. Another [[QF 1 AA]] is located on the battlements above the main gate. A pair of [[FK 96]] guns are located at the tip of the northern bastion, defending a fairly open section of the fort's coastal perimeter. |
||
| + | |||
| + | <gallery> |
||
| + | Fao Fortress Outer Courtyard 01.png |
||
| + | Fao Fortress Outer Courtyard 02.png |
||
| + | Fao Fortress Outer Courtyard 03.png |
||
| + | Fao Fortress Outer Courtyard 04.png |
||
| + | Fao Fortress Outer Courtyard 05.png |
||
| + | Fao Fortress Outer Courtyard 06.png |
||
| + | Fao Fortress Outer Courtyard 07.png |
||
| + | Fao Fortress Inner Courtyard 07.png |
||
| + | Fao Fortress 21.png |
||
| + | Fao Fortress 20.png |
||
| + | </gallery> |
||
====Inner Courtyard==== |
====Inner Courtyard==== |
||
| Line 132: | Line 188: | ||
As with other sections of Fao Fortress the Inner Courtyard is well equipped with emplaced weapons, which are mostly positioned along the crenellated walls of the southern bastion. They include three [[FK 96]]s, a [[QF 1 AA]] gun and a pair of [[Maxim MG]]s. Additionally, a [[Flame Trooper#Battlefield 1|Flame Trooper]] kit located next to the central circular redoubt can be effectively utilised in this uniquely enclosed area of the map. |
As with other sections of Fao Fortress the Inner Courtyard is well equipped with emplaced weapons, which are mostly positioned along the crenellated walls of the southern bastion. They include three [[FK 96]]s, a [[QF 1 AA]] gun and a pair of [[Maxim MG]]s. Additionally, a [[Flame Trooper#Battlefield 1|Flame Trooper]] kit located next to the central circular redoubt can be effectively utilised in this uniquely enclosed area of the map. |
||
| + | |||
| + | <gallery> |
||
| + | Fao Fortress Inner Courtyard 01.png |
||
| + | Fao Fortress Inner Courtyard 02.png |
||
| + | Fao Fortress Inner Courtyard 03.png |
||
| + | Fao Fortress Inner Courtyard 04.png |
||
| + | Fao Fortress Inner Courtyard 05.png |
||
| + | Fao Fortress Inner Courtyard 06.png |
||
| + | Fao Fortress 22.png |
||
| + | </gallery> |
||
====Shatt al Arab Post==== |
====Shatt al Arab Post==== |
||
| Line 137: | Line 203: | ||
A [[QF 1 AA]] gun is located on the edge of the short cliff by the shoreline. A scout car spawns at this flag, and the Ottoman tank can deploy here once captured by their side. |
A [[QF 1 AA]] gun is located on the edge of the short cliff by the shoreline. A scout car spawns at this flag, and the Ottoman tank can deploy here once captured by their side. |
||
| + | |||
| + | <gallery> |
||
| + | Fao Fortress Shatt al Arab Post 01.png |
||
| + | Fao Fortress Shatt al Arab Post 02.png |
||
| + | Fao Fortress Shatt al Arab Post 03.png |
||
| + | Fao Fortress Shatt al Arab Post 04.png |
||
| + | </gallery> |
||
| Line 172: | Line 245: | ||
The second attack falls on the telegraphs emplaced around Turtle Hill. The Ottomans have positioned one of the stations near the gun battery in the middle of the island, and another around the crags towards the southern end of the landform. |
The second attack falls on the telegraphs emplaced around Turtle Hill. The Ottomans have positioned one of the stations near the gun battery in the middle of the island, and another around the crags towards the southern end of the landform. |
||
| − | Turtle Hill is protected by a pair of [[FK 96]]s in this gamemode. |
+ | Turtle Hill is protected by a pair of [[FK 96]]s in this gamemode. |
===Sector 3=== |
===Sector 3=== |
||
| Line 189: | Line 262: | ||
===Fao Gate=== |
===Fao Gate=== |
||
| + | [[File:Fao Fortress Domination Fao Gate.png|thumb|200px]] |
||
| − | Fao Gate is located around the main gate into the fortress on the southwest side. The capture zone is mostly outside the fortress walls, with only a narrow area extending past the gate into the Outer Courtyard. |
+ | Fao Gate is located around the main gate into the fortress on the southwest side. The capture zone is mostly outside the fortress walls, with only a narrow area extending past the gate into the Outer Courtyard.{{Clear}} |
===Fao Galleries=== |
===Fao Galleries=== |
||
| + | [[File:Fao Fortress Domination Fao Galleries.png|thumb|200px]] |
||
| − | Fao Galleries is located in the underground garrison below the northern sector of the fort. The relatively large capture zone includes most of the deepest areas of the galleries, which are formed of a square loop of corridors with compartments and inward-turning sections of wall forming many hiding spots and corners to ambush from inside the confined objective. |
+ | Fao Galleries is located in the underground garrison below the northern sector of the fort. The relatively large capture zone includes most of the deepest areas of the galleries, which are formed of a square loop of corridors with compartments and inward-turning sections of wall forming many hiding spots and corners to ambush from inside the confined objective.{{Clear}} |
===Fao Bastion=== |
===Fao Bastion=== |
||
| + | [[File:Fao Fortress Domination Fao Bastion.png|thumb|200px]] |
||
Fao Bastion is situated in the middle of the Inner Courtyard. The small capture zone only includes the central, circular redoubt and the staircases leading up to it, as well as a small section of the bastion platform and the taller circular watchtower to the immediate east. |
Fao Bastion is situated in the middle of the Inner Courtyard. The small capture zone only includes the central, circular redoubt and the staircases leading up to it, as well as a small section of the bastion platform and the taller circular watchtower to the immediate east. |
||
| + | {{Clear}} |
||
| Line 218: | Line 295: | ||
Simon-barle-simonbarle-23.jpg| |
Simon-barle-simonbarle-23.jpg| |
||
Simon-barle-simonbarle-24.jpg| |
Simon-barle-simonbarle-24.jpg| |
||
| + | Fao Fortress 01.png |
||
| + | Fao Fortress 02.png |
||
| + | Fao Fortress 03.png |
||
| + | Fao Fortress 04.png |
||
| + | Fao Fortress 05.png |
||
| + | Fao Fortress 06.png |
||
| + | Fao Fortress 07.png |
||
| + | Fao Fortress 08.png |
||
| + | Fao Fortress 09.png |
||
| + | Fao Fortress 10.png |
||
| + | Fao Fortress 11.png |
||
| + | Fao Fortress 12.png |
||
| + | Fao Fortress 13.png |
||
| + | Fao Fortress 14.png |
||
| + | Fao Fortress 15.png |
||
| + | Fao Fortress 16.png |
||
| + | Fao Fortress 17.png |
||
| + | Fao Fortress 18.png |
||
| + | Fao Fortress 19.png |
||
</gallery> |
</gallery> |
||
Revision as of 14:53, 28 May 2018
— Official website description
Fao Fortress is a map featured in Battlefield 1. Taking place during the British amphibious landings on the Al-Faw peninsula in 1914, it sees the Ottoman Empire defending the hilltop fortress from land and sea attack.
Overview
Within days of the Ottoman Empire joining the war with the Central Powers, the British Empire mounted an amphibious landing on the Turkish-occupied section of the Persian Gulf known as the Al-Faw peninsula. The dim light of the dawn colors the sand and rock of the coastline a dull red, and though not fully risen the pink-orange sun, reflected by the rippling purple waters, causes the air to shimmer hazily. The relatively narrow strip of accessible land along the coast is bordered to the west by tall, impassible cliffs. Around the map center on the west side are lower cliffs that can be scaled, the steep rocky ridges of the range giving way to massive dunes sloping down towards the sea. Close to the water the low ground of the beaches is divided by the tide, forming shallow inlets and canals between several "islands" which can be navigated by small boats, and forded at points by infantry and vehicles. At the end of a spit on land stretching out to the northeast is the fortress itself, its many towers and bastions dominating the region from the high ground.
Further out to sea to the east, a large section of ocean is available for boats and ships to sail in, although map boundaries ineventibly take them close to the fortress walls. There are no obstacles out in the expanse save for a small, featureless island to the northeast of Fao Fortress.
Behemoth
This map features the Dreadnought as its Behemoth. The Dreadnought is potentially able to knock down portions of the fortress walls with its powerful guns, but is vulnerable to torpedo bombers as well as torpedo boats - when the behemoth is deployed, the opposing side gains access to an additional boat spawn.
Control Points
| Control Point | Conquest | Domination | Rush | Operations | Frontlines |
|---|---|---|---|---|---|
| British Deployment | |||||
| Beach Outpost | 1A 1B |
1A | |||
| Turtle Hill | A |
2A 2B |
1B | A | |
| Sunwada Redoubt | B | 3B | 2B | B | |
| Marsh Village | C | 3A / 3B | 2A | C | |
| Al Faw Battery | D |
3A | |||
| Fao Gate | A | ||||
| Outer Courtyard | E |
3A | |||
| Fao Galleries | B | 4A | |||
| Inner Courtyard/Fao Bastion | F | C | 4B | 3B | |
| Shatt al Arab Post | G |
||||
| Ottoman Deployment | |||||
Conquest
Several of the objectives near the coast (specifically Turtle Hill, Sunwada Redoubt, Marsh Village and Shatt al Arab Post) feature capture zones that extend a ways out into the water, permitting them to be captured by boats.
Equipment
| Light vehicle(s) | |
| Tank(s) |
1 FT-17/Mark V/A7V/Artillery Truck/St Chamond/Putilov-Garford |
| Fixed-wing aircraft | |
| Boat(s) | |
| Light vehicle(s) | |
| Tank(s) |
1 FT-17/Mark V/A7V/Artillery Truck/St Chamond/Putilov-Garford |
| Fixed-wing aircraft |
1 Albatros D.III/Rumpler C.I/Hansa-Brandenburg G.I/Ilya-Muromets |
| Boat(s) | |
Deployments
British Empire Deployment
The British start on a narrow strip of beach in the southwest corner of the map. A single solitary roadway heads straight north past shores lined with rowboats, past the unoccupied fortifications of Beach Outpost and fording the inlet to the first island of Turtle Hill. The west side of the inlet can be followed to bypass Turtle Hill by heading over the dunes and hugging the west edge of the map, with players eventually finding themselves at Marsh Village or Al Faw Battery.
A trio of FK 96 guard the road and coastal approach to the spawn.
")
")
")
Ottoman Empire Deployment
The Ottomans deploy amongst the sandstone walls of a now crumbling old structure, which appears to have been converted to a vehicle maintenance workshop, near the coastline in the map's far north. They spawn behind tall bluffs which block the view south, between which the road to Shatt al Arab Post and the inner sector passes. A bend in the road prevents enemies from shooting directly into their spawn area, but the narrow path through the gorge can be a potential bottleneck. The bluffs can be bypassed by sea, or by following a trail up to the high ground to the southwest.
Their deployment too is defended by three FK 96s, emplaced around the ruins and oriented towards the surf.
")
")
")
Flags
Turtle Hill
Turtle Hill is on the smaller of the two islands created by the ocean channels, and is found to the south. The capture zone is concentrated around the southern end of the island, and excludes the two buildings on the opposite side. Turtle Hill is not much of hill, being only slightly elevated compared to the surrounding terrain, with mostly gentle slopes and a wide, flat summit that is easily accessible. The southern tip of the island is a jagged embankment of boulders and vertical cliffs, and features only marginally rougher terrain due to the low, surmountable hillside. The main feature of the capture zone, which is otherwise sorely lacking in cover aside from scattered rocks and overhanging ridges, is a shallow bay trench dug astride the main road which houses an inoperable howitzer.
A QF 1 AA gun is found west of the road from the flag itself. In addition to spawning a scout car, the flag provides a forward deployment location for the British team's tank.
")
")
")
Sunwada Redoubt
Sunwada Redoubt is along the south coast of the second, larger island of the map, accessible from the south and west (Turtle Hill and Marsh Village, respectively) by shallow fording points marked with wooden poles and duckboards. Light fortifications have been constructed around a short hillock raised up from the shoreline, in place to defend against the south and southwestern approaches. Further inland is a rocky mound that forms a sort of high ground over the position, granting additional directional cover to the northwest and blocking sightlines from the capture zone of Sunwada and Marsh Village. The mound, as well as a set of gullies on the northeast side of the area, can also be used to shelter from seaborne attack. Much of the area lies incorrigibly vulnerable to fire from the high walls of the fortress on the opposite end of the island.
The sandbag fighting positions on the southeast side of the capture zone feature several usable heavy machine guns that can direct fire against the smaller island or out to sea. A single scout car spawns at this flag.
")
")
")
")
")
Marsh Village
Marsh Village is located on the mainland across the inlet a short distance northwest from Sunwada Redoubt. Aside from the houses north of Turtle Hill, the village is the only civilian settlement on the map. It is comprised of three structures set about a clearing - a large, two storey building is located on the southwest side and smaller, single room dwellings are found to the north and east. An additional ruined structure sits outside the capture zone near the northeastern shoreline, with the marshes that define the objective situated outside the village to the northwest. The settlement is overlooked by high cliffs to the west that climb steadily upwards towards Al Faw Battery, often making it the target of long range bombardment. The main road that passes through the hamlet, and the inlet flowing by to the immediate east, further subjects the area to potential tank or boat attack. The buildings of the area, as few and fragile as they may be, are nonetheless the primary source of protection inside the capture radius.
The three houses that make up the village each possess ladders for roof access, with the single room house on the east side toting a machine gun nest orientated towards the river inlet. A scout car is available from this flag.
")
")
")
")
")
Al Faw Battery
The Al Faw Battery is situated on a high plateau on the western edge of the map center. Of the several rocky ridges that partition the dunes leading up from the sea, the one that seats the objective is made more accessible by a dirt road that passes through the flag, ramping up to the plateau to the north and south. The battery consists of an artillery shelter constructed onto the cliff edge, including three inoperable howitzers, an accompanying pile of empty shell hulks, and a shallow bay trench covered with camouflage netting. The high ground is useful for gaining sight over the adjacent lower areas and ridges, but the position is itself overlooked by even taller cliffs further west. Line of sight to the plateau from the low ground is obscured by the wide rim of the battery ridge, requiring players to scale the heights in order to get a shot into the position.
Two FK 96 guns watch the two roads ramping up into the capture zone from opposite ends of the plateau. The steep hill can make tanks scaling the dunes slow and easy targets for the cannons, with the southern gun closer enough to the cliff edge to drop shells onto the structures of Marsh Village. A scout car and one horse are provided by the flag's capture, and a Tank Hunter kit can be picked up from inside the camouflaged gunpit.
")
")
")
")
")
")
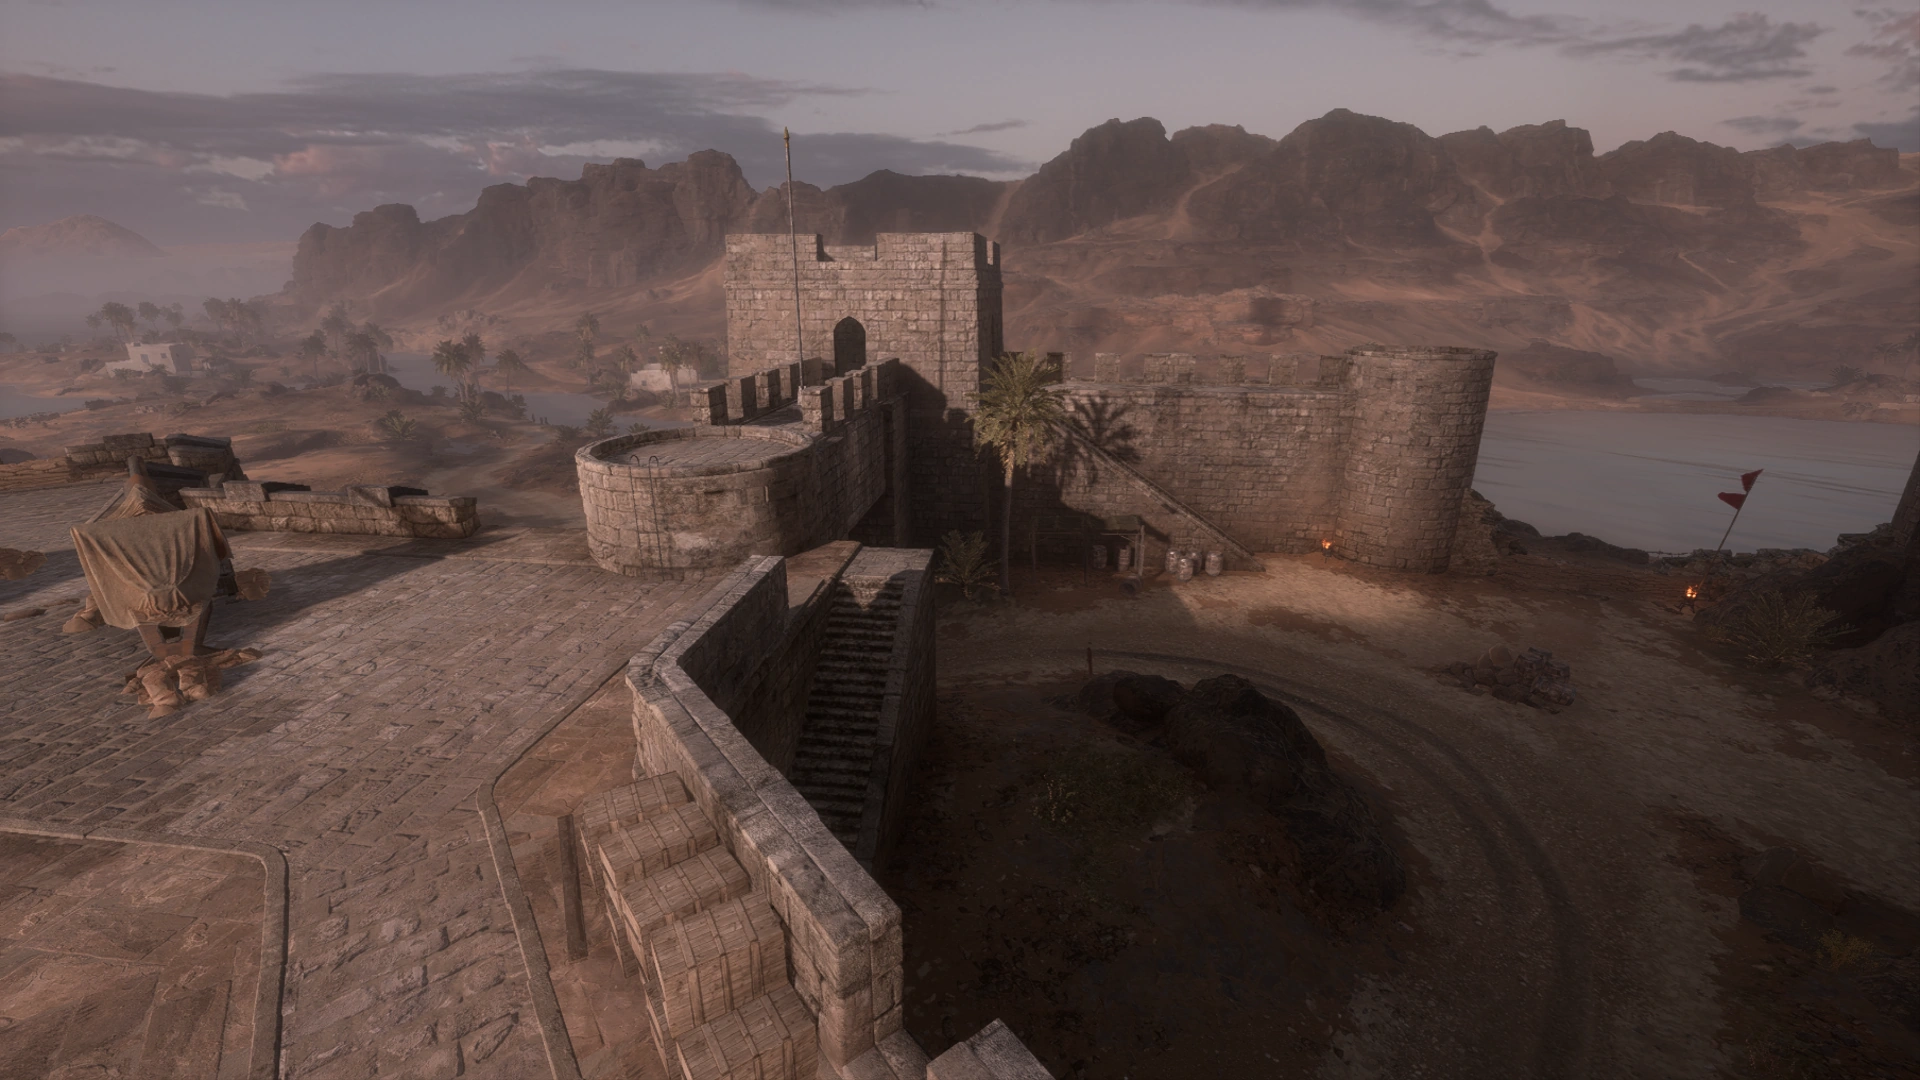
Outer Courtyard
The namesake of the map, Fao Fortress, is located atop the heights at the northern tip of the large island. The expansive fortress has high walls only climbable in certain spots, although the entire fort exterior can be circuited by land permitting a wide variety of ingress points for infantry. The fortress features many tall towers, bastions lined with gun emplacements, inner defenses and battlements, and underground galleries that run between the two lower sections beneath the main fortress redoubt. The Outer Courtyard is located on the southwest side. The courtyard houses the main fortress gate on the southern wall, which is lockable but can be negated with explosives or by using a heavy vehicle as a battering ram. The roughly triangular yard is bordered by high walls, accessible by stone staircases, which allow troops to shoot down into the mostly cover-devoid capture area from advantageous and comparatively well covered positions. A broken wall on the west side provides an alternate entry point, with the adjacent stairway and rocky outcropping creating a blind spot to the north and east. The other features of the area include a steel door leading down to the galleries on the north side, and an archway that joins to Inner Courtyard to the direct east.
Gun emplacements in this area include an AA gun on a circular corner tower, located up the staircases to the north that lead into the highest segment of the fort, housing a row of artillery lumbers. Another QF 1 AA is located on the battlements above the main gate. A pair of FK 96 guns are located at the tip of the northern bastion, defending a fairly open section of the fort's coastal perimeter.
")
")
")
")
")
")
")
")
")
")
Inner Courtyard
The Inner Courtyard encompasses the majority of the fort's eastern segment of defenses. The south side is formed of a star-shaped bastion that projects over the road leading to the main gate. The raised platform is accompanied by taller outer walls and guard towers that look inwardly upon the lower ground of the courtyard grounds. The bastion platform and watchtowers are reached by staircases and ladders respectively. A raised circular structure sits in the middle of the courtyard - this area and the lower ground are included in the capture zone, while the majority of the taller, surrounding constructions are not. The tunnel leading down to the galleries is on the northeast side of the area, alongside an inner gate that forms the perimeter of the fort's northern section.
As with other sections of Fao Fortress the Inner Courtyard is well equipped with emplaced weapons, which are mostly positioned along the crenellated walls of the southern bastion. They include three FK 96s, a QF 1 AA gun and a pair of Maxim MGs. Additionally, a Flame Trooper kit located next to the central circular redoubt can be effectively utilised in this uniquely enclosed area of the map.
")
")
")
")
")
")
")
Shatt al Arab Post
The Shatt al Arab Post is found on a small, circular speck of land along the coastline to the map's north. This low-lying area is surrounded by water, with the sea to the east and swampy marshland to the west. Narrow land bridges carrying the road connect the area to the adjacent landmasses. The post consists of rudimentary fighting positions constructed of low sandbag walls, intended to defend the objective to the north, east and south. The west section of the island, facing the marshes, is made up of an earthen mound topped with boulders, and remains as the only solid and considerable cover position on an otherwise highly indefensible point, although a low cliff where the sea meets the shore can be used as a possible hiding spot. The area is watched over by tall cliffs to the north and west, further highlighting its vulnerability.
A QF 1 AA gun is located on the edge of the short cliff by the shoreline. A scout car spawns at this flag, and the Ottoman tank can deploy here once captured by their side.
")
")
")
")
Operations
Fao Fortress is featured as the first map in Oil of Empires in Operations. The attacking British Empire make a beach landing and push up the coastline while the defending Ottoman Empire attempt to prevent the attackers from reaching the fortress.
Sector 1
British forces commence their attack by along the thin strip of land to the south of the map. The first objective is the Beach Outpost, which consists of a bay trench topped with camouflage netting dug in next to the sea shore. Further on across a fording point is Turtle Hill, on the west end of the small island at the foot of the fortress island. The British attack is made across mostly open ground, emphasising the importance of their armor, although the cliffs to the west of the objective can be used to gain an elevation advantage and support the push. If the position initially proves too strong, the area can be bypassed by boat and a landing can instead be made on Turtle Hill, blocking the Ottomans from resisting a subsequent advance on the flank of the Outpost. Both objectives are lacking cover inside the capture zone, with only shallow fortifications, scattered boulders, and low cliffs around the sea edge providing shelter for those moving the flag.
The British begin the battle with an impressive array of vehicles - two tanks, two planes, two boats and one horse, as well as a Sentry elite kit. The Ottomans can field only a single plane in response, but have access to an arsenal of static weapons around the coastline, which includes two QF 1 AA guns on Turtle Hill.
Sector 2
Ottoman forces retreat north as the British cross onto the larger of the two islands. Objective A is on the west bank of the river, and is a village surrounded by marshland. Objective B is the Sunwada Redoubt emplaced to defend the southern tip of the fortress island. The two objectives are once again isolated from each other by waterways, and are this time protected by more formidable defenses. The British team can suffer heavily when attempting to ford or swim across the inlet, inciting players to attack Marsh Village over the land route formed by the dunes to the west. Each flag can alternatively be attacked by sea. Tanks, aircraft and ships can be useful in reducing the Ottoman positions in the town and at the redoubt to rubble.
The Ottomans receive an extra plane to check the enemy air forces, which also get another plane. Around the Marsh Village is an FK 96 gun and a QF 1. A similar variety of equipment can be found at the Redoubt, in addition to its regular battery of machine guns.
Sector 3
British forces advance to the fortress itself with the objective of capturing both the Outer and Inner courtyard. The bastion defenses are once against strong, with the many Maxim and field guns lining the battlements capable of inflicting severe losses on enemies charging the main gate. A total of three QF 1 AA guns line the tops of the towers, able to reap a similar harvest in the air. Flanking routes around the outer perimeter of the fortress allow it to be infiltrated from multiple directions, but even after clever manoeuvring the sector requires the attackers to enter the open courtyard killing zones, muscling out the Ottomans despite the expected hailstorm of lead from the walls above. The two tanks the British bring to this final sector are of limited use except for suppressing enemy positions on the walls and smashing in the main gate.
In the close quarters fighting, the British bring up a Sentry and the Ottomans a Flame Trooper. Both team's air complement are up to three aircraft by this point.
If the fortress falls, the Persian Gulf can be considered a secure landing point for British reinforcements to expand their beachhead before heading to counterattack the Suez Canal.
Rush
In Rush, the British forces make an attack on the Ottoman communications network on the Al-Faw peninsula.
Sector 1
The first wave is made against the coastal lookout of Beach Outpost. One objective is inside the bay trench near the shoreline, while the second is closer to the cliffs to the west, in a small dugout shelter.
The British advance on land with a single cavalry unit, and at sea with one M.A.S. Torpedo Boat. Ottoman gunners can use an FK 96 gun set up in front of objective B in the seafront trench.
Sector 2
The second attack falls on the telegraphs emplaced around Turtle Hill. The Ottomans have positioned one of the stations near the gun battery in the middle of the island, and another around the crags towards the southern end of the landform.
Turtle Hill is protected by a pair of FK 96s in this gamemode.
Sector 3
The next sector has two possible layouts for the telegraphs. Objective A is always located in the Marsh Village, on the ground floor of the large house on the southwest side of the settlement. Objective B can be either at the howitzer battery of Al Faw heights to the west, or amidst the central mound of the Sunwada Redoubt to the east.
The British are equipped with a Sentry and a tank to assist in the assault, while the Ottomans receive a Tank Hunter.
Sector 4
The final objectives are located inside the Fao Fortress. Objective A is located underground in the galleries, near the southeastern entrance into the passage. Objective B is in a archway under a twin staircase leading up to the bastion at the Inner Courtyard.
The fortress wall above the gate is reinforced with an FK 96 to support the pair usually found on the bastion walls alongside a Maxim MG. The Ottomans additionally field a Sentry SMG to combat the British's own Sentry.
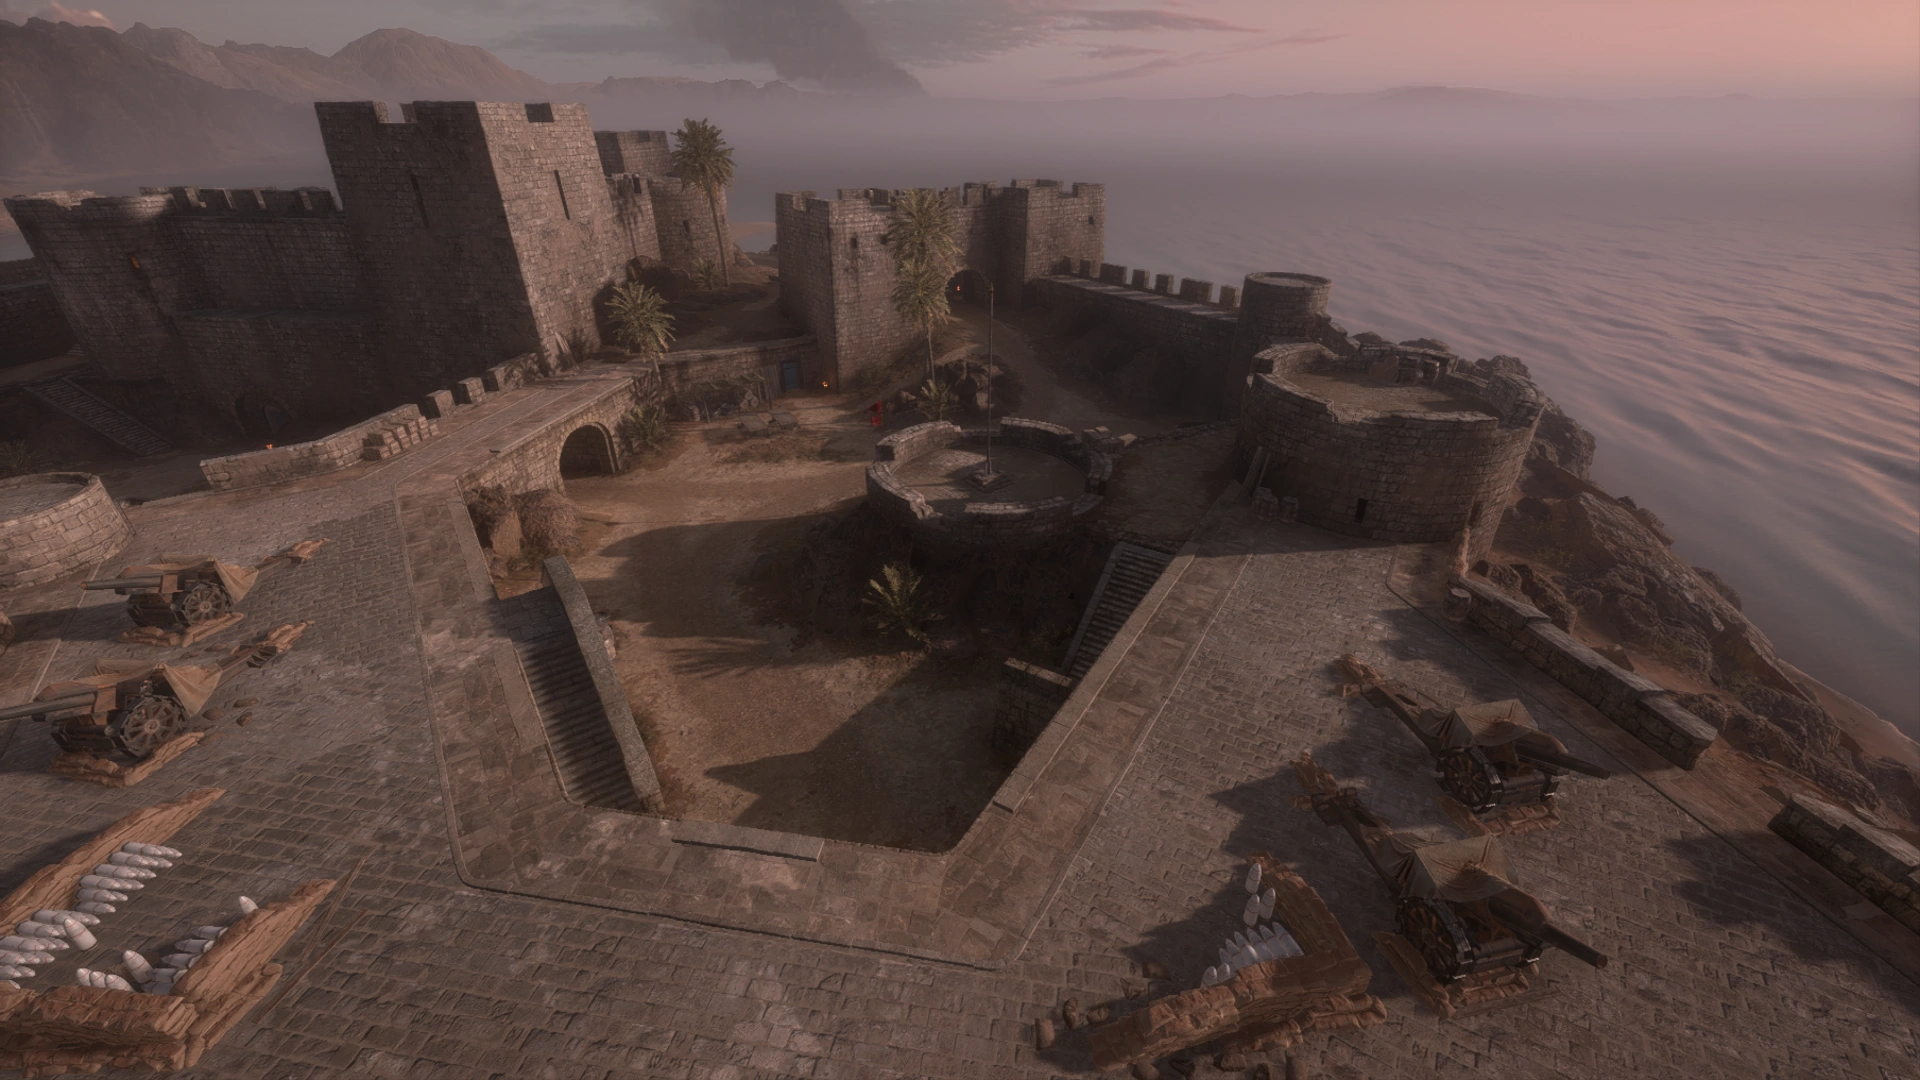
Domination
Domination takes place in and around Fao Fortress proper. All areas of the fortress are accessible, with map boundaries allowing the fort to be circled from the outside along the shoreline.
Fao Gate

Fao Gate is located around the main gate into the fortress on the southwest side. The capture zone is mostly outside the fortress walls, with only a narrow area extending past the gate into the Outer Courtyard.
Fao Galleries

Fao Galleries is located in the underground garrison below the northern sector of the fort. The relatively large capture zone includes most of the deepest areas of the galleries, which are formed of a square loop of corridors with compartments and inward-turning sections of wall forming many hiding spots and corners to ambush from inside the confined objective.
Fao Bastion

Fao Bastion is situated in the middle of the Inner Courtyard. The small capture zone only includes the central, circular redoubt and the staircases leading up to it, as well as a small section of the bastion platform and the taller circular watchtower to the immediate east.
Team Deathmatch
Team Deathmatch takes place within the exact same boundaries as Domination.
War Pigeons
War Pigeons uses an identical layout to Domination and Team Deathmatch.
Gallery
")
")
")
")
")
")
")
")
")
")
")
")
")
")
")
")
")
")
")
")
")
")
")
")
")
")
")
")
")
| ||||||||||||||||||||
Trivia
- While taking place in completely different engagements, Fort Nöbet seen in The Runner has many similarities with Fao Fortress.
- In the game files this map is named MP_FaoFortress.
- Craters created on the beach will fill up with water if they are in contact with the ocean.
- The Operations intro of Fao Fortress for the British side shows the ship SS River Clyde, which isn't present on this map.