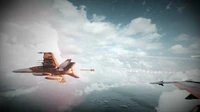
[[File:Going Hunting - Target Pod.jpg|thumb|right|200px|Hawkins in Target Pod view]]
After taking out the jets, Hawkins flies towards Mehrabad Airport, tasked with clearing the airspace of ground threats so that the A-10s can launch their attack runs. Bulldog 3-2, however, is struck by AA fire, and is destroyed, prompting Hawkins to engage the SAMs with AGM-88 HARM missiles. Switching to the F-18's targeting pod, Hawkins locks onto and fires three HARM missiles, destroying three SAM positions through heavy cloud cover.
After taking out the jets, Hawkins flies towards Mehrabad Airport, tasked with clearing the airspace of ground threats so that the A-10s can launch their attack runs. Bulldog 3-2, however, is struck by AA fire, and is destroyed, prompting Hawkins to engage the SAMs with AGM-88 HARM missiles. Switching to the F-18's targeting pod, Hawkins locks onto and fires three HARM missiles, destroying three SAM positions through heavy cloud cover.
Line 48:
Line 49:
Lasing the area with the targeting pod, Hawkins calls in an A-10, Bulldog 3-3, to destroy the helicopter with cannon fire, which it does. Hawkins also directs Bulldog 3-3 onto the survivors of the airstrike, who were running for cover. Again, the cannon fire of the A-10 eliminates the runners. Reaper 1 calls a halt to the airstrikes, as friendly troops were moving into the area, and 4-6 is directed back to the USS George H.W. Bush, landing on the carrier without mishap after dark.
Lasing the area with the targeting pod, Hawkins calls in an A-10, Bulldog 3-3, to destroy the helicopter with cannon fire, which it does. Hawkins also directs Bulldog 3-3 onto the survivors of the airstrike, who were running for cover. Again, the cannon fire of the A-10 eliminates the runners. Reaper 1 calls a halt to the airstrikes, as friendly troops were moving into the area, and 4-6 is directed back to the USS George H.W. Bush, landing on the carrier without mishap after dark.
+
==Trivia==
==Trivia==
Revision as of 06:25, 2 May 2012
This article contains possible spoilers. Read at your own risk!
"Get your fangs out, Hawkins. We're hunting big game today."
The mission begins as Hawkins meets up with her pilot below deck on the USS George H.W. Bush aircraft carrier, and is briefed on the mission ahead. The mission the pair had was to neutralise Al-Bashir in the Mehrabad Airport, but the pilot noted that Iranian jets were already in the air. The pair make their way onto the flight deck, passing several naval personnel on her way to the jet, an F/A-18F Super Hornet.
Putting on her helmet once reaching the aircraft, Hawkins climbs into the rear seat of the Super Hornet, and activates the Multi-Function Displays in front of her seat, and closing the canopy. Her pilot then begins to run through pre-flight checks, starting with checking the flaps and stabilisers on the aircraft. Hawkins first visually checks the port side of the aircraft, then the starboard side, before signalling that the aircraft was ready for take-off. Next, Hawkins activated the Helmet Mounted Display, checking that the cannon, Sidewinder missiles and flares were all working, before giving the final go-ahead for launch. Shark 4-2, the wingman to Shark 4-6, Hawkins' jet, was catapulted off of the ship first, before 4-6 is catapulted moments later. Flying a loop around the US fleet in the ocean, 4-2 and 4-6 link up and proceed towards their objective.
Clearing the skies
The two jets climb up into the cloud layer, experiencing some minor turbulence, but break through above the cloud cover. However, 4-2 notices a radar contact, several miles out, without an IFF tone signalling they were friendly. Suddenly, two Iranian Su-35S fly past, firing cannon rounds towards the US jets. 4-2 and 4-6 break formation, with 4-6 going for one of the Iranian jets that had broken right, whereas 4-2 went for the one on the left. However, the Sukhoi that 4-6 was hunting down pulled off a Pugachev's Cobra, managing to get behind 4-6 and starting its pursuit.
Shark 4-2, moments before being hit by an Iranian missile.
Hawkins now began to launch counter-measures to avoid the Iranian missiles. The pilot of 4-6 then bleeds the jet's speed, bringing round the F-18 so that Hawkins can engage the Flanker with cannon and Sidewinder missiles. Engaging the Iranian jet, Hawkins destroys it, but not before the Iranian jet deploys flares to throw the aim off of some of the missiles that Hawkins fired. However, eventually the jet is destroyed, and 4-6 flies towards the dogfight between 4-2 and the remaining Su-35. Pulling up behind the Flanker, Hawkins engages and destroys the jet while 4-2 breaks away, before linking up again with 4-6.
However, as the F-18s link up again, 4-2 is locked onto and destroyed by another pair of Su-35s, who lock onto 4-6 as well. Hawkins again deploys counter-measures, before engaging and destroying one of the Sukhois who had flown towards the port side of her jet. The second jet is also caught out and destroyed, and Shark 4-6 joins with the strike formation heading towards Mehrabad Airport.
Mehrabad Airport
Hawkins in Target Pod view
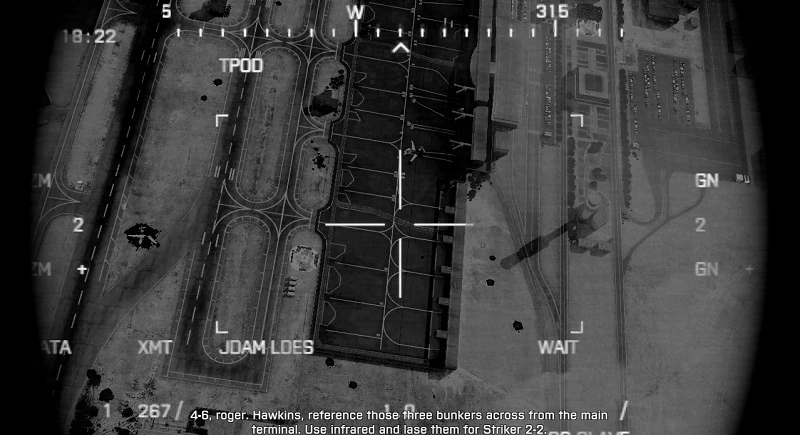
After taking out the jets, Hawkins flies towards Mehrabad Airport, tasked with clearing the airspace of ground threats so that the A-10s can launch their attack runs. Bulldog 3-2, however, is struck by AA fire, and is destroyed, prompting Hawkins to engage the SAMs with AGM-88 HARM missiles. Switching to the F-18's targeting pod, Hawkins locks onto and fires three HARM missiles, destroying three SAM positions through heavy cloud cover.
Next, after seeing fuel tankers heading onto the main runway, Hawkins is told to lase Iranian jets for bombing runs by a flight of F-16s. Four parked Su-35s are targeted and destroyed, alongside three moving jets that were already fuelled and ready for take-off. With the airspace cleared, Reaper 1, the overall controller for the mission, spies three vehicles moving onto the runway, as well as a helicopter. As the helicopter lands, Reaper 1 identifies the occupants of the vehicles as including Al-Bashir, and tasks Shark 4-6 to engage and destroy the helicopter before it takes off.
Lasing the area with the targeting pod, Hawkins calls in an A-10, Bulldog 3-3, to destroy the helicopter with cannon fire, which it does. Hawkins also directs Bulldog 3-3 onto the survivors of the airstrike, who were running for cover. Again, the cannon fire of the A-10 eliminates the runners. Reaper 1 calls a halt to the airstrikes, as friendly troops were moving into the area, and 4-6 is directed back to the USS George H.W. Bush, landing on the carrier without mishap after dark.
Trivia
This is the only dogfighting mission out of the whole game.
If you destroy all enemy jets without failing the mission, wasting any rockets, letting one hit your plane or letting a jet escape, you can get the You can be my wingman anytime Achievement/Trophy.
The mission apparently begins with a U.S. Naval fleet in the Caspian Sea. In reality, the Caspian (the largest enclosed body of water on the planet) is only accessable by rivers and canals in Russia that would be much too small for thousand-foot-long, 100,000-ton Nimitz class carriers, such as the USS Bush seen in the game. An actual American naval assult against Iran (involving large vessels such as carriers) would have to come from the Persian Gulf, south of the country, where the U.S. Navy has a large presence based out of Bahrain.
One of the mission objectives mistakenly refers to the enemy fighters as MiGs, though they are actually Sukhoi Su-35BM multirole fighters. Sukhoi and Mikoyan (the maker of MiG aircraft) are both owned by Russia's United Aircraft Corporation, a majority of whose stock is in turn controlled by the Russian government. In reality, Russia is the only country known to currently possess Su-35s, as it is still a new model. Iran does have several MiG-29 air superiority fighters, but it is unlikely that they will have any Su-35s in the immediate future; relatively few have been produced so far and such a transaction would violate current international sanctions against Iran.
After you switch to the Laser Designator after the HARM missile, you can switch back but you cannot switch to the laser again, causing you to fail the mission.
Multiple misspellings occur in the subtitles. Examples include "Colby" rather than "Coleby", "Teheran" instead of "Tehran", etc.
The "Pilot" of Hawkins' jet in this mission never has his name mentioned, not even in the credits.
On Hard difficulty, enemy fighters will always use Countermeasures to prevent your missiles, making the Heat-Seeking Missiles close to useless. The only probable way of destroying an enemy plane is by waiting for the pilot to get behind an enemy and to hit them with the machine-gun rounds.
During the dogfighting event in the skies above the airport, this is the only mission to have a memorizable pattern of gameplay; your pilot tracks an enemy, you will be advised to use your gun while behind one of them
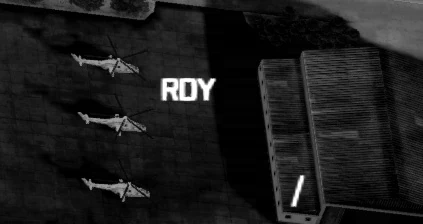
Mi-24's Parked at Mehrabad Airport
, and you will need to defend your plane with counter-measures once the enemy "bleeds" his speed.
There are two carriers in the task force but both are marked as CVN 77, i.e., as the George H.W. Bush.
If you look closely, the helicopter gunships parked in the Airport are Mi-24 "Hind" which do not make any other appearance anywhere else in the game.


