m (Made link accurate) |
Imperis825 (talk | contribs) No edit summary |
||
| (9 intermediate revisions by 8 users not shown) | |||
| Line 1: | Line 1: | ||
| − | {{Classification|standard}} |
+ | {{Classification|standard}}{{See|'''Heavy Metal''' redirects here. For the multiplayer level, see [[Heavy Metal (multiplayer)]]}} |
| + | |||
| − | {{See|'''Heavy Metal''' redirects here. For the multiplayer level, see [[Heavy Metal (multiplayer)]]}} |
||
| ⚫ | |||
{{Infobox/level |
{{Infobox/level |
||
| ⚫ | |||
| ⚫ | |||
|prev = [[Snowblind]] |
|prev = [[Snowblind]] |
||
|next = [[High Value Target (mission)|High Value Target]] |
|next = [[High Value Target (mission)|High Value Target]] |
||
| ⚫ | |||
| ⚫ | |||
|game = [[File:Battlefield BC2 ICON.png|25px]] [[Battlefield: Bad Company 2]] |
|game = [[File:Battlefield BC2 ICON.png|25px]] [[Battlefield: Bad Company 2]] |
||
| ⚫ | |||
| ⚫ | |||
| ⚫ | |||
| ⚫ | |||
|place = Talinay Wind Farms near Puente de Inca, Argentina - close to the Chilean Border. |
|place = Talinay Wind Farms near Puente de Inca, Argentina - close to the Chilean Border. |
||
| + | |date = 20XX |
||
|objective = '''Kill or Capture HVT Kirilenko:''' |
|objective = '''Kill or Capture HVT Kirilenko:''' |
||
*Rendezvous with 1 Armored Cav |
*Rendezvous with 1 Armored Cav |
||
| Line 24: | Line 20: | ||
'''Secure Enemy Stronghold:''' |
'''Secure Enemy Stronghold:''' |
||
*Investigate Targeted House |
*Investigate Targeted House |
||
| ⚫ | |||
|multiplayer = [[Heavy Metal (Multiplayer)|Heavy Metal]] |
|multiplayer = [[Heavy Metal (Multiplayer)|Heavy Metal]] |
||
| ⚫ | |||
| ⚫ | |||
| ⚫ | |||
| − | |||
| ⚫ | |||
| ⚫ | |||
| ⚫ | |||
| ⚫ | |||
| + | }} |
||
{{Template:Quote|So we went south, toward Chile. I guess Aguire had some friends in high places cause there were US tanks waiting for us. We hadn't had support in a long time, so it felt a little like Christmas, except our present was a crazy Russian colonel. Truth is, I'd had worse holidays.|[[Preston Marlowe]]}} |
{{Template:Quote|So we went south, toward Chile. I guess Aguire had some friends in high places cause there were US tanks waiting for us. We hadn't had support in a long time, so it felt a little like Christmas, except our present was a crazy Russian colonel. Truth is, I'd had worse holidays.|[[Preston Marlowe]]}} |
||
| Line 33: | Line 33: | ||
==Synopsis== |
==Synopsis== |
||
| ⚫ | |||
| ⚫ | The squad starts along the road in an [[M1A2 Abrams]], call sign Kodiak One, with several [[HMMWV|HMMWV's]] and M1A2 Abrams's on each side. With [[Preston Marlowe|Preston]] at the wheel, they are told by the mission commander, [[Riverguard]], to take out two ECM radar stations that are jamming radar signals for the [[A-10]]s when the tank reaches the intersection with another road. The first ECM radar is on a hill to the left and the second is further back to the right. Once both ECM radars are down, the tanks advance down the road, where they encounter two houses with [[9M133 Kornet]] launchers mounted on top. One tank, Kodiak Four, is hit and immobilised, and the rest (including the squad's tank) return fire. Once the Kornets are down, Preston is told to commandeer a [[UAV-1]] station, and then uses it to take out [[BMD-3 Bakhcha AA|BMD-3 AA]] tanks and Kornet Launchers in a small town. Upon completion, Preston returns to the tank. The task force now advances towards the town, but is attacked by three BMD-3s. The task force swiftly destroys the tanks, but is attacked by three more as they advance upon a farmhouse, this time armed with Kornets as well as their main cannon. After destroying the tanks, the task force then advances towards a town, which is ''"full of TOW launchers."'' Preston is told to target four launchers using his [[binoculars]], which A-10s then destroy with their GAU-8/A Avenger cannons. Once the last Kornet is down, the squad advance into the town on foot with the [[United States Marine Corps|Marines]], but witness Russian troops withdrawing from the wreckage of the town. They are then attacked by a [[KORD]] HMG, but Preston manages to destroy it quickly. However, as Bravo-Two breaches the house where Kirilenko was supposed to be, they find that he has disappeared. In the end cutscene, a US Marine informs the squad of a prisoner that knows where Kirilenko is, who agrees to share the info in return for his freedom. [[Redford]] lets him free, after the prisoner said that he had family in Texas, and Redford requisitions some Marine [[HMMWV|HMMWV's]] to advance towards Kirilenko. |
||
| + | {{Transcript|Heavy Metal}} |
||
| − | |||
| ⚫ | The squad starts along the road in an [[M1A2 Abrams]], call sign Kodiak One, with several [[HMMWV|HMMWV's]] and M1A2 Abrams's on each side. With [[Preston Marlowe|Preston]] at the wheel, they are told by the mission commander, [[Riverguard]], to take out two ECM radar stations that are jamming radar signals for the [[A-10]]s when the tank reaches the intersection with another road. The first ECM radar is on a hill to the left and the second is further back to the right. Once both ECM radars are down, the tanks advance down the road, where they encounter two houses with [[9M133 Kornet]] launchers mounted on top. One tank, Kodiak Four, is hit and immobilised, and the rest (including the squad's tank) return fire. Once the Kornets are down, Preston is told to commandeer a [[UAV-1]] station, and then uses it to take out [[BMD-3 Bakhcha AA|BMD-3 AA]] tanks and Kornet Launchers in a small town. Upon completion, Preston returns to the tank. The task force now advances towards the town, but is attacked by three BMD-3s. The task force swiftly destroys the tanks, but is attacked by three more as they advance upon a farmhouse, this time armed with Kornets as well as their main cannon. After destroying the tanks, the task force then advances towards a town, which is ''"full of TOW launchers."'' Preston is told to target four launchers using his [[binoculars]], which A-10s then destroy with their GAU-8/A Avenger cannons. Once the last Kornet is down, the squad advance into the town on foot with the [[United States Marine Corps|Marines]], but witness Russian troops withdrawing from the wreckage of the town. They are then attacked by a [[KORD]] HMG, but Preston manages to destroy it quickly. However, as Bravo-Two breaches the house where Kirilenko was supposed to be, they find that he has disappeared. In the end cutscene, a US Marine informs the squad of a prisoner that knows where Kirilenko is, who agrees to share the info in return for his freedom. [[Redford]] lets him free, after the prisoner said that he had a family in Texas, and Redford requisitions some Marine [[HMMWV|HMMWV's]] to advance towards Kirilenko. |
||
| − | ==Tips and Tactics== |
||
| − | *While assaulting the town, before triggering the building with the shielded [[KORD]] emplacement, try to get into houses on the left. One of them should let you climb up and slightly out of the map ( you'll get the warning but ignore it) and quickly jump over a small wall into the house diagonal from the HMG. Doing this with an assault rifle will let you have the same height as your attackers as well as a shorter distance to launch bullets and grenade rounds. |
||
==Collectibles== |
==Collectibles== |
||
The [[MG3]] is located on a small case shortly after entering the village. |
The [[MG3]] is located on a small case shortly after entering the village. |
||
| − | ==M-COM |
+ | ==M-COM Locations== |
| + | {| border="1" cellpadding="1" cellspacing="1" style="width: 670px;" |
||
| − | * The first M-COM Station can be accessed when the player exits their tank to man the [[UAV-1]]. Instead of manning the UAV, the player should look for the closest windmill. Next to it is a guard tower, and under that guard tower is the M-COM Station. |
||
| + | |'''Image''' |
||
| − | * The second M-COM Station is inside the wrecked town at the end of the level. Once the KORD MG fires upon you, search the buildings on the left side of the small square you're in. The M-COM is hidden in the back room of the middle house. |
||
| + | |'''Information''' |
||
| − | |||
| + | |- |
||
| − | ==Transcript== |
||
| − | + | |[[File:Heavy Metal 1.jpg|200px]] |
|
| + | |Just after dealing with the first TOW launchers, before entering the UAV, face east and head towards the large wind turbine and sand bagged area. The M-COM is just behind these |
||
| + | |- |
||
| + | |[[File:Heavy Metal 2.jpg|200px]] |
||
| + | |After leaving the tank for the second time, and have come under fire from the armored MG position, head into one of the last houses on the left with a band of red around the bottom and a wooden shelter outside. The M-COM is just inside. |
||
| + | |} |
||
==Related Achievements and Trophies== |
==Related Achievements and Trophies== |
||
| Line 75: | Line 79: | ||
*The UAV-1 also has a very fast reload, the High Powered Optics Package, and the Alternate Weapon Package as well. |
*The UAV-1 also has a very fast reload, the High Powered Optics Package, and the Alternate Weapon Package as well. |
||
*This mission is the only time in which the UAV-1 has thermal sights. |
*This mission is the only time in which the UAV-1 has thermal sights. |
||
| + | *This mission is also the only place that BMD-3 AA and A-10 Thunderbolt are present in campaign. |
||
*The windmills are invulnerable to any damage. |
*The windmills are invulnerable to any damage. |
||
*It is possible for the player to kill themselves with the UAV-1. |
*It is possible for the player to kill themselves with the UAV-1. |
||
*If the UAV is destroyed, blood will line the edges of the screen. |
*If the UAV is destroyed, blood will line the edges of the screen. |
||
| − | *During the opening cutscene and before Riverguard tells the player the first objective, music will play that sounds much like the Surf music from ''Battlefield: Bad Company'''s radio play. However, it is not heard anymore throughout the mission. |
+ | *During the opening cutscene and before Riverguard tells the player the first objective, music will play that sounds much like the Surf music from ''Battlefield: Bad Company''<nowiki>'</nowiki>s radio play. However, it is not heard anymore throughout the mission. |
*If player look through the binoculars at the moving convoy in the background near the village, the tanks that move in row is actually a [[Black Eagle]] MBT, as the shape of the tank is not similar with the T-90 body design. |
*If player look through the binoculars at the moving convoy in the background near the village, the tanks that move in row is actually a [[Black Eagle]] MBT, as the shape of the tank is not similar with the T-90 body design. |
||
*It is possible to land the UAV on one of the windmills. |
*It is possible to land the UAV on one of the windmills. |
||
| + | |||
{{BFBC2 Levels}} |
{{BFBC2 Levels}} |
||
| − | [[Category:Bad Company 2 |
+ | [[Category:Levels of Battlefield: Bad Company 2]] |
| − | [[Category:Singleplayer Levels]] |
||
Latest revision as of 19:21, 12 April 2020
Heavy Metal is the 7th mission in Battlefield: Bad Company 2. After extracting the satellite's black-box and discovering that Arkady Kirilenko is behind the Scalar Weapon project, Aguire arranges for Redford's squad to "piggy-back" with the United States 1st Armored Division, in their assault on a Russian-held village.
Synopsis[]
This section contains spoilers for
Battlefield: Bad Company 2.
The squad starts along the road in an M1A2 Abrams, call sign Kodiak One, with several HMMWV's and M1A2 Abrams's on each side. With Preston at the wheel, they are told by the mission commander, Riverguard, to take out two ECM radar stations that are jamming radar signals for the A-10s when the tank reaches the intersection with another road. The first ECM radar is on a hill to the left and the second is further back to the right. Once both ECM radars are down, the tanks advance down the road, where they encounter two houses with 9M133 Kornet launchers mounted on top. One tank, Kodiak Four, is hit and immobilised, and the rest (including the squad's tank) return fire. Once the Kornets are down, Preston is told to commandeer a UAV-1 station, and then uses it to take out BMD-3 AA tanks and Kornet Launchers in a small town. Upon completion, Preston returns to the tank. The task force now advances towards the town, but is attacked by three BMD-3s. The task force swiftly destroys the tanks, but is attacked by three more as they advance upon a farmhouse, this time armed with Kornets as well as their main cannon. After destroying the tanks, the task force then advances towards a town, which is "full of TOW launchers." Preston is told to target four launchers using his binoculars, which A-10s then destroy with their GAU-8/A Avenger cannons. Once the last Kornet is down, the squad advance into the town on foot with the Marines, but witness Russian troops withdrawing from the wreckage of the town. They are then attacked by a KORD HMG, but Preston manages to destroy it quickly. However, as Bravo-Two breaches the house where Kirilenko was supposed to be, they find that he has disappeared. In the end cutscene, a US Marine informs the squad of a prisoner that knows where Kirilenko is, who agrees to share the info in return for his freedom. Redford lets him free, after the prisoner said that he had a family in Texas, and Redford requisitions some Marine HMMWV's to advance towards Kirilenko.
Collectibles[]
The MG3 is located on a small case shortly after entering the village.
M-COM Locations[]
| Image | Information |
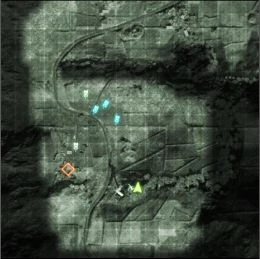
|
Just after dealing with the first TOW launchers, before entering the UAV, face east and head towards the large wind turbine and sand bagged area. The M-COM is just behind these |
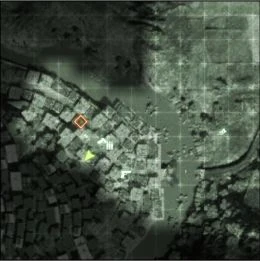
|
After leaving the tank for the second time, and have come under fire from the armored MG position, head into one of the last houses on the left with a band of red around the bottom and a wooden shelter outside. The M-COM is just inside. |
Related Achievements and Trophies[]
The following achievements/trophies can be completed on this mission.
| Image | Name | Criteria | Gamerscore | Trophy type |
|
Nobody ever drowned in sweat | Campaign: finish Heavy Metal | 15 G | Bronze |

|
Taxi! | Campaign: drive 5 km in any land vehicle | 15 G | Bronze |
Trivia[]
- It is possible to get out of the map in the Village.
- The squad's M1A2 Abrams has the High Power Optics Package, Quick Reload Package, and Active Armor Upgrade multiplayer Specializations applied, but it reloads much faster than it would online with the Quick Reload spec.
- The UAV-1 also has a very fast reload, the High Powered Optics Package, and the Alternate Weapon Package as well.
- This mission is the only time in which the UAV-1 has thermal sights.
- This mission is also the only place that BMD-3 AA and A-10 Thunderbolt are present in campaign.
- The windmills are invulnerable to any damage.
- It is possible for the player to kill themselves with the UAV-1.
- If the UAV is destroyed, blood will line the edges of the screen.
- During the opening cutscene and before Riverguard tells the player the first objective, music will play that sounds much like the Surf music from Battlefield: Bad Company's radio play. However, it is not heard anymore throughout the mission.
- If player look through the binoculars at the moving convoy in the background near the village, the tanks that move in row is actually a Black Eagle MBT, as the shape of the tank is not similar with the T-90 body design.
- It is possible to land the UAV on one of the windmills.
| |||||||||||