| Line 101: | Line 101: | ||
|light = 1 [[Universal Carrier]] |
|light = 1 [[Universal Carrier]] |
||
|half-track = 1 [[M3 Half-track#Battlefield V|M3]] |
|half-track = 1 [[M3 Half-track#Battlefield V|M3]] |
||
| + | }} |
||
| + | {{Equipment |
||
| + | |faction = Neutral |
||
| + | |light = 1 [[Tractor]] |
||
}} |
}} |
||
Revision as of 16:45, 4 August 2019
| This article is a stub. It is short and in need of fortification. Why not help out? |
| Incoming! The subject of this article is a recent or unreleased addition to a Battlefield game. It may contain speculation or errors. Have new, relevant information to add? Why not help out? |
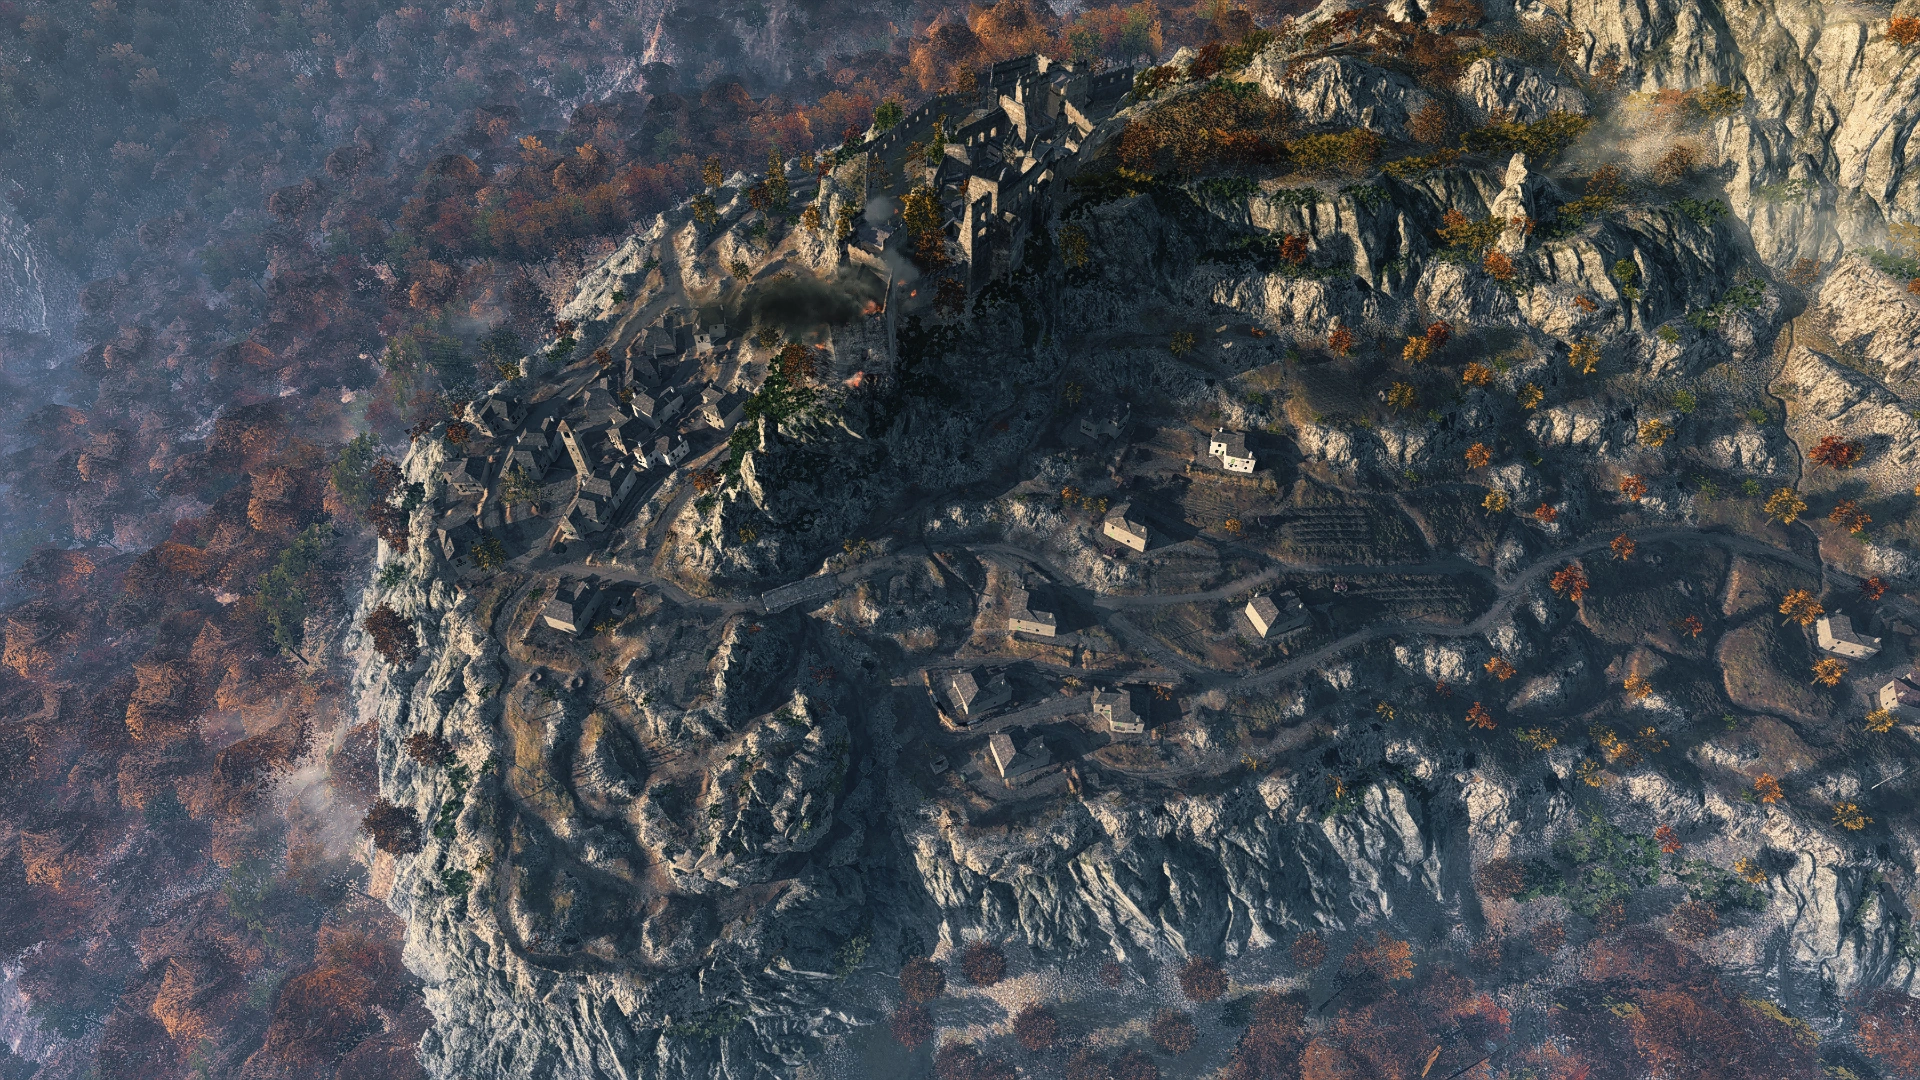
Marita is a map in Battlefield V introduced in the fourth chapter of Tides of War, Defying the Odds. It was released on July 30th, 2019.[2]
Operation Marita was the German codename for the Axis invasion of mainland Greece that started on April 6th 1941, with the offensive renewing Italy's stalled attempt to occupy the country in late 1940. With the bulk of the Greek army tied down fighting the Italians, the German drive from the east through Bulgaria overwhelmed the Allied defensive lines, held by an outnumbered British and ANZAC force redirected from the fighting in North Africa. The deteriorating situation would ultimately lead to an Allied evacuation from the peninsula by 28th April. The campaign concluded with the German capture of Crete on June 1st 1941.
Overview

Marita takes place on a plateau high in the Pindus mountains, overlooking a vast river valley shrouded in mist, where an idyllic Greek farming community is situated somewhat precariously on the edge of the abyss. Although the rough terrain on the slopes results in tumultuous and sudden changes in elevation, the map progresses gently uphill as it wraps around the mountain face from south to north, divided as such by a large ravine running through the map center. At the lower end of the slope, secluded farmhouses stands vigil over a patchwork of sewn fields and vineyards. Climbing further to the north reveals a quiet village of over a dozen stone houses, pressed together by narrow tight cobblestone streets and alleyways, sitting at the foot of the inacessible mountain peak, at the top of which is an imposing medieval fortress. Safe from siege in any past century, the violence in the world below has reached even this isolated haven, with the prize of conquest being artillery dominance over the valley. German bombers have set the castle ablaze, but now stand aside while the infantry begin the uphill struggle to finish the job.
As with the majority of maps planned for release with Defying the Odds, Marita has an "up close and personal" focus with few vehicles - no tanks, planes or Squad Reinforcement vehicles are present in any gamemode. The map places further emphasis on verticality as the town's streets and surrounding areas vary in elevation due to the sloping hillside setting. The topography, as well as the architecture and layout of the small town, is reminiscent of Łupków Pass and Brusilov Keep from Battlefield 1. Guilin Peaks from Battlefield 4 is also a notable inspiration for the mountainous setting and cloud-obscured valley surroundings of Marita.[3]
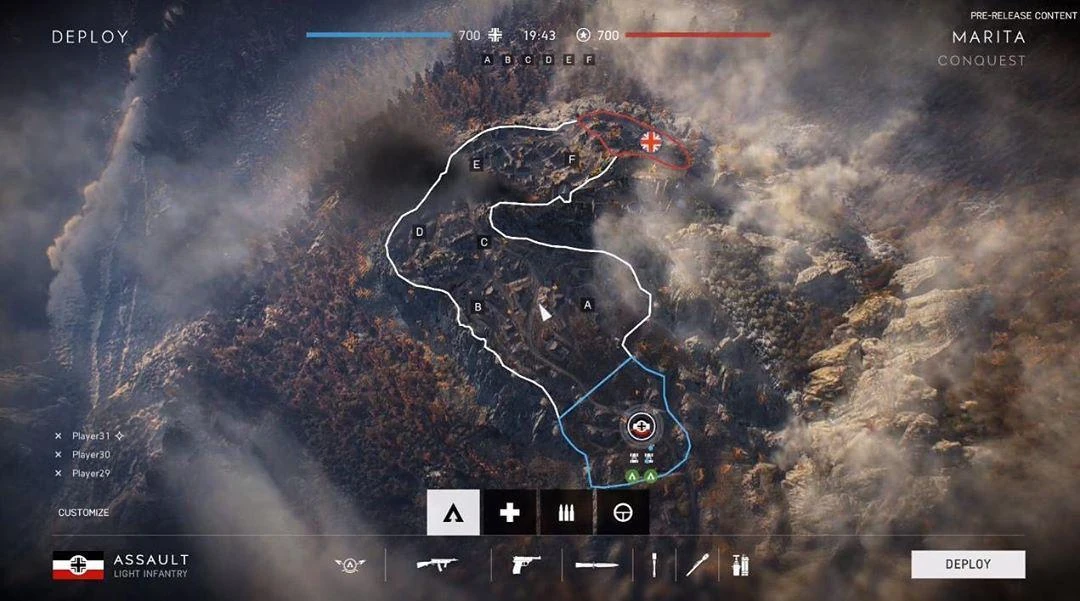
Flag Layout
| Control Point | Conquest | Breakthrough | Squad Conquest | Frontlines | Domination |
|---|---|---|---|---|---|
| German Deployment | |||||
| Zervos Farm | 1A | ||||
| Kostas Farm | A | ||||
| Cliffside Post | B | ||||
| Effyіs Bridge | C | ||||
| Northern Battery | 2B | ||||
| Southern Battery | 2A | ||||
| Old House Vista | D | ||||
| Clock Tower Plaza | E | ||||
| Petras Guesthouse | 3A | ||||
| Ganis Inn | 3B | ||||
| Path of Light | F | ||||
| Last Stand | 3C | ||||
| British Deployment | |||||
Conquest

In Conquest, the map's six objectives are evenly aligned with three in the northern sector across the Ravine and three in the south either on or past the Ravine. The three middle objectives of B, C and D are much more close together than any others, but are separated by significant terrain obstacles amidst the map's compressed waist area - the unusual curved profile of the map boundary as well as the narrow width of the map encourages linear confrontations and allows the establishment of a moving frontline, although there are still some opportunities for flanking and varied infantry gameplay. The enclosed urban terrain around this area and the Village facilitates close-quarters fighting, where destruction can be used to undermine enemies in cover or create new routes of advance. The more open, rural terrain to the south allows more for medium range engagements.
Each team starts with 700 tickets. Light vehicles are present, but are few in number - although useful for quickly travelling between objectives or rushing past the frontline to deploy infantry in rear areas, the capricious and highly limited road network in addition to vehicle-impassible terrain around the Village, Forest and Ravine can severely reduce effectiveness, while players actively mining the roads can stop them in their tracks. Every objective except Old House Vista and Clock Tower Plaza has pre-built Ammo and Health stations nearby - in the latters' case, the caches require building first.
Equipment
| Light vehicle(s) | |
| Half-track(s) | |
| Light vehicle(s) | |
| Half-track(s) |
1 M3 |
| Neutral | |
| Light vehicle(s) |
1 Tractor |
Deployments
German Deployment
The Germans' Conquest spawn is in the map south, along the western mountain face. The team deploys on the main road around the earthworks of the former Allied Trench, as well as in the Vineyards surrounding Zervos Farm. The road takes players towards the more built-up areas of the map center before splitting up at Cliffside Post. Upon spawning infantry can cut northwest through the farm fields to reach the nearest objective of Kostas Farm. As the German spawn is in direct view of the overlooking farmhouse, players should prevent its capture by the British if at all possible.
")
British Deployment
The British spawn on the northeast edge of the mountain, to the west of the main Village area on the opposite end of the Main Road. The Road snakes north around a large hill known as Outskirts which serves as a line-of-sight blocker for safe spawning. While the Main road directs players and light vehicles through the heart of the settlement before continuing on to Effyis Bridge, those one foot can use the mountain trails to cut directly westwards over the hill to capture the adjacent Path of Light objective.
")
Flags
A: Kostas Farm
Kostas Farm is a collection of three houses lying adjacent to the Farm Road in the map's southeast. The complex, comprised of fenced-off yards and fields of vine crop surrounding the buildings themselves, is built onto the eastern mountain slope - as such all three structures are at varying levels of elevation. The southernmost building is the highest, and is the focal point for the objective capture zone which encompasses the house interior and the raised L-shape foundation it sits on. The high ground area gives an unobstructed view over the adjacent roadways, and allows good cover against enemies moving up from the German deployment or via the mountain trail leading up from Effyіs Bridge.
The map's only neutral vehicle, a Tractor, can be commandeered from the vineyards to the south of the flag. It does not respawn when destroyed.
")
")
")
B: Cliffside Post
The Cliffside Post in on the opposite side of Farm Road to Kostas on the western cliff edge. The area is the command post for the Allied artillery positioned nearby due to its dominant position against the valley below. The area is a group of four detached houses with tight alleyways running between them - like at Kostas, the buildings are on different levels of ground, meaning players must use stairs or scale the alley walls to gain access to neighbouring properties. The flag's capture point surrounds the northwestern building and its adjoining curved driveway and shed. The building stands right by the cliffside and the Forest Ravine Path to the direct north.
")
")
C: Effyіs Bridge
The Effyis Bridge objective is located directly in the map center. The point consists of a single-land arched stone bridge over a mountain Ravine, with objective capture possible from the length of the bridge deck or the shallow fissure below. The objective is of particular strategic value for several reasons, not least because it is the main road link between the north and south map sectors and the only crossing point over the creek for vehicles. The bridge is a potential bottleneck for either side as the Ravine, the cliff edge and the crags south of the Old House Vista make the area the narrowest point on the map and thus one of the hardest to bypass, although an alternative crossing point is a buildable rope bridge at the western end of the Ravine, linking Cliffside Post to Forest Ravine Path. The high ground at either end of the bridge gives a commanding overwatch position against the approaches from Cliffside Post and Old House Vista, respectively.
The Bridge area can be fortified with anti-tank obstacles at its ends and sandbag divides along its length, which can be useful assets for repelling infantry and vehicle assaults alike. A sandbag fighting position can also be dug beneath the bridge deck in the Ravine, allowing for defense against the Forest Path opposite. A suspension bridge can be built to the west of the flag to allow for another path across the Ravine.
")
")
")
")
D: Old House Vista
The Old House Vista is on the western edge of the map on the outskirts of the Village. Despite the objective name, no buildings in the vicinity remain standing, with the objective instead standing in a forest at the foot of the Northern Battery cliffs by the mountain edge. The capture point follows the curve of the tiered cliff, allowing capture at different elevations as the terrain slopes towards the precipice. The flag is accessible via two narrow gorges cutting through the crags south of the area. Of the two, the most direct route is the Forest Path which links to the Bridge end of the Ravine. The other snakes around the crags at the very edge of the cliff, known as Forest Ravine Path. Although these areas offer ways to bypass the generally highly contested Bridge flag, they can be just as hazardous and prone to bottlenecks should they be actively defended. The objective can also be reached from the north by following the cliff edge along from the Village - the rocky high ground to the flag's direct north renders much of the directional cover within the capture zone useless.
")
")
")
E: Clock Tower Plaza
The Clock Tower Plaza is situated towards the west end of the Village central block. The area consists of a small village square with an inacessible clock tower on its east side and a circular enclosure for a pair of oak trees at its center. At its sides are rows of buildings, with those to the south being on raised foundations. Aside from the central planter and a parked military truck on the northern side, the area is completely devoid of cover, especially considering the number of windows looking down onto the area. However, capture of the flag generally necessitates players standing in the open as the objective radius extends only to one adjacent building. Having team members occupy the surrounding structures to cover those in the point radius can aid its capture.
On of the few stationary weapons on the map, a Heavy Machine Gun, can be built in the plaza to defend the length of the Village Road. Multiple walkways can be built to reach the rooftops of buildings in the village.
")
")
")
F: Path of Light
The Path of Light is found on the Village's eastern outskirts. It consists of a rocky cliff that serves to house both a small shrine area in addition to being a scenic overlook over the town itself. The capture zone is the largest on the map, covering a significant area around the several levels of cliff as well as the winding Castle Road which chicanes around its base up towards the base of the mountain peak. The high elevation grants those in the capture zone decent protection from fire from the upper storeys of nearby houses. It can also be used to spawn-trap the British as they are forced over a blind hill when travelling to the flag via the direct route. By following the Castle Road from this flag, the entire Village can be bypassed along its southern edge.
")
")
Breakthrough
Breakthrough sees the Germans attempt to throw the British from their decisive mountainside position, eliminating their artillery and thus clearing a route of advance through the valley below. The attack is made against three sectors of increasing objective frequency, progressing through the southern farmland and artillery base before falling finally on the Village redoubt.
The Germans have 200 starting tickets. No light vehicles are available in this mode.
Sector 1
The first wave of the assault is concentrated against a single target, Zervos Farm. Neighbouring Kostas Farm down the hill to the west, Zervos farmhouse stands adjacent to a fork between the Main Road and Farm Road, flanked by vineyards to the south and east and the Cliffside Path to the west. The capture zone encompasses the house and a small portion of its exterior, and is a highly concentrated area for full teams to be fighting over. The house may present a difficult obstacle to the advance so long as it remains standing and occupied - otherwise, the majority of the scant cover within the capture zone comes from the changes of elevation created by the house and road foundations. Despite the pinpoint focus of the objective, attackers have a great deal of freedom for flanking, either up the Eastern Slope, via the Cliffside Path or through the Vineyards, allowing them to relieve pressure on the objective by intercepting enemy reinforcements on the Main Road, or attacking defenders within the objective area when they are in enfilade. Defenders can counter this by occupying not just the Zervos farmhouse but also Kostas and the Drakos Vanguard to protect their flanks.
Sector 2
In the second assault, the Germans are tasked with seizing control of the ravine crossings and the Allied artillery guns in the vicinity. The Southern Battery flag is at the south end of the Effyis Bridge, on a flat piece of ground overlooking the approach from Cliffside Post. The area is flanked a ditch on its east side as well as the Ravine to the west, although the clear sightlines around the position can make it difficult to attack directly. The Northern Battery is past the Bridge's far end, positioned on a ridge above the Old House Vista to the immediate west. This position can be captured first by bypassing the Southern Battery via the Forest Paths and looping around the cliffs to attack Northern Battery from the rear - such a move may place the latter position in flank and allow its capture. However, achieving this can be difficult due to the limited routes through the forest which can be blocked by defenders with ease due to their narrowness. The Northern Battery is also in the direct path of the British reinforcement spawn in the west Village, who can rapidly counterattack and overwhelm the position. Overall, the sector can be perilous for attackers due to their limited room to manoeuvre. On the other hand, due to the concentrated nature of the capture zones, defenders should be mindful of enemy artillery barrages or any direct, mass assaults under smoke cover.
Sector 3
As the German attackers enter the town, the battle descends into a melee in the tight confines of the old Village. They must take and hold all objectives at once, of which there are three. The objectives consists of single buildings within the town - cornerstones of the Allied defense. Objective A is Petras Guesthouse, which is one of two buildings sitting directly across from the Clock Tower Plaza to the north. The capture zone, which only includes the easternmost of the semi-detached houses, is confined to the interior of the structure only, necessitating either a room-clearing action or its reduction with explosives. Objective B is the Ganis Inn, situated on the southern outskirts of the town between the Castle and Village Roads. Although it too has a capture radius mostly focused on the building, the inn has a surrounding garden area that is fenced-off and includes a small shed, granting additional hiding spots for players in cap. Objective C is on the eastern outskirts where the Main Road forks into the Village Road. This lone structure, titled The Last Stand, is similar in both radius size and appearance to the Ganis Inn, but is bordered by much more open ground to the east. Capture of this flag early may bar the British from reinforcing the Village from their deployment around the Path of Light and Outskirts hill. Regardless, the final Village area sector, while highly confined in terms of terrain and distance between objectives, offers plenty of routes for flanking or hiding amidst the mass of houses, alleyways and walled gardens.
Squad Conquest
Deployments
German Deploment
British Deployment
Flags
A:
B:
C:
Team Deathmatch
Team Deathmatch takes place within the Village sector in the map's north. The entire settlement up to its northern cliff boundary, and including the Outskirts to the east, south and west are included, as well as the Northern Battery approach and a small forested area around Old House Vista and Fotos Manor.
Frontlines
German Headquarters
British Headquarters
Domination
A:
B:
C:
Gallery
")
")
")
")
")
")
")
")
")
")
")
")
")
")
")
")
")
")
")
")
")
")
")
")
")
")
")
")
")
")
| ||||||||||||||||||||||||||
Trivia
- The map's internal name is MP_Kalamas.
- Originally, the map was stated in official news posts to be set during late 1940, although this was changed to spring 1941 in posts produced just before the map released.[4]
- Many singular buildings in the village and surrounding farmland have unique names. Some of these are: Captured House, Zevos Farm, Kostas Farm, Kostas Inn, Drakos Vanguard, Fotos Manor, Cliffside House, Nikas Homes, Spiros Refuge, Petras Guesthouse, Ganis Inn and Last Stand.