No edit summary |
m (→Airborne) |
||
| Line 89: | Line 89: | ||
===Airborne=== |
===Airborne=== |
||
| − | On Day 1, |
+ | On Day 1, as the Allied fleet enters the ice-free Fjord to offload an amphibious invasion fleet, airborne troops are sent ahead to take out the German coastal defenses prepped to soften up the approaching land contingent. Airborne takes place at night, with the Aurora Borealis casting an unearthly light over the map, which is not overly dark due to the heavy presence of reflective snow. |
====Deployments==== |
====Deployments==== |
||
Revision as of 15:00, 5 August 2019
| This article is a stub. It is short and in need of fortification. Why not help out? |
Narvik is a map featured in Battlefield V. It was first seen in the Official Multiplayer trailer.
The map is set during the Battles of Narvik, fought between April 10th to June 8th 1940, specifically depicting the Allied landings at the city on May 28th. The Germans invaded Norway as part of Operation Weserübung on April 9th in an attempt to win naval bases in the Baltic and North Seas, and secure the export route of iron ore from Sweden. In response, British and French troops were landed in country to take back the ports, while the German fleet was attacked in two separate Allied naval incursions into Narvik's Ofotfjord.
Overview
The seaside town of Narvik is large, but quite rural in appearance, situated between the foot of an imposing mountain range and the Norwegian coast. Arranged in neat rows along the north of the map, the red and yellow painted chalets stand in stark contrast to the white background of the area's innumerable snow-capped cliffs, laden with pine thickets, which slope southwards towards the water's edge. On the outskirts the few roads that branch out from the town link to an assortment of tiny hamlets and hilltop overlooks of the periphery, as well as following the general descent south towards the port.
Although Norway was still neutral at the beginning of 1940, Narvik's fate is inevitably sealed due to these harbor facilities. Accessible year round due to the protective ice-free fjord, it is the export point for Swedish iron ore, a strategic resource vital to the German war effort. The town's close ties to the substance is clearly visible; the hill-like mounds sitting along the dockside, the unending trainloads waiting in the sidings and yards of the locale's extensive rail network, as well as the towering dam-like structure built along the southern shore - the loading point for the large ships the quantities of ore require. A significant portion of the town's vast industrial base, which dominates the southern and inaccessible eastern section of the map, is devoted entirely the flow of iron. To either secure or sever this metallic artery, Narvik must be captured, and both civilians and military personnel alike have already paid a high price - many of the buildings in town are in shambles, bombed or bracketed by naval guns, while the stricken and flaming hulks of the devastated fleet responsible lie stranded in the bay's calm waters.
The open and highly variable terrain of Narvik caters to many styles of gameplay, capable of supporting infantry, tanks and aircraft alike. The northern hills and town outskirts, as well as the large docking platform to the south, grant opportunities for long range gunfights, whereas closer to the northern mountains, combat becomes more oriented around street fighting, with the charge of buildings and roadways becoming more important in the battle-scarred yet deceptively dense central block.[2]
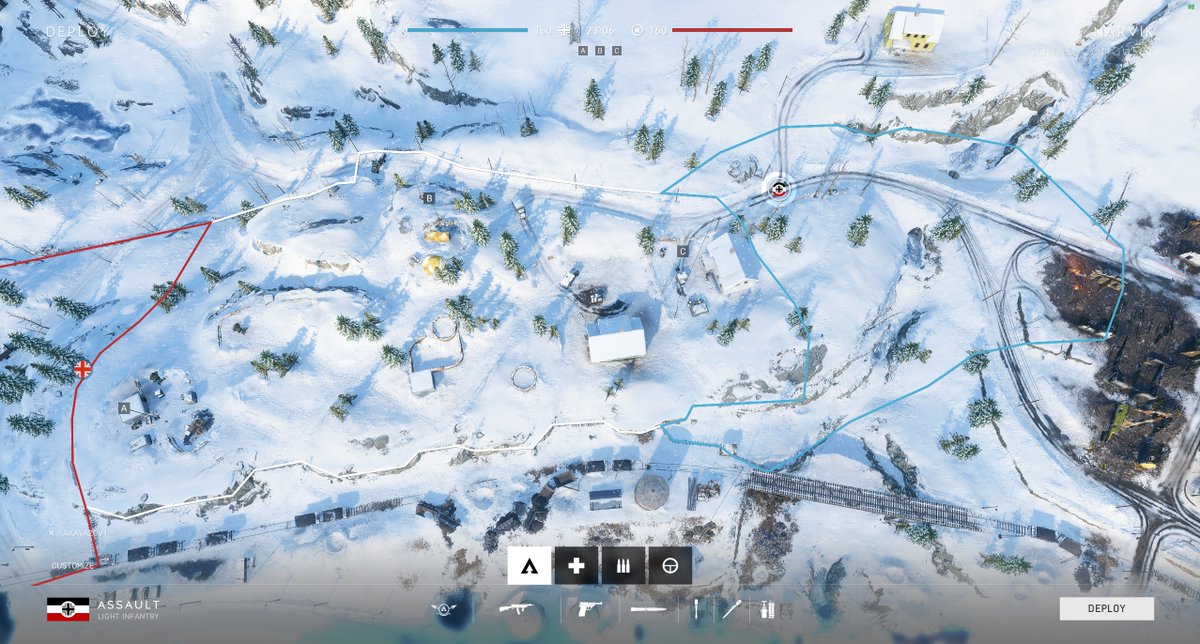
Conquest

Conquest on Narvik is fought between six flags, arranged into a pair of threes, arranged roughly linearly across the map length. The first three objectives alphabetically concern the northern urban section and its outlying suburbs, while the remaining three are positioned along the south coast, comprising industrial areas of interest.
Equipment
The launch build feature one tank, two aircraft, and three transport vehicles for each team, with additional slots for one tank and two gun carrier halftracks spawnable with Squad Reinforcement points.[3]
Deployments
British Deployment
The main British deployment is in the north-west corner of the map, in a cliffside Gully west of Artillery Base. The area is sheltered by several high ridges and dipping terrain, shielding the country road heading into town. Upon one of these ridges is a Pak 40 and two unbuilt Vickers HMGs, along with an Ammo Cache. Another Ammo Cache is to the south next to a vehicle resupply station, and a single Flak 38 is located behind a shack far to the rear.
Further south is the second British spawn, on the Outskirts inland from the Coast. Just uphill is the Western Trainyard, which continues directly east towards Train and the docking platform. This location holds a Flak 38 and a Health Station, with another Health station and Ammo Cache at the near end of the Yard. A Pak 40-towing halftrack is available from this secondary spawn position.
German Deployment
The Germans spawns are along the eastern edge of the map. Of their two possible deployment points, one is to the north in the hills, in line with Ammo Depot - here, the faction's light vehicles are found along the road checkpoint for the port, in addition to two vehicle resupply stations and two sets of ammo and health caches. For defense around the checkpoint, two Pak 40s, a Flak 38 and a Vickers are set up in emplaced positions.
The southern spawn is around the port facilities to the south. This eastern section of the railyard offers players spawning on it protection in the form of large piles of ore, a Flak gun and three Pak 40s, one of which is set up at the end of a jetty, covering the waterline. Health and Ammo can be retrieved from either side of the rail track. Another Halftrack spawns here with a Pak 40 ready in tow.
Around both German deployments, Engineer combat roles players can build additional emplaced Pak 40s.
Flags
A: Artillery Base
The Artillery Base is at the summit of a hill dotted with pine trees, known simply as North Hill, in the north-east of Narvik. The hill is bordered by uneven high ground to the west, where several unusable heavy howitzers are emplaced amongst concrete pillboxes, watching over the fjord. Only a small section of the capture zone is dedicated to this area however, with the main body being centered around flattened section of the ascent, where two houses have be built, one south and one east of an open air storage area for munitions. The yard between these structures is quite open aside from heaped snowdrifts around the perimeter and the few trees, making the houses the most substantial choice of protection.
In Conquest, the base features two Flak 38 positions, with in the front yard of the eastern house, and the other nearer the bunkers on the North Hill overlook - this second gun can be further shielded with sandbag walls. A Pak 40 covers the north side approach, and two Vickers guns can be used to watch the low ground and ravine viaduct to the direct east. A Flak 38 can be built atop a climbable fuel silo at the west end of said viaduct. A Kettenkrad spawns here when seized.
B: Train
The Train flag is around the south-west section of the bay. It is the point where the western Train Yard meets up with the large docking platform that spans waterline across the map's southern edge. A stationary cargo train divides the upper deck of the double-level platform into two lanes, to the sides of which are modest cover positions in the form a shipping crates and low piles of ore. A roofed shelter, on of three on the whole platform, falls within the capture zone on the west side. Aside from the structure itself, the flag radius spreads to a low beach on the south side, permitting captures from the shoreline and even underneath the bridge's supporting arches. Scaffolding and ladders along each side of the dock can be scaled to reach the raised sections. Additionally, the ravine road that passes by to the north can similarly be used to influence the flag status.
A Vickers guns can be built amongst the reinforcement points around this shelter comprising the eastern portion of the upper deck capture zone. It is orientated along the length of the dock westwards. Directly below on the lower platform is an ammo cache, with no accompanying health station nearby. Directly west at the lip of the Train Yard hill is a Pak 40 and Flak 38.
C: Town
The Town flag is in the middle of the built up urban section of the map's northern half. The town consists of rows of detached, multi-storey detached houses, some intact, some heavily damaged, and others completely burned out or left and blasted hulks. The capture point itself amounts to an unkempt snowy courtyard surrounded by all sides by buildings of various states of repair. The terrain slopes downhill to the south at an increasingly steep rate - in this way, the second storeys of houses that line the south side of the capture zone are lower than the top of the hill. As the flag is in the open middle ground, players utilising the house cover will be predominantly on the outer perimeter, and so will be slow to influence flag capture. These covered positions can be reduced with explosives, and subsequently built back up again using the fortifications system.
A Vehicle resupply station is found along the northern road that passes through the town center, although tank traps can be built along the road to stop vehicles from entering the capture point. Health is on the west side of the inner yard and Ammo can be taken from a cache in a destroyed house on the east side.
D: Loading Bay
The Loading Bay is in the map's south center, and is at the east end of the raised docking platform that straddles the edge of the bay. Once the site at which ships would take on their metalliferous earthen cargo, the structure has sustained severe damage, with splintered timber, twisted rail tracks and upturned rail carts jutting out of the massive ramp of debris. As with Train, the flag can be captured from both the upper and lower sections of the dock bridge, with the elevated platform offering good sightlines over the surrounding area at the cost of leaving players exposed from fire from the northern hills. The lower level is safer, but still in enfilade along the horizontal axis. Both spaces can be reinforced with sandbag wall cover. Unlike Train, the capture zone is much larger and more spread out, allowing players to capture the point from behind the rows of derailed ore trucks that litter the otherwise open ground level, or by hiding under the structure's archways. The flag can again be captured from the water at certain points.
Ammo and Health stations are found on the lower and upper sections of the dock, respectively. A vehicle repair station is along the north side of the middle of the bridge, next to another Ammo cache and in line with the ravine crossed by a narrow rail viaduct further north.
E: Ammo Depot
The Ammo Depot consists of a fortified cluster of houses on the east side of town - in addition to the two intact multi-storeys and one smaller outbuilding facing the main road on the west side, the capture zone encompasses a battery of gun positions dug into a high cliff to the north-east. This gun line, made up of two Vickers, a Pak 40 and a Flak 38, definitely cover the low ground and surrounding streets between the Depot and the central Town objective. Along the zone's southern edge are another pair of Vickers and a Pak gun. The Ammo and Health stations are close by in the back gardens of the houses.
A Kettenkrad spawns on this flag when captured.
F: Ore Depot
The Ore Depot is within the east dockyards. It consists of two buildings across from one another in an open compound surrounded by wire fence. Aside from the structures, the edges of the capture zone are full of cover, ranging from stacks of crates, lumber and iron as well as stationary train cars around the north side, however the flat, low-lying position is exposed to fire from the tops of the ore heaps, the raised conveyor belts, and the hillside to the north. Outside of the capture zone around the west side, mounded fighting positions and tank traps can be built to impede attackers coming along the rail tracks or cutting between the ore stacks.
A Vickers is set up south-east of the flag, and can be used to stop advances along the generally uncovered shoreline. A Flak 38 is found in a pit behind the eastern house, and another Pak 40 is found on the north side of the tracks, pointed towards Loading Bay - it is close to a vehicle repair station. Health and Ammo caches are found the in the middle ground between the two buildings.
Grand Operations
Narvik is the first map in a Fall of Norway Grand Operation concerning the British counterstroke against German-occupied Norway.
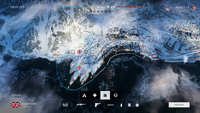
Airborne
On Day 1, as the Allied fleet enters the ice-free Fjord to offload an amphibious invasion fleet, airborne troops are sent ahead to take out the German coastal defenses prepped to soften up the approaching land contingent. Airborne takes place at night, with the Aurora Borealis casting an unearthly light over the map, which is not overly dark due to the heavy presence of reflective snow.
Deployments
The Attacker's aircraft approach from the south-west, flying over the fjord's waters and passing over the main body of objectives, typically arriving in groups of three. In the first wave, all players and deployed along the beach area known as Coast, which serves as the spawn point for the team's bombs.
The German's two base deployment points are around the eastern end of the docking platform, the Conquest objective of Train. Alternatively, they deploy to the east of Artillery Base.
Objectives
Four objectives are present in this mode, with the British team allocated a maximum of two bombs. Once one gun remains, the British must complete the mission with a single bomb only.
A
The nearest gun to the British deployment is at the western end of the Train Yard, along with a Health and Ammo Station. The wire perimeter can be fortified with sandbag walls in order to limit access points to attackers, who may still advance along the length of the train yard using the southern slope before doubling back to attack the spike the gun.
B
Objective B is to the north-east of A, atop a ridge lined with Pillboxes that overlooks the first gun - this is South Hill. The lip of the ridge can similarly be built up with sandbags, and offers a commanding view of the Coast and the initial drop zones.
C
Gun C is close to B, but shifted slightly north along the summit of North Hill. The position is vulnerable to being attacked from the blind western slope, where several nearby ridges can hide the approach of attackers.
D
The final gun is the nearest to the Artillery Base, again further north of guns B and C.
Outcomes
For the attackers, destroying all four guns will cripple the German defensive strategy, winning a major victory and allowing the landing fleet to reach shore virtually unopposed. Destroying between two and three guns will net the British a minor victory or draw respectively, with some losses inflicted before resuming operations on Day 2. If one or no guns were destroyed, a minor or major defeat is inflicted on the attackers, and heavy losses are reported amongst their assault wave.
Regardless of outcome, the Germans are unable to completely destroy the British fleet, with the land assault scheduled for daybreak.
Breakthrough
The landed British forces make a bid to retake the town and its valuable port facilities from the German defenders, now supported by tanks and combat aircraft. Teams can be reinforced with one tank and two armored gun carriers concurrently.
Sector 1
In the first sector, objective A is the Artillery Base and objective B is Train.
The British attack is made with two tanks, two transport vehicles and two aircraft.
Sector 2
The next set of objectives are Town and Loading Bay, respectively. The British lose all aircraft support briefly for this stage.
Sector 3
In the final stage, the British are tasked with attacking the main German facilities at Ammo Depot and Ore Depot. At this point, the defenders receive substantial heavy armor support in the form of the four tanks, as well as two combat aircraft. Comparatively, the attacker tank force is reduced to a single tank, but their two aircraft return to battle.
Outcomes
If the British are successful in overcoming all three sectors, the Germans retreat to Fjell 652 to make their last stand in Norway.
Squad Conquest
Squad Conquest became playable on Narvik and Devastation on July 4th 2019 as part of Defying The Odds Update #2. Its focus is on the west side of the map, with the play area consisting of the pillbox-adorned hill and Artillery Base. Map boundaries prevent players from flanking along the map length via the southern base of the hill, requiring team face each other head on across the relatively narrow diameter summit. In addition, all capture zone are very small, sparsely furnished with cover and quite close together, leading predominately to CQB-style engagements.
Each team starts a round with 160 tickets. No vehicles are available in this mode, and each flag has Health and Ammo stations within their capture zones.
Deployments
British Deployment
The British spawn in the Railyard at the foot of the South Hill. Although the train cars and light forest screen the approach somewhat, if the team loses control of the nearby Checkpoint flag they may be fired directly on upon spawning from the top of the cliff.
German Deployment
The German side deploy from the Ravine down the northern slope from Artillery Base. Their spawn location is protected by the depression until they crest the ridge, although the map boundaries does provide some opportunity to bypass the adjacent Holberg's flag using the roadway to the northeast.
Flags
A: Checkpoint
The Checkpoint objective consists of a single pillbox and sandbag fighting position on the southeastern lip of the South Hill, directly overlooking the Yard.
B: North Hill
The North Hill objective is located on the edge of the western slope of the Hill. Aside from a nearby pine thicket and a number of dividing snowdrifts around its perimeter, the flag lacks any sort of identifiable feature. Its precarious position allows players to flank around the base of the hill to avoid frontal engagement.
C: Holberg's
Holberg's is the northernmost of the two houses around the Artillery Base, with a capture zone that includes the building interior, a small line around its perimeter, and the front yard to the south. The flag offers the most substantial cover position of all objectives so long as the house remains intact.
Team Deathmatch
The focus of Team Deathmatch is the Town area, which is accessible in its entirety from Ammo Depot and Checkpoint to the east, the Upper Ridge to the north, and Crossroads to the west. The large hill that separates the town from the docks serves as the map's southern boundary. All of the stationary weapons found in Conquest, such as the HMGs and anti-tank guns to the north and south of Ammo Depot, appear and are functional in this mode as well.
Frontlines
Frontlines on Narvik occurs along the map's northern axis, taking players through the destroyed Town to the Artillery Base hill, or vice versa. Most of the objective areas are very small with obtrusive sightlines within them, encouraging close-quarters combat. In addition, the five objectives tend to be rather close together - no more than 100m in general and as little as 30m between Holberg's and Checkpoint. The effect of this is that there is very little time to reorganize once a position is lost, and can lead to snowballing momentum for whichever team gains the initial foothold.
Each team fields one tank each, with a further one tank and two gun carriers allowed through Squad Reinforcements.
British Headquarters
The British base objectives are found within the Train Yard in the low ground behind the Artillery Base hill. Objective A is by the northwest corner of the Yard, closer to the base of the hill, while Objective B is further back, behind the trains in the southeast corner. Defense of the objectives is aided by the terrain - although German occupation of the overlooking ridge allows them to effectively cover the infantry assault downhill, the lack of cover in the ground between in addition to the ample, sturdy cover around the trainyard can prove vital. However, the position is vulnerable to a German flank around the east side, as this negates much of the cover provided by the stationary train cars.
A: Checkpoint
Checkpoint is concentrated on the approximate location of the Squad Conquest objective of North Hill, somewhat confusing located on the lip of the ridge of South Hill, north of the Train Yard. Although the position does not look directly over the British Headquarters sector beyond the ridge, the Allied team may have a difficult job of counterattacking if they are pushed completely off the hill because of its elevated position, but may flank around its sides to the west and east and attack the position from the rear, if needs must.
B: Holberg's
Holberg's is more towards the traditional Conquest location of Artillery Base, and is directly south along the North Hill summit from the central objective. The capture zone includes the open ground around the green chalet standing on the East Hill edge, as well as the building interior itself. The house is, aside from a destructible pile of lumber, the only substantial cover inside the diminutive capture area.
C: Artillery
The central objective is known as Artillery. It is to the northeast of the standard Artillery Base position on the North Hill plateau, with the capture zone centered precariously on the lip of the ridge overlooking the low ground between it and the Town. The radius extends some way down the cliff, allowing the German team to capture the flag from within the defilade of the Ravine. On the hill crest, large snowdrifts, trees and indestructible canvas-covered obstacles break up direct line of sight between onrushing teams.
D: Crossroads
The Crossroads objective is down the hill from Artillery along the western approach to the Town, amongst a set of razed buildings. Reaching the objective can be difficult for both sides, as both the clifftop Artillery base and the three-storey houses on the edge of Town provide excellent overwatch positions over an objective area mostly lacking in overhead cover. Inside the small capture zone however the many half-standing wooden walls and debris piles obfuscates line of sight, generating plenty of directional hiding spots for close-quarters ambush.
E: Village
The Village objective is located within the Town in the map center. The capture zone is a little smaller than the Conquest variant of Town by no longer encompassing the buildings to the west and south and being more focused on the sloping stretch of open ground that the houses surround. The flag can be seized from the interior of the lone building on the north side of the zone as well as the burned down house adjacent.
German Headquarters
The German base objectives are on the opposite side of the town, around the razed town block on the way to Ammo Depot. Objective A is on the northwest side of the area in the concrete foundations of a destroyed house, while objective B is further to the rear, in the back yard of the row of houses within the Ammo Depot itself. Unlike the British Headquarters, the debris-strewn area generally limits fields of fire for the defenders and opportunities to pick off the attacking team at range.
Domination
Domination takes place across the map center. In addition to the Town area, the Ore Depot, North Hill and a portion of the Loading Dock is also accessible.
A: Town
The Town objective is located in the clearing between buildings in the middle of the Town proper. The capture zone includes the open, sloping ground in addition to the three buildings to the south, two to the north and the single razed structure to the east.
B: Loading Bay
The Loading Bay objective is moved eastwards relative to its Conquest location, now centering on the destroyed buildings by the water's edge adjacent to the ore piles between the bay and Ore Depot.
C: Ammo Depot
The Ammo Depot is largely unchanged, both in terms of location and capture radius, from its appearance in Conquest.
Rush
Rush was available on Narvik, as well as Devastation and Twisted Steel, between March 7th to 20th 2019 as part of Tides of War chapter two Lightning Strikes.
One tank is allocated to the attackers for all stages.
Sector 1
The first sector is located on the east side of the map, with the British attacking out of the Conquest deployment point of the Germans. The two objectives are found in the vicinity of the Ammo Depot on the outskirts of town. Objective A is the northernmost of the two, and is found in the yard on the east side of the pair of intact houses that comprise most of the point. The area comes protected by a prebuilt sandbag wall, but is still vulnerable to fire from the cliff to the northeast and the houses and ruins that overlook the area between the Depot and the British deployment. Objective B is further west, found in the foundation of a burned out house adjacent to the north road.
Sector 2
Sector two is located further into Town, with objectives either in or north of the central block used as the capture radius for Conquest. Objective A is in the area's southwestern corner, with the telegraph itself found in a small alley between buildings. Objective B is across the road to the north, in a small vacant lot usually reserved for a Vehicle Supply Station.
Sector 3
Sector three's objectives are on and around the Loading Dock. Objective A is in the middle of a group of lumber in the valley that runs under the Rail Bridge. Objective B is on the lower deck of the Dock, underneath the westernmost shelter near to the Conquest flag of Train. The former objective is somewhat vulnerable to the surrounding high ground, although the indestructible obstacles limit both line of sight and provide solid cover beside the telegraph station. The latter can be easily defended due to the overhead cover and few routes to the objective.
Sector 4
The Sector four artillery guns are located around the South Hill. Objective A is next to the concrete pillboxes overlooking the Train Yard and Beach Landing to the east, while Objective B is in the southeast corner of the Yard itself. The pillboxes and preexisting earthworks around A give defenders strong positions to fight from, but the dominant position of the hill can be difficult to retake if they are pushed off, giving access the attackers access to a commanding view over objective B.
Grind
Deployments
British Deployment
German Deployment
Flags
A: Train
B: Bay - West
C: Loading Bay
Developer Notes
Homely houses – both pristine and on-fire litter the landscape, offering plenty of hard corners, verticality and ambush opportunities. Fight along the railway to the end station and then back onto the big loading bridge that overlooks the entire map. Engage in intense firefights along the bridge or use the height advantage to control and fight in long range sniper battles - or just bunker down and use Fortifications to turn a house into a fortress." — Battlefield V Launch Notes
Gallery
")
")
")
")
")
")
")
| ||||||||||||||||||||||||||
Trivia
- The internal name for this map in Closed Alpha is MP_ArcticFjord. The name Arctic Fjord was used to refer to the map at various points during pre-release, including in official blog posts and assignment descriptions in the Open Beta.
- A Blue whale can be found on this map. The whale can be spotted swimming by the B, D, and F flags and around the destroyed battleships.[4]
- The snowman can build by fortifications system between two houses in objective A. After the Tides of War Chapter 1: Overture Update, It has been moved to north of objective A area.[5]