Operation Underground is a map of Battlefield V which was introduced on October 3rd, 2019 as part of the Battlefest event.[1] It is a reimagined version of Operation Métro from Battlefield 3 and Battlefield 4: Second Assault.[2]
Taking place in the final months of World War II, the map depicts the British Army attacking an Axis stronghold located beneath the streets of an unidentified German city. Following their crossing of the Rhine River during Operation Varsity in late March 1945, the British advanced eastwards towards the Elbe and the Baltic Sea, forming the northern pincer of the Allied invasion of Germany.
The city of Hamburg appears to be the reference location of the map, as it was one of only two cities in Germany along with Berlin to have an underground railway, or Untergrund-Bahn. Plus, Operation Underground highlights the bombardment that Hamburg did suffered in history (which presented in My Country Calling),[3] and the town hall (Rathaus) of Hamburg is indeed right next to the metro and the river. Hamburg was one of the last remaining pockets of resistance in the northwest, it fell to the British on May 3rd, less than a week before the final German surrender and the end of the war in Europe.
Overview[]

Overview
Operation Underground takes place in the ruins of a sprawling riverside city. Once industrious, with a skyline of smokestacks and neat rows of townhouses, the urban expanse has disintegrated under the weight of years of strategic bombing, leaving no building unscarred and no road without craters. Yet even as the end draws near, a final futile battle must be fought for what remains - regime banners drape from every facade and lamppost, demanding a defiant last stand, while artillery bursts and droning propaganda loudspeakers, echoing across the canal and throughout the devastated streets, form the backing choir of the city's swan song. The battle has seemingly claimed all spaces within the city - bombers can be seen blanketing positions across the river, while Spitfires circle above the ash clouds like opportunistic buzzards, pouncing on targets on the shattered streets below. To escape the bombing the enemy has seemingly retreated underground, but when a V-1 Rocket strike aimed at the British HQ inadvertently reveals their refuge in the metro tunnels underneath the Rathausplatz city station, a second frontline forms below the city surface.
Above ground the combination of wide, tramway-lined boulevards and rows of ruined but widely accessible multi-story terrace houses, as found at either far end of the map, is a familiar setting. While relatively restricted compared to Rotterdam and Devastation due to map boundaries, they nonetheless offer both open sightlines for longer range engagements as well as confined interiors and back alleys that predominately favor close quarters fighting. However in the underground areas that comprise the map center, which cannot be bypassed on street level, infantry engagements are unlikely to occur beyond short range. Within the main tunnels train cars and supporting columns break up lines of sight considerably, while along the flanks, in amongst a network of poorly lit utility corridors and interconnecting smaller rooms, there are even more blind corners, narrow doorways and object clutter, further inducing a sense of claustrophobia.
In comparison to the previous iterations of Operation Métro, the play area is shorter with only around 200m of underground tunnel end-to-end, but has been expanded laterally in the center with more branching pathways to the sides of the main route. This offers players more opportunities for flanking than before, although bottlenecks can still occur around the many doorways and tight passages within, and some entryways can be blocked completely using Fortifications. Despite this, Operation Underground is still quite small compared to other maps, which prevents use of vehicles of any kind. Furthermore, with the main body of the map taking place underground, Squad Reinforcements are limited to Supply Canister Drops and Smoke Barrages. The map also contains a Levolution-like event where the metro floods at specific times, indicated by a warning claxon and loudspeaker broadcast. Afterwards, new routes open up as they are drained, while other areas that could previously be walked through become submerged.
Flag Layout[]
| Control Point | Conquest | Breakthrough | Squad Conquest | Rush |
|---|---|---|---|---|
| British Deployment | ||||
| Crossroads | A | 1A | 1A, 1B | |
| Train Station | B | 2B | B | 2B 3A, 3B |
| Construction Site | 2A | A | 2A | |
| Hallway | C | |||
| Town Hall (Plaza) | C | 3A | 4A, 4B | |
| German Deployment | ||||
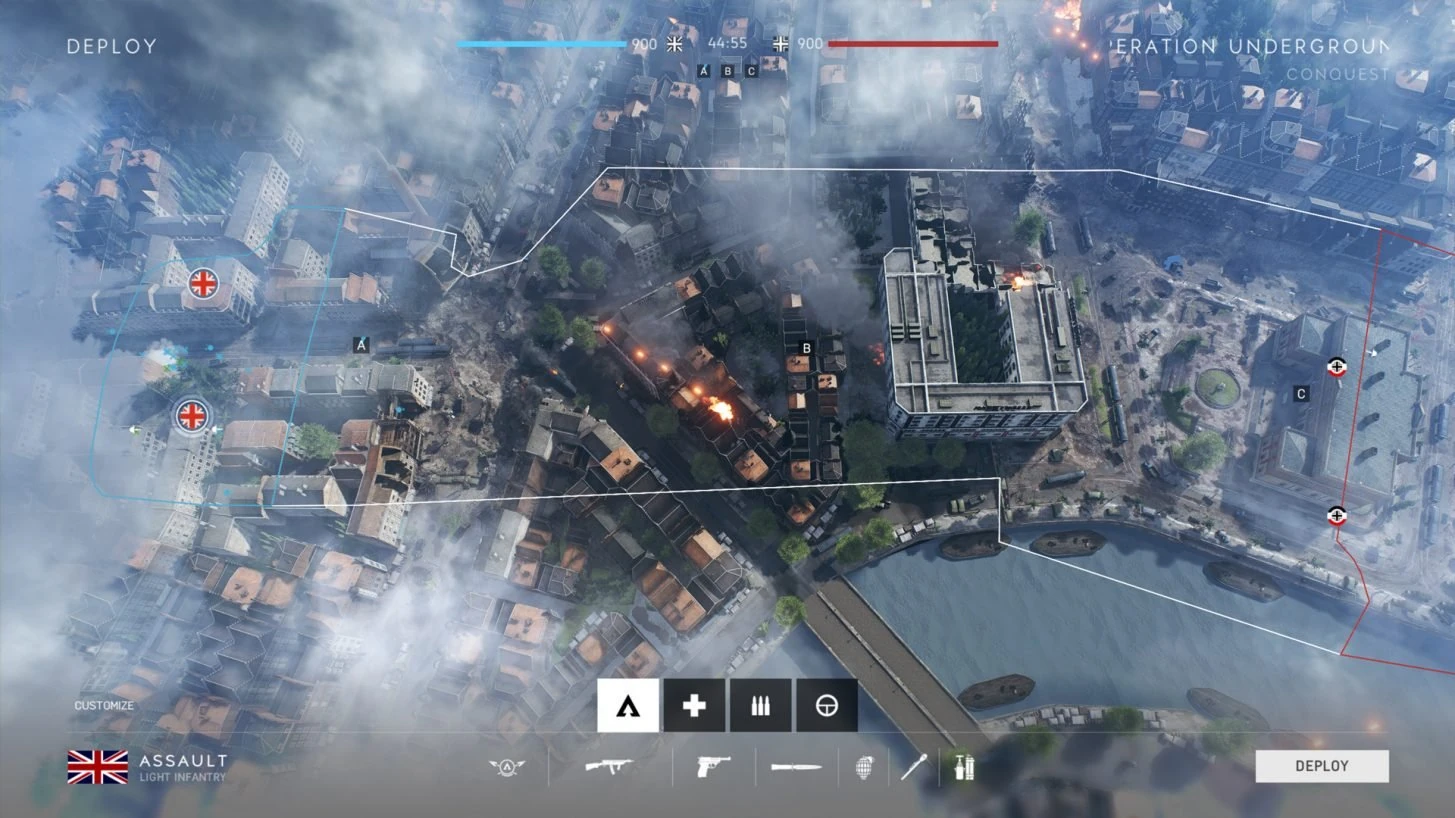
Conquest[]
Conquest is fought between three objectives, two of which are at street level with the central Train Station flag located underground. Despite substantial changes in layout and time period, Operation Underground recaptures much of the spirit of its predecessors, offering a room-by-room, corridor-by-corridor melee by way of frenetic close quarters combat, but with more options for alternate routes within this compressed version of the underground station. Although there is no risk of a roof cave-in as seen in Battlefield 4, this version includes new environmental hazards such as explosive fuel barrels on the station platform, as well as the sudden flooding of narrow passageways of the utility areas that can trap and drown players should they lose their bearings. Other differences include the warmer-hued color palette of the map, and brighter lighting in the main interior areas of the complex.
With 900 starting tickets, more than any other Conquest map seen thus far, Operation Underground has the potential to produce lengthy matches, especially since ticket bleed is limited by the low number of flags and stalemates are relatively common. This is balanced somewhat by the large number of player deaths expected each round.
Operation Underground is also one of a few maps known to feature a spawn-based comeback mechanic. Considering the highly linear layout of the map whole as well as the small, route-restricted spawn areas, in the event that a team controls all three flags, members of the opposing team have the option of spawning in the map center by selecting their deployment point, allowing them to bypass any frontline formed around their spawn and thus giving them a chance of capturing an unoccupied flag and regaining a foothold.
Deployment[]
British Deployment[]
The British Deployment is on the south side of the map, about 40m along the street from the Crossroads objective. Their spawn area is itself a Crossroad, being at the junction between the Main HQ Street and the intersecting Supply/Hotel Courtyard Street. HQ 1, their primary spawn, is directly north of the Supply Courtyard, in a cramped cul-de-sac that includes a pair of Resupply Stations and two pre-built Vickers HMGs, useful for defending the street separating HQ 1 from the team's secondary spawn of HQ 2, which is across the street to the east. HQ 2 is found in a T-shaped walled plaza that looks directly onto Hotel Courtyard. This area contains another set of Supply Caches as well as three more HMG positions.
If the enemy team captures all three flags, players spawning on the headquarters will instead spawn inside the metro station, either on the south section of the Station Platform area, or somewhere in the Utility/Shelter section on the west side of the tunnels.
")
")
")
German Deployment[]
The Germans deploy in a courtyard to the rear of the Town Hall building, on the northern end of the map. Similar in layout to their deployment on Rotterdam, the area is surrounded by a tall brick wall reinforced with sandbags and firing steps, supported by no less than six Stationary MG34s, which allow the Germans to put up some resistance against any enemies encroaching on their spawn from across the street. Nevertheless the team's deployment area is even smaller and lacking in exit routes compared to the British's - there is less than 30m between the team's two deploy points, with the secondary site being around the Corner House by the map boundary barricades at the north end of Town Hall Street.
Each HQ has a Health and Ammo Station nearby. When the British hold all flags, spawning on the deployment will deposit players either beneath the Ticket Hall or in the Construction Site zone of the underground.
")
Flags[]
A: Crossroads[]
The Crossroads is one of two above-ground objectives, found on the south side of the map. Previously used as a staging area for personnel and supplies arriving by train, after a direct hit from a V-1 Rocket all that remains of the Crossroad itself is a smouldering 30m wide crater. The actual objective area is slightly further up the street to the south. Although the capture area of this flag is of a comparable size to the others on the map, the Crossroads objective focuses not on a single section of tunnel or building, but covers an entire city block and all the structures and alleyways therein. As a result, the capture zone can be considered as split into three areas; the street, the Hotel and the Supply Courtyard.
The flag itself is located directly in the middle of the Main Street boulevard, next to a backed up line of streetcars. On either side of the street are rows of partially destroyed buildings, most of which are enterable, which look onto the street and Crossroads from a height of up to four stories. On the east side of the street is the Hotel and its courtyard, the latter being a closed-off pair of alleyways leading from the British secondary spawn. The Hotel is made up of a semi-circular ring of buildings, rooms of which are almost entirely furnished with bookcases, of which only the first and second stories are accessible. Along with an apartment-style stairwell at either end of the semicircle, a collapsed section of floor in a gutted portion of the building serves as an alternate ramp up. Behind the row of buildings across the street from Hotel is the Supply Courtyard, consisting of an L-shaped loading bay for trucks. As with Hotel, the Courtyard itself is looked upon by several multi-story buildings, some of which are only enterable after building a Long Walkway Fortification. On the north side of the area is a building skeleton, which provides both access to the Main Street boulevard as well as firing positions on the remains of each of its devastated floors via a neighbouring building.
With the open street being thoroughly covered from above via the tall buildings, environmental protection in this area is notably lacking. While players can find shelter in isolated, single room shopfronts on street level or inside caved in house facades, most will gravitate to the surrounding enterable terraces for protection. This can potentially produce a varied environment for gunfights, with opponents facing each other from windows across the street from one another, fighting for ever higher vantage points in the ruins. At the same time, control over the buildings is usually the outcome of room clearing actions, fought at close-quarters, during which players can make extensive use of interior Fortifications that allow them to better reinforce their cover.
Supply Stations occupy the four outer corners of the capture area - tucked into ground floor recesses such as the café below the Hotel or by the cargo trucks at Supply Courtyard. Ammo can be picked up from the southeast and northwest corners, while Health can be resupplied from the alternate corners. A further three Vickers HMG positions can be built facing north - one is atop boxes looking over the brick wall on the south side of Supply Courtyard; another is within a ring of sandbags in the middle of the Main Street; the last is at the deployment end of the westernmost alleyway leading into Hotel Courtyard.
To the north of the flag is the bowl-like V-1 crater that grants access to the underground railway line. It has three possible entrances. The west passage is the narrowest, taking players through linear service corridors up through the Utility Area and Shelter. The middle passage takes players along the main tunnel, which is two tracks wide, and is joined to the east entrance and its single track tunnel via a series of maintenance platforms. The east tunnel also houses an additional Health and Ammo station near the exit into the bottom the crater.
")
")
")
")
")
")
")
")
")
")
B: Train Station[]
As one would expect from the map name, one of the most substantial sections of Operation Underground in terms of size and complexity are the below ground areas surrounding the centrally located Train Station flag.
The middle section of the area is the Rathausplatz station itself, which includes one lane of double tracks and one single track, separated by passenger platforms at each side. Comparatively spacious and well-lit, the linear nature of the tunnel grants the best opportunities for long-range combat within the subsurface section of the map, although line of sight may be broken by low ceilings, supporting columns and walled-off stairwells. Along the tracks are a number of stopped passenger carriages and cargo wagons, reflecting the station's dual use as a military transport and supply artery in and out of the city. These carriages can be travelled through and used as cover, but can also be destroyed with explosives - in either case, they too add to the obfuscation within the main metro area.
The flag itself is within the platform area, suspended above the tracks within a pedestrian overpass. The four windows of the overpass overlook the track area in both directions, with a further four, symmetrically-positioned staircases leading up to the walkway from the train platform located at its ends. Makeshift ramps from the train tracks through the windows can be constructed with the Toolbox. Aside from a number of metal cases and hazardous explosive barrels, the narrow and enclosed oblong overpass is lacking in cover along its length. The main method of defending the area is to cover the staircases up, and reinforce the cover around the windows using sandbags and a maximum of four HMG positions, emplaced by Support players.
Despite the tactical advantages of holding the overpass, the flag can be seized from other areas within the station, as the capture zone is quite expansive. This includes the platform and train tracks below and to the sides of the overpass, as well as a large portion of the west side of the complex, known as the Construction Site. The Construction Site consists of a train tunnel in the midst of being built, having been excavated but with unfinished walls and floors. The majority of cover within these undeveloped chambers are dirt piles and stacks of construction supplies, as well as the occasional broken-down excavator. While lacking in this regard, the closed-off nature of the three rooms within Construction Site may better allow players to influence flag capture from its location, and despite the leaky ceiling and rudimentary construction lamp lighting, visibility throughout the area is good because of the overall lack of visual clutter.
Yet more distinct sections of the underground lie outside the capture zone. On the west side, the Construction Site continues northwards before reaching the outside, while towards the southern end, the Shelter and Utility Halls can be found. The Utility Halls are a pair of parallel hallways with a number of small office rooms branched off from them. This area, while tough to navigate for infantry due to the potential number of chokepoints, provides a mostly uninterrupted path from Crossroads to Shelter. An HMG can be built near the south end of the west corridor, facing along its length. The Shelter is an extension of the Utility area, where two large chambers have been converted into a below-ground refuge for soldiers and civilians alike. The rows of three-man bunks turn the location into a sort of improvised hedge maze, while stacks of suitcases, tattered fabric partitions, sandbag barricades, dim emergency lighting and steam shooting from the pipes in the ceiling above, create a visually oppressive and chaotic atmosphere. The two bunkrooms, one of which is short and wide and the other long and narrow, are side by side with one another, and are linked with the similarly adjacent Utility, Train Platform and Construction Site areas by a number of double door entryways.
The east side of the station is far more limited. Reachable from the single track tunnel using stairwells down, the waterlogged, dank and barely lit Generator Halls are about the same width as the Utility Halls, but with the unfinished aesthetic of Construction Site. These narrow passages, which are so named for containing a bank of sparking generator turbines positioned beneath a grate from street level that lets in sunlight, provide in effect a direct route through the entire length of the station which can be useful for flanking. Besides offering little cover, the area can be uniquely hazardous because of a tendency to suddenly flood - starting with ankle deep water, the chambers can quickly fill up the entire room, drowning players caught unawares. The only escape is to find an air pocket around the handful of stairwells back up to the platform.
The Generator and Utility Hallways are further connected by a corridor that runs beneath the Train Platform itself, but the path is always completely flooded, requiring players to dive beneath the surface to use it. Too long to travel through in a single breath, pockets of air can be found by staircases at intervals along its length, but these spaces are cramped and can only accommodate a few players at once. Although useful for getting across the Platform area undetected, any indecision or confrontation in this unlit, claustrophobic tunnel can mean certain death for any involved parties. In an air pocket midway along the tunnel, players may also construct a Battle Pickup station and obtain an Flamethrower.
At the far northern end of the station is the Ticket Hall, which like the overpass is suspended above the train tracks with two staircases up and with a bevy of windows looking out onto the Platform from on high. The Hall is a long, high ceiling antechamber with green tile pillars, ticket booths, customer gates and not much else by way of concealment. Its main entrance is on the north side, and is comprised of a long row of glass doorways, with two other smaller entrances at their sides. Players inside the Hall can find themselves blinded by the glare of daylight pouring in through the windowed front, but should be wary that enemies outside looking in can see those inside the Hall much clearer. As with the Crossroads, there are three other exits to street level from the Tunnel, via the Construction Site and east and west train tracks, respectively.
The Underground is full of Health and Ammo Caches, usually grouped in pairs one of each, and found at various sections of the station. Such pairings can be found in the Shelter, the Generator Hall, and both within and below the Ticket Hall, amongst others.
")
")
")
")
")
")
")
")
")
")
")
")
")
")
")
")
")
")
")
")
")
")
C: Town Hall[]
The Town Hall objective, also referred to as the Plaza, is located on street level on the northern end of the map by the canal waterfront. The primary focus of the flag is the Town Hall building, a stately red brick, n-shaped manor house endowed on the exterior with ornate marble statues and German flags, with similarly refined decorations indoors. The building has recently become the local headquarters for German forces within the city. In contrast with the the ramshackle, packed-in buildings surrounding it, the Town Hall stands isolated and undamaged in the middle of a large Plaza, encircled by a loop of roads alike in width and appearance to those around the Crossroads. The capture zone for the flag encompasses much of the building interior and the Plaza to the front of the building.
Both the Town Hall building and the Plaza are slightly raised up from the street by foundations, requiring stairs to reach them. The Plaza is a square paved area with steps up on three sides, the north side having more steps up to the Town Hall main entrance terrace. It is marked by a central, circular flowerbed housing a copper statue of a scholarly figure, worn and rusted with age. The Plaza, as well as much of the outer perimeter of the Town Hall, is further surrounded by an array of marble walls, hedges and planters, all of about waist height, together providing rudimentary cover in an area that is otherwise lacking in it. To improve this, the open spaces of the Plaza and terrace can be used to build extensive sandbag fortifications, allowing the Ticket Hall Street to the south to be covered with a cluster of three buildable HMGs and a set of resupply stations. A further two HMGs are located at the sides of the building, covering the perimeter pathway and the adjacent Town Hall and Waterfront Streets, located west and east of the building, respectively.
Although the Town Hall looks to be around three stories tall, only the ground floor of the building is accessible, as the staircases in the main entrance foyer are found barricaded with furniture. Including the foyer, there are a total of thirteen rooms within the building, consisting of larger meeting rooms along the front of the building, smaller offices at the sides, and a long veranda hallway running along the width of the building to the rear - the latter of which falls outside the capture zone. These spaces are lacking in conventional cover, being instead lavishly furnished with desks, chairs, bookcases and filing cabinets, the majority of which are poorly positioned for concealment and materially weak to gunfire. Combat in this area is not much of a departure from the rest of the map, occurring across rooms as little as 7m in length and with not much in the way of obstacles between, however most rooms have plentiful windows which offer both a shooting position against the exterior for defenders and a potential entry point for attackers. Most of these can in turn be boarded up with sandbags to deter entry.
The area surrounding the capture zone consists mostly of wide, heavily cratered streets clogged with vehicle wrecks which, in the event of a long range exchange of fire between the flag and the metro, form the basis of bounding cover when approaching from either the Ticket Hall or the German deployment. As mentioned previously, the Town Hall Street on the west side of the building can be recognised by unearthed under-road sewer pipes which players can crawl through, bordered by a row of charred terrace houses which can be similarly occupied. This road connects the German secondary spawn with the western entrance to the Underground, namely a small breach underneath a Cinema that joins with Construction Site. The Cinema is just one storefront within the large white market hall building of which the Rathausplatz U-Bahn station forms its basement and the Ticket Hall its ground floor. The Ticket Hall Street runs between the front of the market hall building and the plaza, and is lined with trams. In addition to the main Ticket Hall entrance, craters in the road give players two further access points into the metro tunnels - combined with the west entrance, they mirror the three underground access points on the Crossroads side of the map. Finally, the Waterfront street lies parallel with the canal to the east. Here, players can dip below street level using a pedestrian wharf, allowing unobserved movement about the flanks of the Town Hall. There is also a barge beside the wharf that can potentially be used to hide a Spawn Beacon.
")
")
")
")
")
")
")
")
")
")
")
")
")
")
")
")
")
")
Breakthrough[]
In Breakthrough, the British aim to take out the German headquarters within the Town Hall district, thereby hopefully ending fighting within the city. To reach their objective, they must breach the depths of the heavily fortified metro station before carrying on the assault out the other end.
With limited options for advancing other than a frontal assault, and objectives frequently being relegated to one flag per sector, the attack is expected to be a bloodbath. As such, the British are allocated an unprecedented 600 respawn tickets to conduct the three-phase plan for a decisive breakthrough and subsequent capture of the city.
Sector 1[]
In the first stage, the British launch the assault from their southern HQ sector to seize the collapsed metro tunnel entrance at Crossroads. The objective area is almost identical to that of Conquest, meaning that the flag can be seized from the Main Street, Hotel and Supply Courtyards, or any of their associated buildings. A direct, linear line of assault is unavoidable, as attackers have a choice of only three routes of advance and few opportunities for flanking. The flag itself remains at Street level, meaning those nearby will more heavily impact flag capture but will put themselves in greater danger of enfilade fire from the upper floors of adjacent buildings. These buildings are further suited to covering the Courtyard areas, as cover is still lacking in these areas, from above - the windows of the Hotel look directly onto the tightly enclosed alleyway approaches, while in the case of the more open but ostensibly better covered Supply Courtyard, defenders can access elevated shooting positions on all four sides of the area. Attackers must find a way of neutralising these strongpoints, usually with combination of a liberal use of Smoke and close combat, allowing teammates to close the distance and gain a foothold within the zone.
One of the few advantages available to the attackers at this stage is their sector deployment position. With the flag contested, any Germans not spawning on squad members will be deposited within the underground at the bottom of the crater, whereas the distance between the capture zone and the British deployment is as little as 40m. This potentially allows the attackers reinforce quicker while also blocking incoming defender reinforcements by covering the exit ramps from the crater, thus gradually swaying capture momentum in their favor.
Sector 2[]
With the entrance to the tunnels secured, combat continues inside the underground station itself. The attackers must now take and concurrently hold two objectives - Construction Site and Train Station. The largest of the two capture areas is the Construction Site, which covers the southern half of the largest of the two excavated chambers, on the west side of the complex. Although the area within the capture zone is essentially a large oblong room, there is a cavern-like branch off towards the northern end of the radius that allows players to hide within. Furthermore, the flag can be captured from the multi-door stairwell entrance leading to the underwater passage from the Generator Halls. Objective B, the Train Station, is different from Conquest in that it can only be captured from the upper deck of the windowed walkway, halfway along the length of the main Platform tunnel. In addition to its powerful defensive reach over the Platform below, the area has additional Fortifications options over Conquest that permit defenders to fully entrench themselves by blocking the two south-facing stairwells up, and are self-sufficient in Health and Ammunition resources thanks to the nearby bank of Supply Stations.
Attackers are granted much greater freedom at this stage, although are still initially limited by lack of approach angles, having to force themselves through three possible bottlenecks near the crater entrance. The most direct route towards Construction Site takes the British through the heavily confined Utility and Shelter sections, where most halls and doorways are wide enough to accommodate just two players standing shoulder-to-shoulder. In some cases these halls can be further blocked by sandbag barricades. The approaches through the track tunnels are wider, but similarly lacking in cover, with the Platform ahead of the tunnel mouth also able to be built up with fortifications. Once this frontline has been bypassed however, attackers are given free reign within the metro, being stopped by boundaries just short of the Ticket Hall. In general this allows both flags to be attacked from behind where Fortifications options are more limited, also enabling swimming between the Construction Site and the Generator Hall via the submerged passage.
Sector 3[]
The ultimate objective, the German headquarters in the Town Hall, comes into focus during sector three once attackers leave the confines of the U-Bahn. As with the first sector, the flag uses the Conquest layout, meaning that both the Town Hall building and its perimeter garden must be swept clear of enemies. Some defenses around the Plaza are also pre-built, including a formidable triple-MG nest.
To reach the objective, attackers must first exit the metro and cross the open Ticket Hall Street before entering the capture zone. Their exit from the tunnels is usually undertaken blindly as the sun makes it difficult to see further than the immediate above-ground surroundings, and attackers may be resultingly caught out because of the lack of immediate cover on the street itself. The many craters, trams and burnt-out cars provide the only semi-solid, directional cover while on the approach. Once the Plaza has been reached, the Town Hall has a multitude of windows providing entrypoints, including at the sides and rear. At this stage, the defenders spawn is very close to the capture point, which can allow them to maintain hold of the capture zone as long as the route into the rear of the building is secure for reinforcements to funnel in through.
If the attackers capture this objective, they win the round. Deprived of leadership, and knowing the enemy invasion cannot be halted, German resistance within the city is sure to crumble.
Squad Conquest[]
Squad Conquest is set almost entirely within the Underground Station, with only each team's deployment areas being above ground. The map's three objectives are laid out parallel to one another across the central width of the map. Tickets are the mode standard count of 160. There are some structural changes to the map in this mode - most notably, the underground passage between Construction Site and the Generator Hallway is not underwater, allowing for a safer and more rapid exchange between the map's sides.
Deployments[]
British Deployment[]
The British deploy in the underground entrance Crater north of Crossroads.
German Deployment[]
The Germans deploy from the Ticket Hall Street between the Town Hall and the markethalle building.
Flags[]
A: Construction Site[]
The Construction Site objective is the westernmost of the three. It is found in the middle of the largest Construction Site chamber, in line with the cavern cut into the west wall. The capture zone extends from the cavern across to the east wall in a narrow band. It is both the most open and the most lacking in cover of the three capture points, as players standing outside the cavern are exposed to fire along the full length of the room.
B: Train Station[]
The Train Station objective is located on the passenger overpass above the central Station Platform. The capture area includes the full length of the footway, and is easily fortified due to the limited number of ways to reach it, especially since all four stairwells can be blocked by Fortifications to some degree.
C: Hallway[]
The Hallway objective is on the east side of the play area, found halfway along the Generator Hallway. The capture area is focused on the Hallway's widest part, where the under-track tunnel to Construction Site emerges - like that objective, the many blind corners and lack of inward cover, aside from concrete pillars supporting the gantry against the east wall, can result in close-range ambushes.
Team Deathmatch[]
Team Deathmatch uses the full extent of the underground metro, with only small areas above ground around either entrance falling within the play area. On the south side, players can manoeuvre all around the V-1 crater at Crossroads, although the adjacent Supply and Hotel Courtyards having been cut off from the play area along with the British HQ. On the north side, the Town Hall and German deployment are similarly inaccessible, with movement restricted to the Ticket Hall Street and Plaza immediately outside the main metro egress.
Rush[]
Rush became available on Operation Underground, along with Rotterdam and Mercury, during Battlefest Week Two taking place between 10th and 17th October 2019. The mode sees the British attacking the German-held Town Hall district and its associated U-Bahn station. Because of the small scale of the map, each of the four sectors are quite close together giving little time for both defender preparation at the start of the sector as well as during the retreat.
Sector 1[]
The first set of telegraphs are emplaced within the bombed-out city block uphill from the Crossroads, with each objective being located above ground and inside structures on either side of the Main Road. Objective A is on the first floor of the building skeleton on the west side of the road that links the north side of the Supply Courtyard to the boulevard. Players can reach the floor by scaling debris piled up at ground level, or by using the staircase in a neighbouring building. Objective B is on the first floor of the Hotel building, inside a meeting room with tables and a map board. Like A, the point is located just inside the destroyed section of the building, with a collapsed section of floor forming a ramp up.
The British launch the attack out of their Conquest spawn one block away, while the German sector spawn is further away inside the underground itself. These objectives, located above street level with only a few ways to climb up to them, and with the constricted building interiors being natural bottlenecks, are found within highly defensible positions. As a result attackers may encounter difficulty in reaching them, but once secured and armed, the positions can be used against defenders to great effect.
Sector 2[]
The next set of objectives occupy positions within the underground metro station. They are arranged in a similar layout to sector two of Breakthrough, with objective A being found in the Construction Site and objective B in the overpass above the central Station Platform. Objective A is tucked into the cavern recess made in the western wall of the Site, used to store construction equipment and supplies - the entrance can be completely barricaded with high sandbag walls, requiring explosives to get through. Meanwhile, the adjacent Construction Site room is long and open, with the majority of buildable cover being towards the defender side at the north end, orientated towards the main attacker route of advance through Shelter. Objective B can be similarly built up with obstructions on all four staircases up and HMGs with sandbag firing slits at the windows.
It and Construction Site are limited in accessibility, but the British can use bypassing corridors throughout the underground to flank and therefore negate the advantages of cover held by the Germans. As with sector one, each objective is well equipped with Fortifications and placed in areas that are initially very defender-orientated. However, the limited access routes into each objective can in turn foil counterattacks made against positions taken by attackers.
Sector 3[]
Sector three takes place inside the Ticket Hall on the north end of the station, sitting atop the main train tunnel up a flight of stairs. In a departure from previous sectors and Rush as a whole, the two objectives are located within direct line of sight and within a very short distance from each other. Objective A is found near the windows overlooking the platform, while B is located further back in the Hall on the other side of the ticket office barriers.
The arrangement of the objectives at first seems beneficial to defenders, allowing them to concentrate all their forces within a single room, defending two stairwells to their direct front. However in this sector, lenient map boundaries mean attackers may leave the metro by any of the other exits, move throughout the Ticket Hall Street above ground, and subsequently assault the Ticket Hall from any of its other three remaining entrances - the main entrance along the north wall of the room puts all those inside in enfilade, and unable to return fire accurately due to the glare. To counter this, defenders must disperse from the Ticket Hall, with some holding back the main advance via the stairwells while the others maintain an aggressive defense of the metro exits to the streets. In a recurring theme from all sectors, defenders should ultimately be cautious of attack from behind and try to avoid tunnel vision.
Sector 4[]
The final sector takes place within the Town Hall. Despite all previous sectors being in close proximity, in sector four there is a mere 10m between the temporary map boundary during retreat and objective A, found near the statue within the Plaza to the front of the Town Hall - theoretically, this allows attackers to start arming the objective within the same second they become active by straying slightly out of bounds. Objective B is positioned nearby, inside the main entrance foyer of the Town Hall building.
With defenders having to spawn within the German deployment to the rear of the building, they have comparatively little time to react to any enemy assault. While it may be possible to hold back the attackers at the metro entrance using the battery of HMGs positioned around the Plaza, at this stage attackers hold most advantages in terms of a short distance to advance and plentiful opportunities for flanks.
Grind[]
Grind first became playable on Operation Underground during week four of War in the Pacific, between 21st and 28th November 2019. The map layout, objectives and capture zones are all but the same as in Conquest, with the only notable change being that the Underground remains flooded for a much larger portion of the match time. The effect of this is that players are forced to use the middle station platform route until the side corridors of Utility and Generator Hallway open up again.
As with most other gamemodes on the map, ticket count is elevated to nearly twice the mode standard count, standing at 700.
Deployments[]
British Deployment[]
The British deployment is at the south end of Main Street, 40m from the Crossroads objective.
German Deployment[]
The German spawn is around the rear of the Town Hall building.
Flags[]
A: Crossroads[]
The Crossroads objective is the largest capture zone by area.
B: Train Station[]
The Train Station objective covers both the raised overpass and the Construction Site to the immediate west.
C: Town Hall[]
This objective covers much of the interior of the Town Hall building as well as the front-facing Plaza.
Gallery[]
")
")
")
")
")
")
")
")
| ||||||||||||||||||||||||||
Trivia[]
- The map's internal name is MP_Bunker. It was previously known to the playerbase by the working title Urban Combat, as seen on the Tides of War roadmap from March 2019.[4]
- Operation Underground was originally planned for release in October, but was for a time stated to have been brought forward to September.[5] Although the files for the map were added to the game with the 4.6 Update on September 26th, the map did not become playable until October 3rd.
- In a scripted sequence near the Town Hall objective, a formation of C-47 aircraft can be seen dropping bombs outside the playable area.
- V-1 Rockets can also be seen exploding at certain intervals in Breakthrough. At the beginning of a match, one explodes northwest of Crossroads, which may be a reference to the similarly scripted A-10 strike on the Battlefield 3 version of Operation Métro. Another rocket can be seen impacting the roof of the Trinkshalle building at the start of sector 3.
- An M2 Flamethrower Battle Pickup location was added to Operation Underground in the 6.6 update, the only time the gadget is available outside of Pacific maps.