| Overview | Heroes | BF1 |
|---|
- This item has a Codex entry: Peacekeeper
— In-game description
The Peacekeeper is an all-kit sidearm available in Battlefield 1. It unlocked as a reward after completion of the "Masterman" multi-stage Easter Egg.
The Peacekeeper is a high-damage revolver, with a maximum of ~60 damage when hitting an enemy torso. Besides the standard revolver ability to two-shot kill at close range, the Peacekeeper can one-shot kill with a headshot within a similar distance. This makes it fairly unique among revolvers, and only the Obrez Pistol shares such a rapid time-to-kill in the sidearm category.
The revolver is similar in performance to the Gasser M1870, particularly in its firing characteristics. The Peacekeeper has a very slow rate of fire when aiming down the sights, with the hammer needing to be cocked with the right thumb after each shot. When hipfired, the player quickly fans the hammer with their left hand, significantly boosting the rate of fire - like the Gasser, the player can hold Fire to fire the gun "automatically" when shooting from the hip. Paired with a very tight hipfire accuracy, the peacekeeper can be very potent in close quarters.
As a gate-loaded revolver, reloading the Peacekeeper is a lengthy process, as fired rounds must be replaced individually. The reload is dynamic, which shaves off some time when at different capacities:
- 5 rounds remaining: The user ejects one fired round and loads in a new round.
- 4: The user indexes four positions clockwise and performs the eject-load cycle two times.
- 3: The user indexes three positions clockwise and performs the eject-load cycle three times.
- 2: The user indexes two positions clockwise and performs the eject-load cycle four times.
- 1: The user indexes one position clockwise and performs the eject-load cycle five times.
- 0: The user lifts the gun vertically, operating the ejector rod and the cylinder to quickly eject all six fired rounds, then quickly loads all six rounds held in their right hand.
Being a dynamic reload instead of reloading by cycles, reloads cannot be cancelled once started. It is advised to find cover as even filling one bullet takes almost one and a half seconds. Also, when below 3 rounds in the cylinder, it is faster to fire any remaining rounds and initiate a full reload of the cylinder than ejecting previous rounds.
One of the most notable features of the Peacekeeper are the flamboyant first person animations. When sprinting in a straight line, the character performs a number of handling tricks, including spinning the gun around by the trigger guard, throwing it up into the air, or tossing it from hand to hand. These animations aren't performed when standing still, aiming down the sights, or turning, and can be cancelled immediately by aiming or shooting. Reloading and drawing animations have a similar flourish.
It is also worth noting that other players cannot see the animations when looking at the player, only seeing the character holding the revolver like normal.
")
")
")
")
")
")
")
Unlocking[]
There are 7 steps to unlocking the Peacekeeper: "A Beginning," "A Conflict," "An Omen," "An Escalation," "Angel Sighting," "Belly of the Beast", and finally, the Peacekeeper itself. Of the above steps, 5 of them reward dog tags. "A Beginning," "A Conflict," and "An Omen" unlock front side dog tags, while "Angel Sighting," and "Unknowable" unlock back side dog tags. "An Escalation" unlocks a unique weapon skin for the M1917 MG.
A Beginning[]
The longest step of the process, A Beginning requires the player to decipher 8 unique Morse code messages, with another message that is the same for all players.
"GO STRAIGHT TO <location>. OLD METHODS COMPROMISED. MUST ACQUIRE NEW KEY. WILL MISS DROPOFF IF DELAY OR INCORRECT LOCATION." This message will repeat until the player moves away from the telegraph, at which point it will explode. It is recommended to cause the telegraph to explode after each message to ensure the game registers that the player has received the message, and will not cause the player's message to change or make the symbol not appear. The player will need to decode this message; here is a guide that can help the player in this endeavor. Upon decoding the Morse, the player will receive a location to proceed to. At this location will be a small symbol that only appears when the player is very close to the location, with the first symbol being a line with an arrow at each side pointing to the left and right. A list of symbol locations can be found here. Upon finding the symbol, the player must look at it for a few seconds until they hear an ominous sound effect.
- If the player is at the correct location but cannot find the symbol, the player should go back and grab another set of headphones and make sure the telegraph explodes. When doing this, Morse code does not have to be deciphered as it should still be at the same location.
The player then must repeat these steps several times, collecting a set of headphones, taking them to a telegraph, listening to and recording the Morse code, decoding, and deciphering the message to discover where to go next, and then finding the next symbol, looking at it until the sound effect plays, and then repeating the process starting at the headphones. The following shows the message progression and symbols:
First Light Color: White
First Message: "GO STRAIGHT TO <location>. OLD METHODS COMPROMISED. MUST ACQUIRE NEW KEY. WILL MISS DROPOFF IF DELAY OR INCORRECT LOCATION."
First Symbol: Line with arrows pointing both directions
In the second message, the location is sent in reverse .
Second Light Color: Yellow
'Second Message:' "<reversed location> REMEMBER FIRST RULE. IF COMPROMISED L PILL."
Second Symbol: Triangle
In the third message, the location is sent in an Atbash cipher.
Third Light Color: Purple
Third Message: "<atbash cipher> SECOND RULE. ON SIGHTING. REPORT AND WAIT. INVESTIGATING ALONE COULD LEAD TO DEATH."
Third Symbol: Arrow pointing right
The location in the fourth message is sent in a Caesar cipher with a shift of 7 (N = 19)
Fourth Light Color: Green
Fourth Message: "<caesar cipher> THIRD RULE. IF TAKEN BY THE OTHERS DISCOVER MEANS TO COMMUNICATE TO HOUSE."
Fourth Symbol: Fence
The fifth message is encoded in a reversed rail fence cipher, and can be decoded by first reversing the code and then deciphering it with 5 rails and 0 offset.
Fifth Light Color: Transparent
Fifth Message: "<reverse rail fence> FOURTH RULE. KILL ALL ON SAME TRAIL. REMOVE DOG TAGS AND REPORT TO HOUSE."
Fifth Symbol: Row of vertical lines
The sixth message is encoded with 2 ciphers. The message will be sent in only Es (. in Morse) and Ts (- in Morse). First, the player must change all Es to As and all Ts to Bs. Then, the As and Bs must be decoded using a Baconian cipher, and finally the result of the Baconian cipher must be decoded using an Atbash cipher.
Sixth Light Color: Gold
Sixth Message: <double cipher> MORSE MESSAGES BEING INTERCEPTED. BEGINNING FULL ENCRYPTION SOON
Sixth Symbol: Edward
The seventh message returns to single cipher encoding. This time, it must be decoded with a Vigenere cipher, will the passphrase "Edward"
Seventh Light Color: Pink
Seventh Message: "<vigenere> ALLIES CAN BE CLOTHED AS ENEMIES. ENEMIES CAN BE CLOTHED AS ALLIES. ALWAYS USE ID"
Seventh Symbol: George
The eighth message is encoded using a variation of a Vigenere cipher called a Vigenere autokey cipher. This message can be decoded with the passphrase "George" and the alphabet key "ZABCDEFGHIJKLMNOPQRSTUVWXY"
Eighth Light Color: Lime
Eighth Message: "<autokey> FINAL BELIEVE EVERYTHING REPORT EVERYTHING"
Eight Symbol: London
The ninth message is unique from all other messages because it is the only message that is the same for all players. The player must only activate the telegraph and begin receiving the morse to progress through this step, no decoding or deciphering required.
Ninth Light Color: Teal
Ninth Message: "GIANTS SHADOW WINDMILL BALCONY LOOK UP"
Once the player has received the ninth message, they must proceed to the Giant's Shadow map and head to the balcony at the top of the windmill behind the German spawn, and look up. After waiting for exactly 2 minutes, a bird will fly through the player and a sound effect will play. Upon hearing this sound effect, the player will receive the "A Beginning" dog tag, which can be found in the Misc. section of the front dog tag list. If it appears that the dog tag is not unlocked even after completing all of the steps listed above, switch to the back dog tag list and then back to the front, and it should be unlocked.
- If the pigeon flies through you but doesn't award the tag, join another server and try again.
- To ensure that it will give you the tag, aim at the bird while it comes to you.
A Conflict[]
Unlike "A Beginning," "A Conflict" takes place entirely on one map, Soissons, near the Pernant Chateau, or the E flag near the German deployment. It involves the player solving two puzzles, one involving candles within the chateau and the other involving lights on the floor of the chateau.
The first step of "A Conflict" is to destroy every light source within the chateau. This can be accomplished by shooting out the lights in the ceiling and using explosives to put out the candles. Once this is accomplished, an audio cue will be heard alerting the player that they have moved on to the next step. In this step, the base of the candle holders will be interactable. Interacting with a candle causes other candles around it or even itself to turn off or on. The goal of this step is to have all of the candles in the chateau turned back on. This can be accomplished either by the player working it out on their own, or using this app. After pressing a candle seven times, it will begin to only affect one candle rather than multiple. After pressing a candle fourteen times, all candles will reset to off. The candles will also reset if the player waits for four minutes without pressing any candles.
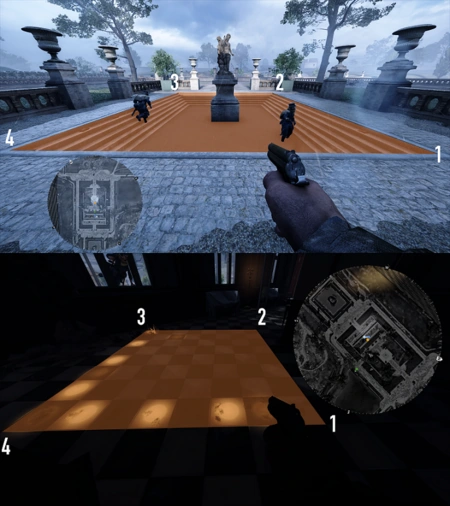
Once all the candles are lit, the same audio cue from before will play, alerting the player that they have moved to the next step. In this step, several small sandbags will spawn near the statue in front of the chateau. These sandbags will only appear once the player is standing near them, and each sandbag is on a certain grid position.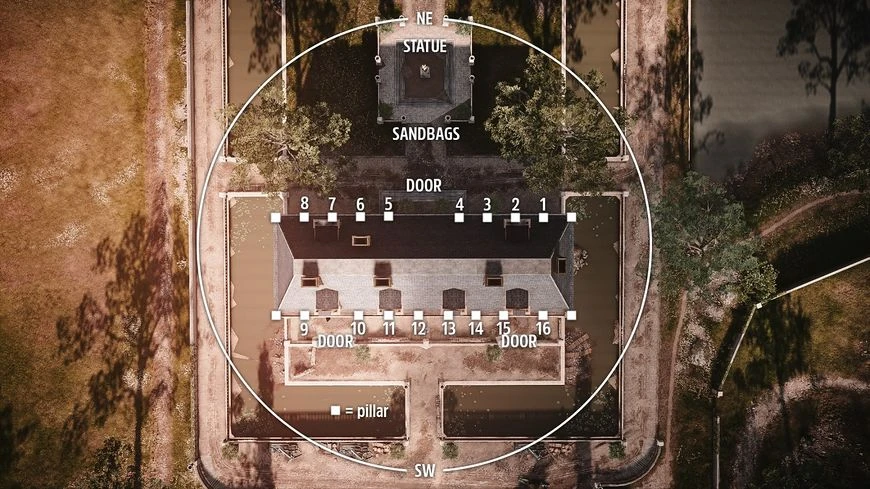

Pillar locations, with the bottom of the image being the back of the chateau
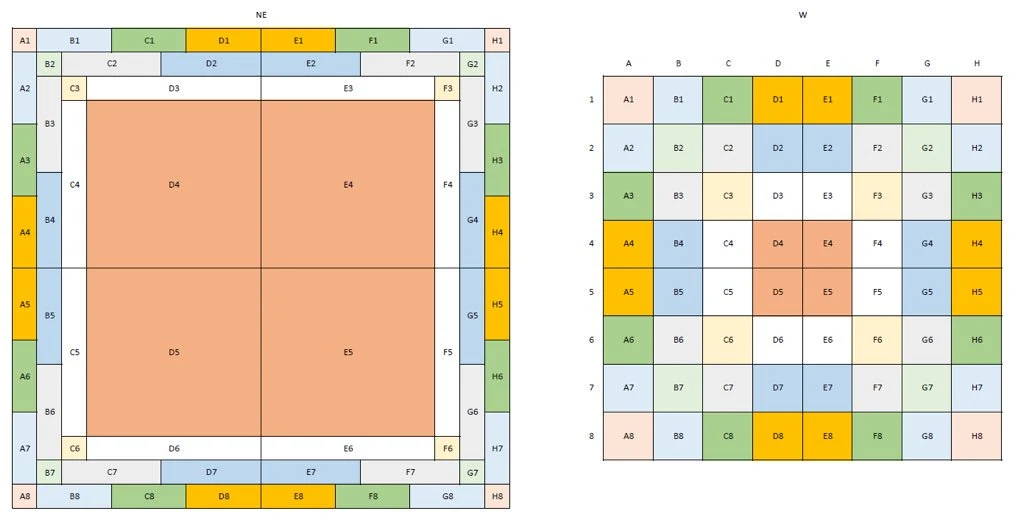
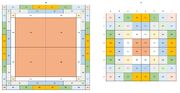
Sixteen pillars of the chateau will also become interactable, with each pillar corresponding to a column or a row. Pressing a pillar that represents a row followed by one that represents a column will light up a tile in the floor of the chateau, while pressing two pillars that both represent a column or row will not light up anything. The goal of this step is to illuminate the tiles that are in the same grid positions as the sandbags near the statue.

Correct orientation of the floor tile grid in relation to the statue
The trick is that the columns and rows represented by each pillar is different for every player, every round, every server, and every pre-round, and there are no apps to help the player on this task. The player must deduce what each pillar represents through trial and error. For example, the player may press Pillar 1 and Pillar 2 with no lights coming on, which tells the player that both pillars represent either a column or a row. Then, the player may press Pillar 1 and Pillar 3, and the grid position 3,5 lights up. This tells the player that one of the pillars represents column 3, and the other represents row 5. Finally the player may press Pillar 1 and Pillar 4, and the grid position 3,7 lights up. This confirms to the player that Pillar 1 would represent column 3, Pillar 3 represents row 5, and Pillar 4 represents row 7. This process must be repeated until the player knows what every pillar represents.
Guide to translating sandbag position to correct tile position
Once this is done, the player must find out which grid tiles have sandbags on them and activate them. After this is completed, a smoke grenade will go off within the chateau, the audio cue will be heard, and the player who activated the final pillar will receive the dog tag. It is important to note that the dog tag ONLY goes to the player who activated the final pillar and no one else.
An Escalation[]
An Escalation is a unique weapon skin for the M1917 MG and contributes to the Masterman easter egg. It is unlockable only on the map Albion.
An Omen[]
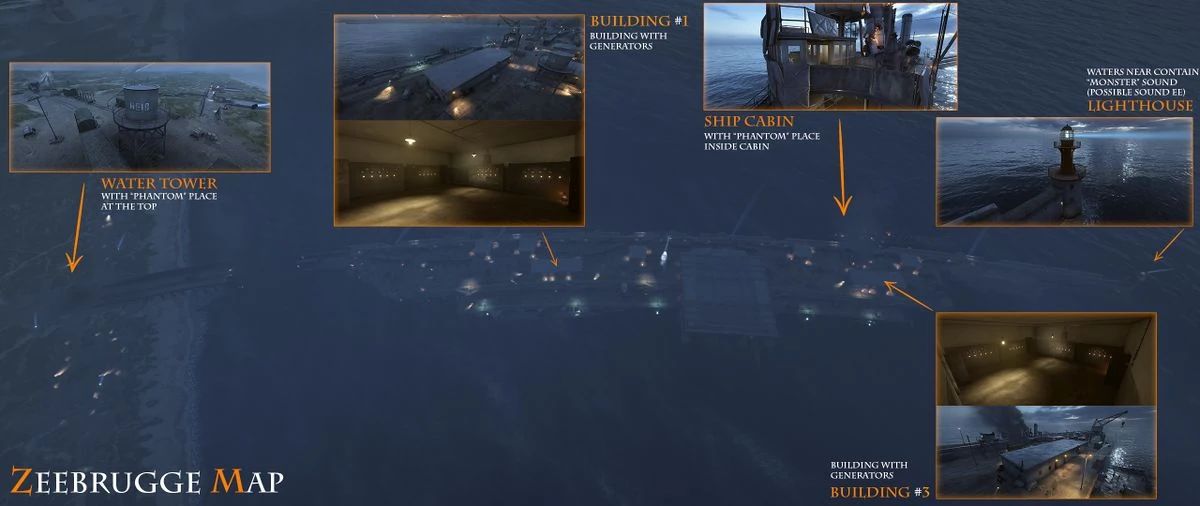
"An Omen" once again requires the player to decode a unique Morse code message in order to solve the puzzle. "An Omen" takes place entirely on Zeebrugge.
In this puzzle, the Morse code is unique for all players, but it is the same message with eight letters missing. The letters that are missing are different for every player, but the full message is "DULCE ET DECORUM EST PRO PATRIA MORI". In order to activate the Morse code, the player must first pick up the Infiltrator kit from the cabin of the HMS Vindictive, which is the E flag in Conquest, and then travel to the water tower on the mainland near the A flag. Once on top of the water tower, the player will begin hearing a Morse code transmission. Once recorded and decoded, the player will discover which letters of the full message they are missing. Each letter corresponds to a number. The player must then convert their numbers into Morse code and work their way to 2 large rooms that each have 4 generators inside. Each generator has 5 switches that are used to input Morse code, with a lit light being a dot and an off light being a dash. The player must input their numbers from left to right in the generator rooms, starting with the generator room closest to the water tower and moving to the one at the end of the docks. When all generators are showing the correct Morse code, a smoke grenade will drop and an audio cue will play, informing the player that they have unlocked the tag. A Google Docs Sheet can be found here that may help the player in this task.
Map of important locations for An Omen
| A = 3 | F = 1 | M = 9 | S = 9 |
|---|---|---|---|
| B = 5 | G = 8 | N = 6 | T = 0 |
| C = 1 | I = 5 | O = 2 | U = 3 |
| D = 2 | K = 8 | P = 0 | X = 6 |
| E = 7 | L = 7 | R = 4 | Z = 4 |
Angel Sighting[]
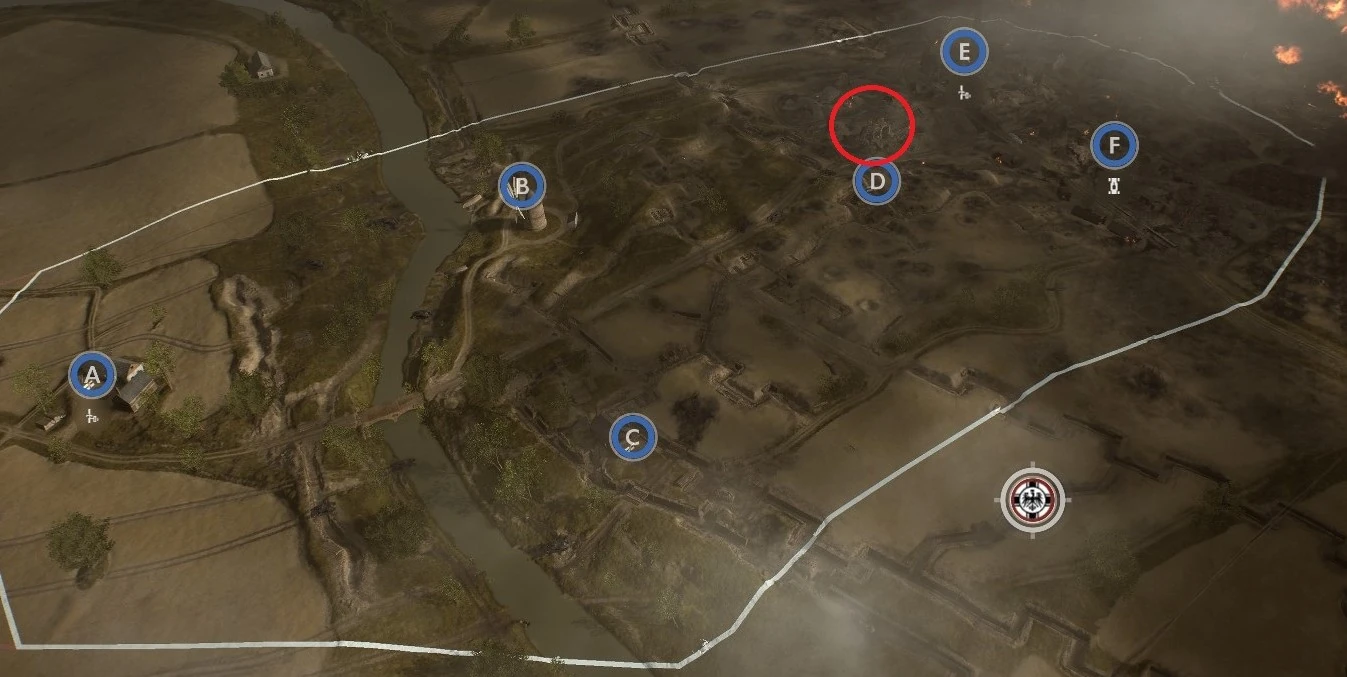
Location of the buried generator
First, the player must detonate one or more explosives in the black ring in order to access the generator, which has 5 lights, which can be each turned on or off with a switch, in addition to one more button used to input the lights. This can be done most effectively with a Limpet Charge. Next, the player must input '0627' in Morse code into the machine, with a dot being represented with a lit light and a dash being represented with an unlit light. Once you have put in a number, press the base of the lamp post on top of the generator to input the number, and then all of the lights will reset.
Next, the player must run to the Wellington Farm, or the A flag. Using another limpet charge, destroy the wall of the main house (not barn) at the objective near the fireplace. Then, climb on top of the chimney and look down inside of it to find a switch. If the player cannot see the switch, the must destroy the top of the chimney in order to access the switch.
Finally, return to the generator that was used to input the numbers before, and this time input the number '03222110' in Morse code. Upon completing this step, the player will receive the 'Angel Sighting' dog tag.
Belly of the Beast[]
This step takes place on Caporetto, behind the Castello Di Solkan, or the B flag in Conquest.
Behind the Castello, there are four angel statues close to each other, and another one further behind the group. The player must use a Limpet Charge to destroy the entire front statue, shoot the head off of the left statue,shoot the torso off of the center statue, and shoot the wing tip off of the right statue. Once the player has successfully completed this task, they will hear a scream. Then, run to the rear statue and interact with it to receive the 'Belly of the Beast' dog tag.
The instructions for this step can be found in the description of the 'Angel Sighting' dog tag.
Final Step[]
The final step of this lengthy easter egg takes place on Passchendaele and grants the player the Peacekeeper.
In order to complete this step, the player must have unlocked the following items: 'A Beginning' dog tag, 'A Conflict' dog tag, 'An Omen' dog tag, 'An Escalation' weapon skin, 'Angel Sighting' dog tag, and 'Belly of the Beast' dog tag. The player must have one of the first three dog tags equipped as the front dog tag, and one of the last two equipped as the back dog tag, and must be using the M1917 MG with the An Escalation weapon skin applied.
Next, the player must proceed to Adler Ridge, or the E flag in Conquest, and proceed to a blocked entrance underneath the wooden trench bridge near the middle of the objective. The entrance will be labeled with a sign that says "MUNITIONS" which the player must destroy. Inside of the entrance at the top, there will be 2 switched, one in the top left corner and one in the top right. The player must input the word 'Unknowable' in Morse code using these switches, with the left switch being a dot and the right switch being a dash. Timing does not matter in this portion, so just following the correct order will do. The correct order of the switches, with L being Left and R being Right, is: LLR RL RLR RL RRR LRR LR RLLL LRLL L.
If the player enters the correct sequence into the switches, the screen will being to shake, and the rocks blocking the tunnels will explode. Enter the tunnel and use the switch in the middle. Be careful, because once the player uses this switch, they must move quickly. The player will be dropped through a trap door into a room with four hallways. The player then must use the compass in the lower left corner of the screen to navigate through the tunnels, pressing a switch at the end which will open another trap door that allows the player to drop down. Once again, the player must be careful, because they will still take fall damage and damage from the poisonous clouds, so be sure to regenerate before activating the trap doors. Also be aware that standing in the middle of the trap door while pressing the switch may cause the player to take double fall damage, resulting in death, so be sure to stand well away from the door while pressing the switch. The correct sequence of tunnels to follow is: W E S W E W W N S W N W S W S, with N being North, W being West, E being East, and S being South. Once you have gone through all floors, on the last floor (where the player heads south) there will be a crate with the Peacekeeper laying on top. Simply interact with the pistol in order to pick it up. Once this is done, it is added to the player's inventory indefinitely, and can be used across all maps and modes.
Trivia[]
- The Peacekeeper's description is a reference to the character Revolver Ocelot from the game Metal Gear Solid. Ocelot carries a Single Action Army as his primary weapon for most of the series, and famously states it to be "the greatest handgun ever made." Ocelot also is famous for his extremely elaborate gun-tricks with his SAA, flipping, juggling and twirling it in the air in a similiar manner to the Peacekeeper.
- An easter egg may be triggered randomly when the player runs with the Peacekeeper: the soldier's left hand forms the finger gun gesture and "fires" thrice into the air, while sound clips of the character Neebs from Battlefield Friends mimicking gunfire is played alongside the "firing".[1]
- The Peacekeeper's reload involves indexing several positions before beginning to eject fired rounds and load new rounds, unlike other gate-loaded revolvers which immediately start with ejecting fire rounds and loading new rounds. The position indexing addresses a logical error with the animations of other gate-loaded revolvers, since in those animations, the rounds ejected and loaded from the second round onwards would actually be unfired rounds as the cylinder rotates clockwise only.