| This article is a stub. It is short and in need of fortification. Why not help out? |
— DLC Overview - Battlefield.com
River Somme is a map featured in the Battlefield 1: Apocalypse expansion.[1]
This map is set during the infamous "first day on the Somme". British casualties on the first day were the worst in the history of the British army, with 57,470 British casualties, 19,240 of whom were killed, the most out of any single day of the Battle of the Somme.
Overview
The map boundaries of River Somme form a rough rectangle that takes the assaulting British southwest to northeast along a diagonal route. A single main road winds the same way up through the map center, connecting the British deployment to the farthest-flung objectives. Horizontally, the map is separated into sectors by a number of defensive trench lines, interconnected via support trenches, and branching off extensively to cover most of the map's core.
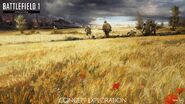
The attack is launched amidst wide-open wheat fields that give way to a marshy valley, and the namesake of the map, the River Somme. Across the river are more, gently-sloping farming fields of gold and green, along with increasingly intricate German fortifications, which carve new routes through the land alongside the main road. The appearance of shell craters and tank wrecks, dotting the countryside in added frequency with every step north, give an eerie indication of what lies ahead. Cresting a hill, the full scale of the devastation is revealed. Descending the reverse slope takes the advance through the twisted remains of an industrial zone, rendered almost unrecognizable by artillery. North still, the horizon is tinted orange by a raging inferno as it lays waste to a vast forest, as shells continue to pound whatever else used to lie beyond. This barrier of flame marks the map's northern boundaries, the end of the main road, and the assault's ultimate stopping point.
Behemoth
In place of a Behemoth, three elite kits spawn in the British base should the team falter. These consist of a Sentry, Sentry SMG and Flame Trooper.
Control Points
| Control Point | Conquest | Domination | Rush |
|---|---|---|---|
| British Empire Deployment | |||
| Wellington Farm | A | 1A 1B | |
| Marsh Landing | B |
2A | |
| Munich Trench | C | 2B | |
| Hill 21 | D |
A | 3A 3B |
| Sugar Mill | E | B | 4A |
| Hawthorn Station | F |
C | 4B |
Conquest Assault
In Conquest Assault, the British must forge a path northwards, capturing objectives as they go, in order to force the opposing Germans off the map. The attackers are granted a ticket lead of 300 points while the defenders initially hold all objectives.
For the British, the initial breakthrough must be made in a timely fashion to avoid the enemy from gaining a significant point lead, levying their unique advantage of tank support to do so. The Germans must maintain their superiority in point gain as long as possible with staunch defense and rapid counterattacks. Both teams can utilize the extensive trench web that spans much of the map as a means of quickly transferring force between objective points. As a result of this, despite the wide-open nature of the map, combat in the trenches that encircle most of the flags is often of the close quarters variety.
Equipment
Two Mark V Landships, available to the British, are the only deployment vehicles found on River Somme. A few neutral light vehicles can be found at some objectives.
Deployments
The British Team deploys from a long horizontal trench line at the southern end of the map. To their backs, dozens of heavy guns fire in support of the offensive, and tanks line the main road leading north. Ahead, either side of said road, are vast open wheat fields that span much of the ground before the river. The assault out of the deployment area must be made over this exposed ground. Infantry can make a direct assault on Wellington Farm with tank support, or alternatively bypass the flag by skirting around the edges of the map to the east and west.
The British have access to a Livens Projector, located in the trench on the left side of the road, to gas the opposition at Wellington Farm. A pair of heavy machine guns are also emplaced nearby, allowing players to suppress the defending infantry at the same objective.
Being Conquest Assault, the defending Germans do not have an HQ spawn location.
Flags
Wellington Farm
Wellington Farm consists of two buildings, a farmhouse and a barn, situated alongside a crossroads in the middle of the wheat fields south of the river. It is overlooked to the north by a ridge, atop which is the first German trench line, a dominant defensive position against the exposed fields lying in between, although the surrounding wheat can obscure players lying prone. The buildings offer the majority of cover in the capture zone's immediate vicinity, but can be demolished with explosives. On the objective outskirts, the occasional shell hole and fallen tree can be used to bound across the field in cover - either to climb the hill once the flag is captured, or to descend it to counterattack against the objective.
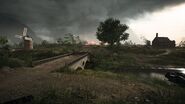
Following the road north through the first fortified line leads to the Somme River valley. The water is shallow, allowing it to be easily forded by infantry and vehicles alike. A single bridge spans the waterway, connecting the south section of main road to the north's larger portion--the bridge can be partially, or completely, destroyed using explosive weapons.
A single MC 18J Sidecar spawns at the crossroads near the the barn.
Marsh Landing
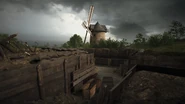
Marsh Landing is on the north bank of the Somme River, and on the west side of the main road. It consists of a windmill and small pier, the mooring point for many small boats seen beached along the riverside. A rising hill and accompanying trench line rings the area to the north and northeast, creating an overwatch point for the flag itself as well as the opposite bank. The circular capture zone, which includes the windmill interior, extends to the water's edge, allowing capture from cover when behind the pier or in the shallow trench alongside it. A woodshed shielded by the hill in the north of the capture zone provides an additional, if destructible, point of high cover.
A Tank Hunter kit can be picked up from the German's second line of trenches near the main road bridge across the river. It is located halfway between Marsh Landings and the parallel Munich Trench.
Munich Trench
Munich Trench is a square loop of trenches that surround a lone farmhouse inland from the riverside in the map's southeast sector. The fortifications are the meeting point between the second and third defensive line, and are quite extensive, with the capture zone encompassing a large area. Clearing the objective may require searching quite a span of trenches, although the farmhouse provides the most obvious central covered position.
Hill 21
Hill 21 is a tight loop of deep trenches dug into a mound, located on the east side of the map center. The objective's capture zone is small, and may result in intense close quarters fighting for control. Within the trenches, troops may ambush each other from around corners or out of dugouts cut into the walls. Above ground and out of the capture radius, the surrounding area is a turmoil of barbed wire, fighting pits and shell craters, granting more abundant positions of cover on the indirect route to the flag.
There are a number of field guns emplaced within the German's third and fourth defensive lines, oriented around Hill 21, and deployed in pairs on opposite sides of the main road. The first two are ahead of Hill 21, in the third line. The second two are alongside it, in the fourth line.
A Sentry SMG is located closest to this flag, and can be found in a stepped trench on the opposite side of the main road, approximately 80 meters northwest of the flag itself. It is nearby one of the FK 96 cannons.
Sugar Mill
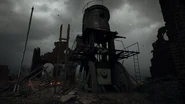
Sugar Mill is one of two parallel objectives located near the map's northern edge, being the westernmost of the pair. A smokestack and some tattered archways and walls of red brick are all that is left of the building exterior, while the mill floor is covered with heaps of debris of stone and timber, burying the factory's shattered machinery. The flag area consists roughly of what used to be the building interior, and includes a gantry climbable by ladder that can serve as a watchtower of sorts over the adjacent area. Behind the factory is a dirt road and more ruins from which defenders of the flag spawn within--necessitating all-round observation when seizing the objective.
An RNAS Armored Car and MC 18J Sidecar spawn on the dirt road to the immediate northeast of the flag, regardless of which team currently controls it.
Hawthorn Station
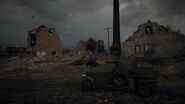
Hawthorn Station is found in the map's northeastern corner, downhill from Hill 21. A railway line, which runs horizontally parallel with the flag and Sugar Mill, spans an arched rail bridge that goes over the main road between the two objectives. A freight train, thrown from the track by the barrage, is the only remaining identification of the building ruins encompassing the capture zone, outside of its name. As with Sugar Mill, the primary cover here is in the form of debris piles and half-standing walls, although they are much lower here than at the latter flag. The surrounding low ground consists of shredded trees and houses. Again, players defending the flag spawn across the road to the north, amongst the burning forest.
A Flame Trooper kit can be found on the north side of the arched rail bridge that crosses the main road, to the west of the flag.
Rush
In Rush, the British team is charged with pushing the defending Germans from their positions along the banks of the River Somme, eventually advancing to the pulverized industrial zone in the map's northern extremities. While the Germans receive no vehicles of any kind, the attacking British team can briefly enjoy the support of tanks for the first objective before combat descends into trench warfare for the following sectors.
Sector 1
Starting from the usual deployment, the British team must attack uphill past Wellington Farm to destroy telegraphs located in the first trench line. Each of the pair of objectives are located at opposite ends of the trench - objective A is at the west end and objective B is adjacent to the main road at the east end. The British have access to a single Mark V Landship in the initial attack.
Sector 2
Crossing the river, the attackers are loosed against the German's second defensive line. Objective A is in a trench a short distance south from the windmill at Marsh Landing. The telegraph is just past the trench entrance, inside the corner as the trench turns south-east. Objective B is across the main road, located within the trench behind the farmhouse on the north side of the Munich Trench area. It is found at the corner of the support trench that links the second and third lines.
The British lose their vehicle support for the rest of the battle at this point.
Sector 3
The third attack is made against the third and fourth trench lines. Again, the two objectives lie in trenches separated by the main road. Objective A is to the west, in a square ditch about the same location as a Sentry kit spawn in Conquest. Objective B is found in a dugout within the Hill 21 trench coil, close to the mouth of the support trench on the south side of the objective area.
Sector 4
The final objective set is downhill in the destroyed industrial area. The two objectives are placed in the same location corresponding to the Conquest flags of Sugar Mill and Hawthorn Station. As before, objective A is the westernmost of the pair, found near the remains of the entrance archway at Sugar Mill, and objective B is found eastwards in the middle of the foundations of the station.
Domination
Domination constricts the play area to the northernmost sector of the larger map, its southern boundary running alongside the third German defense line, cutting off the riverside objectives of Marsh Landing and Munich Trench. The flag placements are generally unchanged from Conquest, with the three objectives forming an equilateral triangle in the middle of the play area.
Hill 21
Hill 21 is the southernmost objective, taking place within the trenches of the cyclical hilltop debout. Although the tiny capture area is less crowded than in Conquest, seizing the objective may still consist of an intense, close range slogging match between teams. The objective's location uphill from the industrial zone makes it the most isolated of the three objectives, and players may be attacked when moving in the open to and from this flag.
Sugar Mill
Sugar Mill is on the western end of the industrial zone. The flag is moved slightly eastwards compared to its Conquest location, but otherwise comprises the same area of the ruined mill interior.
Hawthorn Station
The capture zone extends some distance westwards in relation to the flag itself, resulting in the largest of the three capture zones. The lack of substantial cover in the area leaves those taking the flag vulnerable to ranged attack from all directions, depending on the enemy team's spawn location.
Team Deathmatch
Team Deathmatch takes place in the same area as Domination.
War Pigeons
War Pigeons takes place within the same boundaries of Domination and Team Deathmatch.
Gallery
| ||||||||||||||||||||
Trivia
- The internal name for this map in Community Test Environment is MP_Offensive.
- This map along with with other maps from Apocalypse were publicly trialed in the Community Test Environment with a "white box" prototype texture like the one seen in Operation Outbreak in Battlefield 4 and four maps from Battlefield 1: Turning Tides.
- Some flags on River Somme are references to various locations at which the Battle of the Somme was fought:
- Munich Trench (Flag C) refers to the site of a British war cemetery and a German trench close to Beaumont-Hamel, a village to the front lines.
- Sugar Mill (Flag E) refers to a sugar factory at Courcelette (part of the Battle of Flers-Courcelette), close to the strategic Albert-Bapaume road. It was utilised as a strongpoint by the German defenders.
- Hawthorn Station (Flag F) refers to the Hawthorn Ridge Redoubt, a German redoubt close to Beaumont-Hamel. It was the site where the first mine of the Battle of the Somme was dug and detonated, right under the German positions.
- During the Community Test Environment version of the map, Flag A was known as Hamel Farm and Flag B as Beaumont Mill. Now, they are named Wellington Farm and Marsh Landing respectively.
- These former names, plus the ones from some current flags, suggest that this map is set in Beaumont-Hamel, among the first locations to be attacked during the Battle of the Somme.


