| This article is a stub. It is short and in need of fortification. Why not help out? |
| Incoming! The subject of this article is a recent or unreleased addition to a Battlefield game. It may contain speculation or errors. Have new, relevant information to add? Why not help out? |
Rotterdam is a map set to be featured in Battlefield V. The map is set during the Battle of Rotterdam which was a part of the Battle of the Netherlands campaign in the Netherlands in May 1940.
The German attack, made initially by paratroopers landed in floatplanes, was made to secure a bridgehead over the Nieuwe Maas. Rotterdam fell outside "Fortress Holland", the part of the country prepared for defense, but local forces still offered determined resistance. In reality the defense of the city was an entirely Dutch endeavour, with British expeditionary units playing only a minor role in the short campaign, however the latter are the sole opposition faced by Germany in this representation of the battle.
The map is set before the German bombing of the city, with Devastation representing the aftermath.
Overview
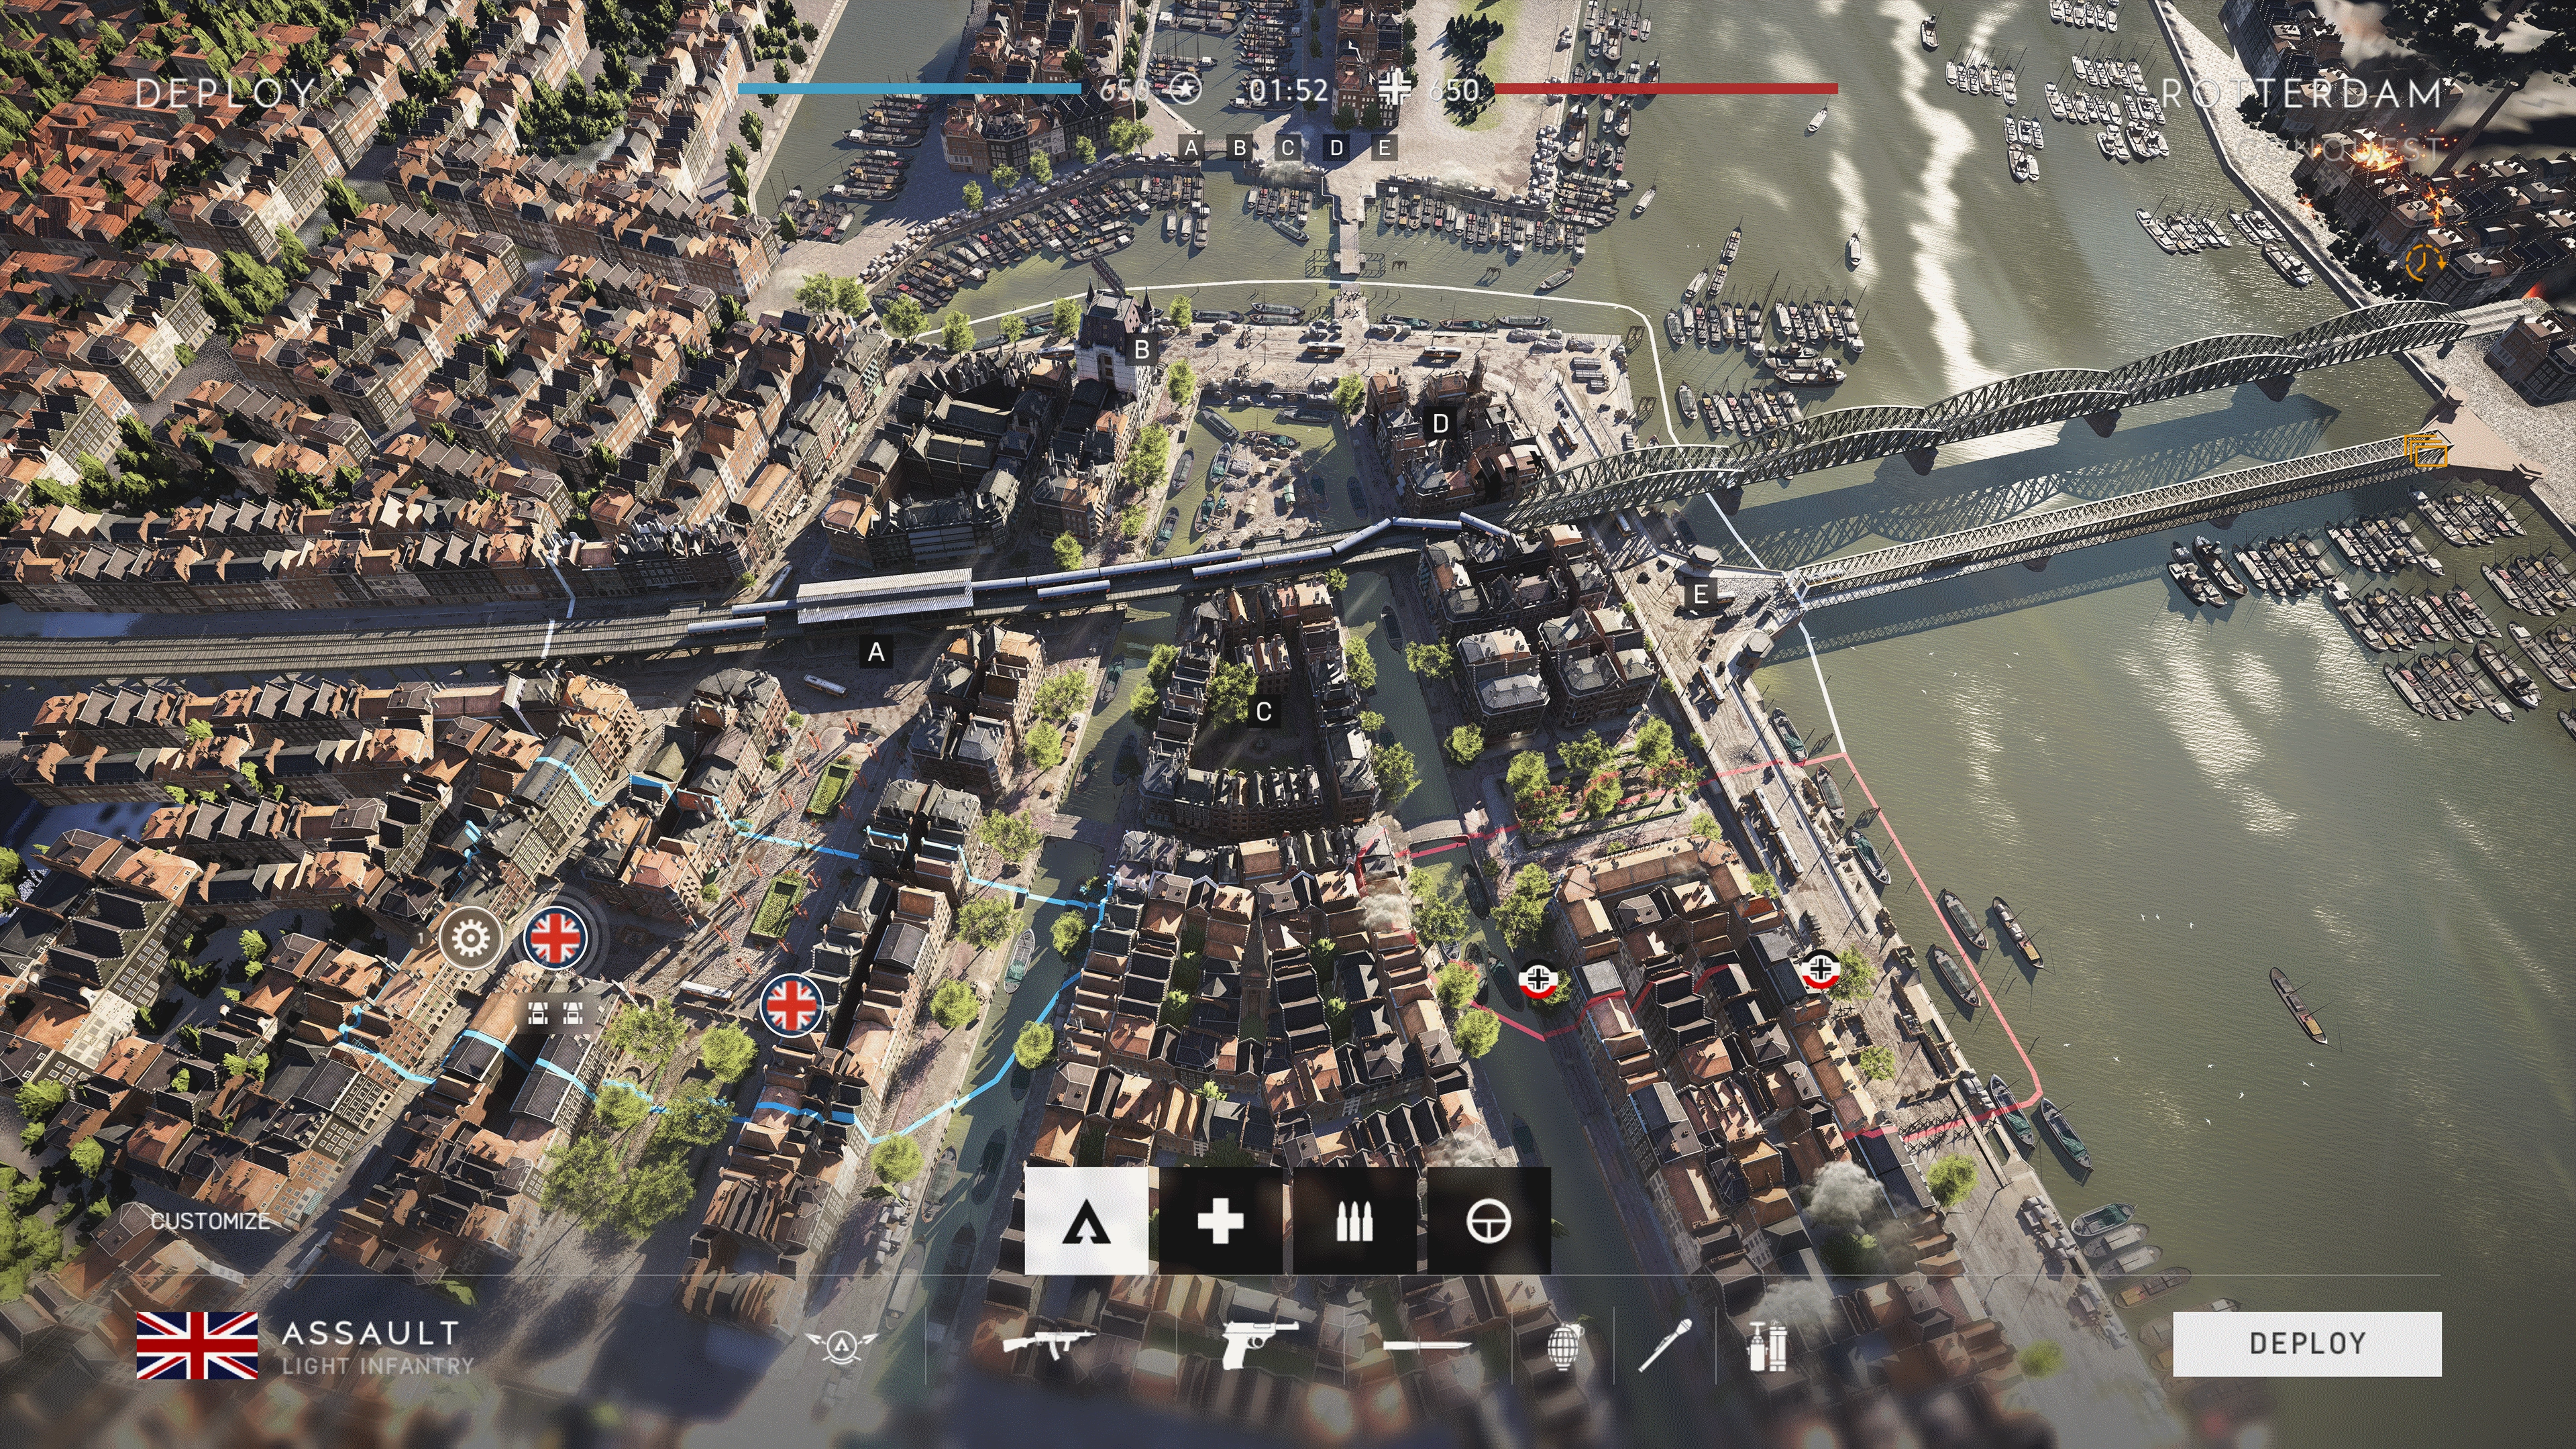
Evoking Amiens and Seine Crossing from Battlefield 1 and Battlefield 3 respectively,[1] this south-western section of Rotterdam depicted in-game is characterised by its abundance of canals, bridges, a scenic quayside, and towering urban expanse. Evidently a once-bustling hub of commerce and culture, the city streets are wide, accommodating tramways and motor vehicles alike. The signage-laden architecture is reminiscent of Amiens but with increased accessibility, and is collected into dense blocks with conversely cramped and restrictive back alleyways. Crossed over by destructible land bridges and crowded by boats and river barges, the main two canals that cut vertically across the map run alongside the urban sprawl that comprises the south of the map, before meeting around a marketplace isolated on an island in towards the middle. Rotterdam is further divided by an elevated train line, overlooking much of the map center as it cuts east to west, atop which is a station platform and a derailed line of cars. Finally, along the north and east side is the Boompjes, a major roadway that runs along the water's edge, adjoined to several bridges spanning the waterway to inaccessible city districts on the far adjacent banks.
The map lends itself both to close quarters street fighting and building clearing actions, as well as long range combat along the northern riverside and obstacle-barren canal roads. In addition the train bridge and buildings, of which most have up to four accessible floors, also gives a sense of verticallity and allow squads to control the more open routes between objectives, which are restricted by the waterways and the range of impassible structures.
Conquest
Conquest is primarily infantry-focused affair fought between five objectives. The layout roughly pentagonal, with three bases along the south-center of the map, and two more closer together on opposite sides of the map's northern edge. Players are advised to use caution in the more open areas between objectives, and must be aware of threats from above, but can otherwise enjoy great freedom of movement through the abundance of alleyways and interior pathways. The few vehicles allotted to either team can be used to navigate the city streets quickly, as well as destroy buildings and apply pressure to some of the objectives, although Courtyard and Ruins are very closed off and leave tanks virtually no room to manoeuvre. Vehicle routes can be further limited by destroying arched bridges over the canals, building anti-tank obstacles, and mining the more restrictive streets between blocks. Although emplacements can be constructed around flags, none of the bases spawn vehicles of any kind.
Equipment
In the launch build, each team is given one tank, and two transport vehicles, potentially augmented further by one tank and two armored gun carriers brought in through Squad Reinforcements.[2]
Deployments
Unlike most maps where teams start on opposite ends of a map lengthways, the British and German spawns are parallel to one another, confined to the south-west and south-eastern sectors respectively, separated by four blocks of buildings and two stretches of canal. Each base is split into two possible spawn areas, which are themselves horizontally parallel and divided from each other by a row of buildings.
British Deployment
The two British spawn points are at the southern end of the two plaza roads directly south of train station, prominently marked by Dutch flags and orange banners that adorn the building facades and lampposts. The area is considerably more open than the German deployment, being two lanes wide with an fenced off park area in-between. In the smaller street adjacent to the plaza to the west is the vehicle resupply station, and a health and ammo cache, an emplaced PaK 40, as well as the team's single towable PaK 40. The southern edge of the main plaza road is fortified row of sandbag barricades, behind which lies a formidable gunline of two stationary PaK 40s, two Vickers HMGs, health, ammo and repair stations, in place to defend the considerably more vulnerable spawn position from potential enemy encroachment to the north.
German Deployment
The eastern spawn option can be considered the main base, and is along the river waterfront at the south end of the Boompjes quay roadway. The area is packed with sandbag barricades, and reinforced with two PaK guns right at the back of the spawn, trained on the road north beside a Vickers. Also nearby is a vehicle resupply station and an ammo cache. The road ahead splits vertically - the left road takes players past a park where trenches can be dug, on the way to the underside portion of Willemsbridge, while the right road proceeds uphill to the upper section of Willemsbridge. At the western spawn, players are deposited on either side of the canal, with two ammo caches found on the east bank or 1st Canal Road, and an ammo cache and a health station on the west bank, aka 2nd Canal Road. Both banks are linked by an arched bridge.
Flags
A: Train Station Beurs
A Train Station for the elevated railway is found near the map's western edge. The capture zone, the largest of the five objectives, is split into two levels - the street level, underneath the rail bridge, and the station platform on the tracks above. On the ground, the area starts mostly open, with only the stone columns holding up the track, and several piles of train cargo and luggage, offering useful cover - the shadows created by the overhead structure can make is difficult to spot players, however. The area can however be transformed through fortifications, where tall sandbag walls spans the gaps between pillars, creating a highly partitioned area closed off from the surrounding roadway. The flag can however still be captured from the makeshift fort exterior, as the zone extends a considerable distance south towards Plaza, which can help get the British a foothold lest they be trapped in their own base. On both the north and the south sides of this area are stairwells that take players up to the station platform. They are divided into two flights, creating a potential blind spot for those ascending. The capture area above is similar obfuscated by darkness by its tin roof, under which a number of stationary train cars are lined up, forming the majority of concealment and creating tunnels of sight lines along the length of track.
The station is one of three possible areas to reach the upper track from, with a second set of staircases opposite the marketplace and the third route, provided by fortification construction, located near the east end around Willemsbridge. The flag's supply bases and buildable emplacements are separated vertically as well - the health station located up top, and the ammo station found in the center of the potential sandbag fortress below. Two Vickers guns can be built by Engineers at this flag. One is at street level, facing east, while the other is on the platform above, at the top of the northern staircase.
B: White House
White House is the westernmost of the two northern riverside objectives, located as one would expect at the intersection of East and West Vithuus roads. Part of the large white structure is visible from most outdoor areas due to the large sign on the roof, and offers a prominent fighting position along the norther quay roadway. The expansive capture zone expands a considerable distance outside the building to the north, allowing those taking cover behind crates at the waterfront docks to influence capture, as well as the alleyway to the east. The aforementioned Vithuus Alley can be heavily reinforced with barricades, effectively cutting off the quickest infantry route between the structure and Train Station Beurs. The riverfront and the White House entrance are mostly devoid of cover, save for several trucks parked outside the northern door.
The elegant gold and crimson decorated interior of White House is split into two floors. At ground level the main lobby is accessible through its three exterior entrances. The assortment of soft lounge furnishings is barely suitable for cover, with solid protection found only at the sides of the two staircases joining to the upper floor. The above floor is itself lacking in concealment but has a balcony-like shape that provides overwatch positions against the lower storey. Furthermore, every face of the building is dotted with windows, permitting players to shoot out from fairly well protected positions at targets in the exposed streets below. The outer walls can be destroyed with explosives, reducing cover available to defenders.
A health station is found on the ground floor inside the building, while an ammo cache is outside at the end of the eastern alleyway. The majority of fortifications around this flag are dedicated to defending against an advance along the quayside to the east. A large barricade spanning the roadway can be further reinforced with tank traps and barricades, as well as a pre-built Vickers HMG. A vehicle repair station is found tucked away at a bend in the road further west of White House.
C: Courtyard
Courtyard is located in the south-central block, bordered by 2nd and 3rd Canal Streets to the sides, Bridge road to the south, and the train overpass road the north. The arrangement of houses along the exterior roads forms an enclosed back street area, inside which is a square park-like courtyard, which is bordered by another, narrower area on the north side. Being completely enclosed by buildings, access to the enclosed flag is therefore limited to the narrow alley entrances at the four corners of the courtyard, as well as through some accessible townhouses around the east and west sides. Inside the capture area, combat encounters are invariably at close range. Initially only a waist-high stone wall, forming the perimeter of the inside garden, grants cover in the zone, along with the adjacent house interiors - these tall buildings have four stories, allowing players to guard the capture point from elevated positions, completely negating the already rudimentary cover available. The flag can however be built up with fortifications, in the form of sandbag walls that block the alley entrances, leaving attackers vulnerable as they scramble over them. Also available are wooden barricades with firesteps, which can act as expedient watchtowers, and a ring of sandbags in the very center of the courtyard. Furthermore, the front of many inaccessible buildings can be blasted in with explosives, creating spider holes and cover positions out of the exterior walls.
The point's supply stations are found within the capture zone inside the main square courtyard. The health station is on the north side, the ammo on the south. Directly north in the marketplace, an extra ammo cache can be found. The man-made island can also be reinforced with built cover positions.
D: Ruins
The Ruins objective is located inside a block of buildings on the north-east side of the map, along the riverfront at the corner of Boompjes and the quay road. The flag is set within one of the few pre-destroyed sections of town - a ruined block of buildings that surround a forked rear alleyway. Although ostensibly similar to Courtyard due to its enclosed nature, Ruins is quite a bit smaller (its capture zone being the least expansive of the five objectives), and has comparatively fewer entrances. The gutted exterior buildings on the north and east side form ramps into the objectives, giving access to the ruined interior corridors. Inside the narrow alley, terrain slopes downhill to the south, giving the raised northern rafters a height advantage over the surroundings. Approaching the objective from the north and east can be difficult due to the highly open roadway, and the capture area itself can, like Courtyard, be fortified to bar easy access to attackers. The southern entryway exits underneath the wrecked section of the train bridge.
In an inversion of Courtyard, the flag's health station is at the south end of the alley, while the ammo cache is on what used to be a second storey at the northern end. To match the stationary weapon set up on the opposite bank outside White House, a Vickers gun can be located outside the capture area to the west. Two vehicle resupply stations are found nearby as well - one is to the north-west, on the outer corner of the north Boompjes bend, while another is at the immediate end of a collapsed bridge to the north-east, roughly centrally between this flag and White House along the quayside.
E: Willemsbridge
Willemsbridge is directly north of the German's eastern spawn and south of Ruins. The flag is the the western end of a tram bridge, built on a raised section of the Boompjes river road. The top of the bridge is open, and apart from a few stationary trucks and tram cars is totally devoid of cover. Its elevated profile protects against fire from the lower streets to the west and the bottom of the hump to the north and south, but is still exposed to those in the upper floors of neighbouring buildings, as well as atop the high level bridge that overlooks the area as part of the rail line. The bridge is supported by two towers at its sides, that each have a spiral staircase down to the lower floor - underneath the bridge is a parking area, enclosed by bricks walls with only four entrances. Cover here is also lacking, with several thick pillars and a few automobiles being the only concealment options aside from hiding in the four corners of the chamber. The area is quite defensible however, as two of the entrances can be completely blocked with barbed wire, and the other two partially barricaded.
The flag's resupply stations are located similarly to Train Station Beurs, with the ammo cache beneath the bridge and the health station up above. Topside, quite a lot of emplacements can be built along the north side of the capture zone. The entire road can be blocked with a mixture of barricades, tank traps and sandbag partitions, in addition to the third point of access onto the rail bridge in the form of a ramp atop one of the tram cars. Atop the bridge, Vickers MG emplacements can be built to defend the length of the bridge to the west.
Another health and ammo station can be found one street over from Willemsbridge to the west, in a place called Tiny Alley.
Grand Operations
Rotterdam is the first map in the planned Battle of Holland Grand Operation, followed by Devastation. It depicts the German airborne landings and subsequent ground invasion of the city, attacking British defensive positions.
Airborne
In Day one, German paratroopers are dropped within the city limits to destroy key objectives in the path of incoming ground forces.
Breakthrough
On the second day, the main assault begins with the intention of sweeping the British opposition from this sector of the city. Each team has the potential to bring in one tank and two armored gun carriers at a time through Reinforcements.
Sector 1
The German attackers are provided two tanks in the first wave.
Sector 2
Panzer forces are reduced by one.
Sector 3
The Germans have their two tanks back on the field at this final stage.
Frontlines
Each team fields one tank each, with provision for one more and two gun carriers as reinforcements.
Gallery
")
")
")
")
")
")
")
")
Trivia
- The White House objective is a real life landmark of Rotterdam, and was one of the few famous structures in the city to survive the Rotterdam Blitz.
- The map has been stated by the developer to be influenced by Seine Crossing from Battlefield 3.[3][4]
- During the Beta, the Conquest objectives of Train Station Beurs, Ruins and Willemsbridge were named differently as Train Station, Ammo Depot and Bridgehead, respectively.
| ||||||||||||||||||||||||||