No edit summary |
(clean up, typos fixed: As a result → As a result,) |
||
| Line 63: | Line 63: | ||
====G: Overlook==== |
====G: Overlook==== |
||
| − | Overlook is found closest to the British deployment along the map's north-east edge. Akin to the Village, the flag consists of a small residential settlement with allotted gardens, at the end of a dirt road, although the edges of the position have been fortified with trench lines, particularly west of the road, which covers the open fields comprising the western approach - the point is named so as the settlement and its earthworks "overlooks" the Swamp found directly west from relative high ground. As a result it can provide solid fighting positions against the exposed adjacent area. |
+ | Overlook is found closest to the British deployment along the map's north-east edge. Akin to the Village, the flag consists of a small residential settlement with allotted gardens, at the end of a dirt road, although the edges of the position have been fortified with trench lines, particularly west of the road, which covers the open fields comprising the western approach - the point is named so as the settlement and its earthworks "overlooks" the Swamp found directly west from relative high ground. As a result, it can provide solid fighting positions against the exposed adjacent area. |
==Grind== |
==Grind== |
||
| Line 95: | Line 95: | ||
==Rush== |
==Rush== |
||
| − | Rush was available on Twisted Steel, alongside [[Narvik]] and [[Devastation]], between March |
+ | Rush was available on Twisted Steel, alongside [[Narvik]] and [[Devastation]], between March 7 to 20 2019 as part of [[Tides of War|Tides of War chapter two]] [[Battlefield V: Lightning Strikes|Lightning Strikes]]. |
The attackers are allocated one tank for each sector. |
The attackers are allocated one tank for each sector. |
||
| Line 110: | Line 110: | ||
A 6 Pounder gun can be constructed on the road in from the stone bridge, covering the primary route in from the east. |
A 6 Pounder gun can be constructed on the road in from the stone bridge, covering the primary route in from the east. |
||
| − | ===Sector 4=== |
+ | ===Sector 4=== |
The last phase occurs in the vicinity of the Silo farm. Objective A is in an isolated compound to the south of the main area and close to the second bridge, surrounded by high perimeter walls. Objective B is in the middle of the Silo farm complex, in the same position as an objective in the Airborne gamemode. |
The last phase occurs in the vicinity of the Silo farm. Objective A is in an isolated compound to the south of the main area and close to the second bridge, surrounded by high perimeter walls. Objective B is in the middle of the Silo farm complex, in the same position as an objective in the Airborne gamemode. |
||
Revision as of 21:10, 17 May 2019
| This article is a stub. It is short and in need of fortification. Why not help out? |
Twisted Steel is a map featured in Battlefield V. It is the second largest map in the base game version following Hamada. It was first seen in the reveal trailer of the game.
The map takes place along the Escaut river in the northern French countryside during the German invasion in May 1940.[2] Their advance north towards the channel threatened to encircle the Allies' eastern extent into Belgium - in response, a number of defensive lines were hastily established along the Scheldt, Scarpe and Meuse rivers.
Overview
A notable feature of the map is a massive, partially collapsed bridge that spans the river and much of the floodplains below. The bridge has been stated by developers to be the largest structure ever modeled in a Battlefield game.[3]
Flag Layout
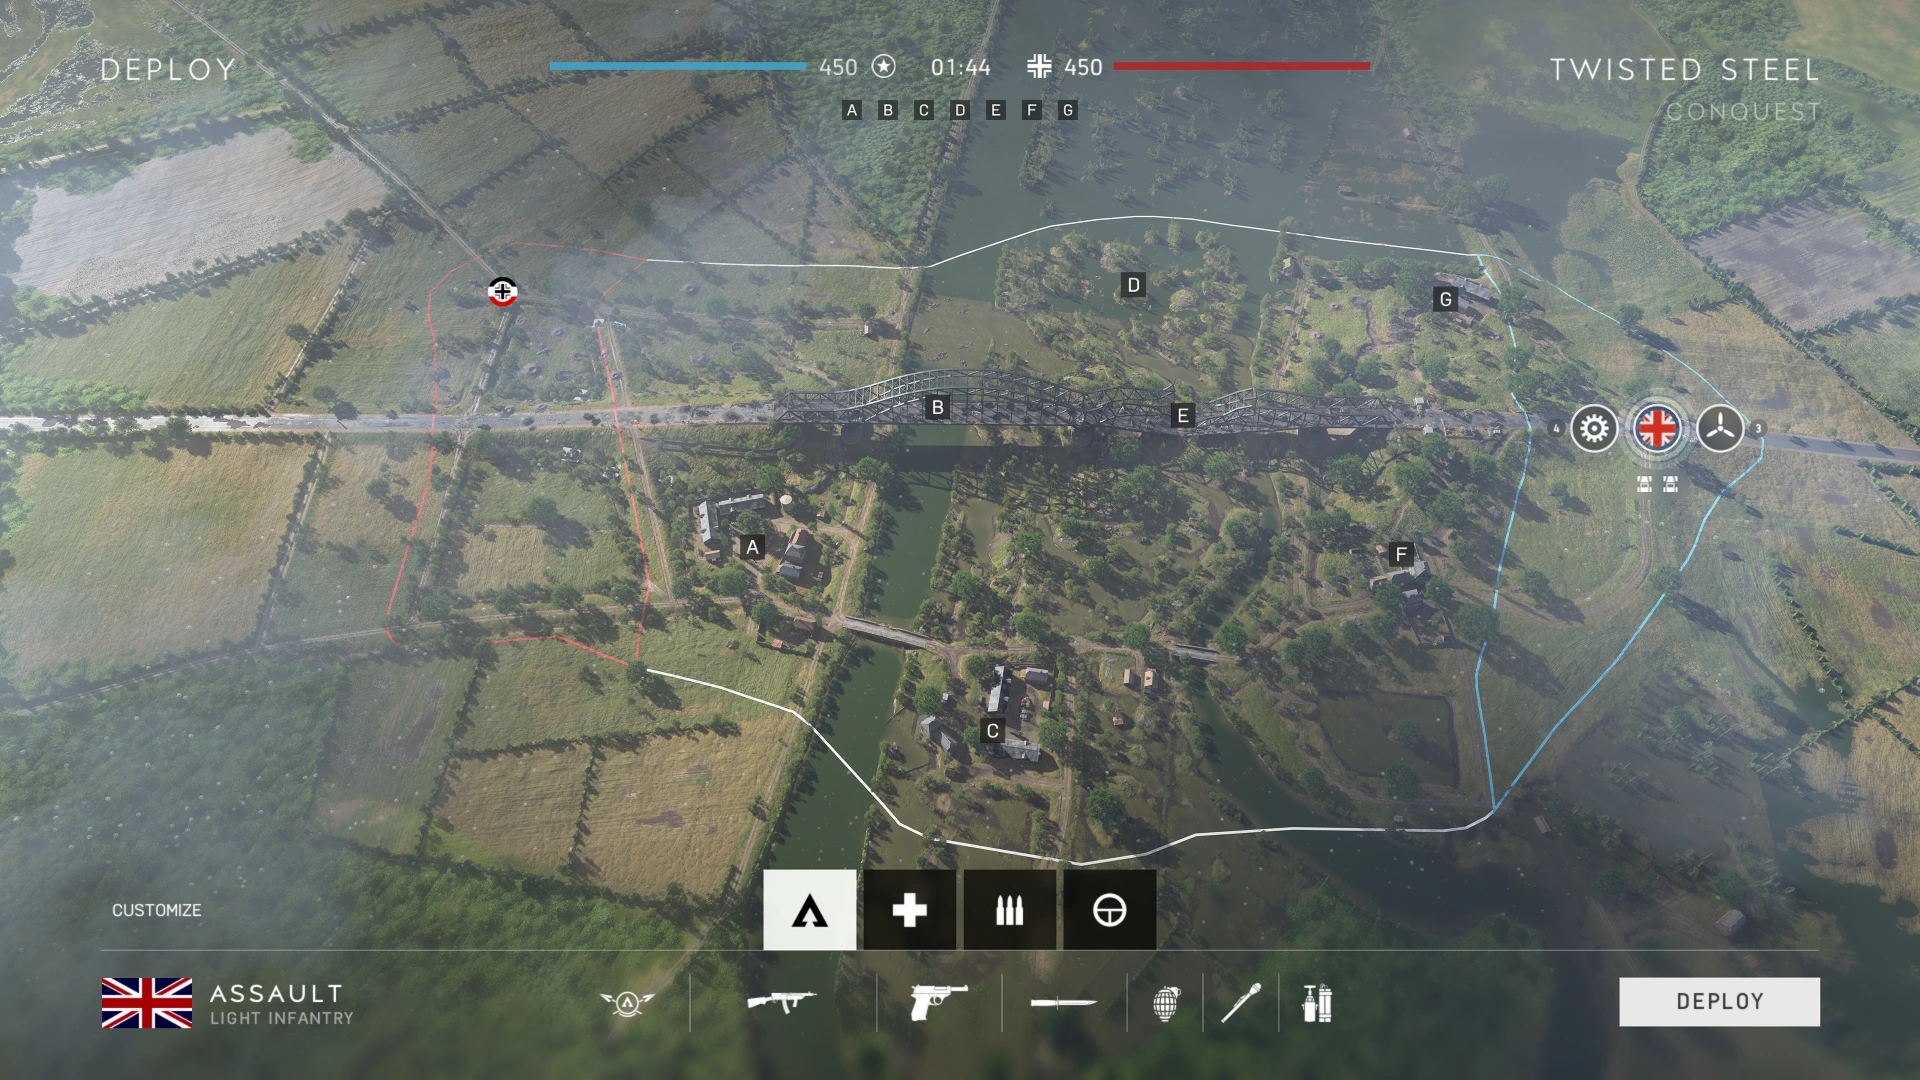
Conquest

Conquest is fought between seven flags, only one of which is one the west bank of the river, and with two along the large metal bridge that crosses the map's horizontal center.
Equipment
Each team deploys with four tanks, three aircraft and two light vehicles. Sides can procure an additional tank and two gun carriers concurrently using the Squad Reinforcement system.[4]
Deployments
Both teams have only a single deployment point. The Germans headquarters is inland from the river's west bank and north of the main road, while the British spawn from the main road at the east end of the bridge.
Flags
A: Silo
The flag closest to the German deployment, and the singular flag on the river's west bank, consists of a farmhouse complex complete with grain silo. Several larger buildings form the outer perimeter of a circular clearing where the flagpole is emplaced, nearer to which are a pair of smaller brick sheds.
The flag has an unspecified pre-built stationary weapon in its vicinity.
B: Bridge
The Bridge flag is suspended above the center of the river on the raised deck of the bridge structure itself, close to the western end. The capture point, and much of the entire length of the platform, is littered with flaming metallic debris - burning tank and aircraft wrecks, collapsed support pillars and overturned supply trucks either condense lines of sight into narrow lanes, or completely obfuscate players from fire along the bridge's length.
C: Flooded Farm
This small agricultural homestead is on the map's lowest point of elevation, situated at the edge of the marshes within the south-west sector. It is linked to the parallel point of silo by a small stone bridge, and their capture zones are of a similar makeup - a series of mixed size structures set around a clearing, however the encroaching river overflow has turned this central yard into a morass. The flag is located at the corner of a large barn, which can provide overwatch positions against players approaching along the west bridge road or from the Village flag directly north-west - another roadbridge joins the two objectives.
A field gun can be constructed to watch the stone bridge road.
D: Swamp
Much of the map's center north of the Farm has been transformed into swamp by the river's flooding, turning a once heavily forested area into a series of tiny islands partitioned by open, clear stretches of water. The flag is set upon one of these islands, adorned with a thicket of trees and surrounded by shallows, however the large capture zone allows the point to be influenced from adjacent areas. Infantry can struggle in this terrain, left vulnerable to players firing down from the bridge as they wade slowly through the marshland. The terrain is therefore better suited to tanks.
E: Sabotage
The second bridge-based flag, found in the direct center of the map. The point is located at a collapsed section of the bridge, with the flag itself planted in the earth, and the two separated pieces of decking forming massive ramps up to the remaining elevated span on each side - the flag can be capture from underneath these slanted partitions. In the middle of the capture zone is the remains of a destroyed convoy, with the cluster of vehicle wrecks forming the majority of cover. The flag can be hard to hold due to limited opportunities for fortification, and its vulnerability from lying on low ground.
F: Village
A small village composed of around a dozen houses and smaller structures is found in the south-east sector of the map. The buildings are organized along short, cramped stretches of streets, with fenced and walled-off gardens to their rears. As the most substantial built-up area on the map, it is well-suited to infantry combat, with the upper storeys of the structures providing ample opportunities for ambushing players in the adjacent tight streets of the interior, and open dirt roads of the approaches. The partitions formed by the building alleyways and dividing walls can cut up lines of sight within the capture radius - fortifications can be built to create further chokepoints.
A field gun is positioned somewhere in town.
G: Overlook
Overlook is found closest to the British deployment along the map's north-east edge. Akin to the Village, the flag consists of a small residential settlement with allotted gardens, at the end of a dirt road, although the edges of the position have been fortified with trench lines, particularly west of the road, which covers the open fields comprising the western approach - the point is named so as the settlement and its earthworks "overlooks" the Swamp found directly west from relative high ground. As a result, it can provide solid fighting positions against the exposed adjacent area.
Grind
Grind is fought between three flags on the central bridge of the map, with deployments on both sides of the bridge. Unlike other gamemode variants, the bridge is no longer destroyed. Additionally, the entire underside of the bridge now features a catwalk.
Grand Operations
Twisted Steel is the first map in the Battle for France Grand Operation, fought over on the first two days, before the battle moves to Arras. In this Operation, German paratroopers are dropped on top of British fortifications along the Escaut to pave the way for the approaching mechanized spearhead.
Airborne
The first day begin with Airborne gamemode which German paratroopers attacking the British positions.
Breakthrough
The second day uses the Breakthrough gamemode. Squad Reinforcement vehicles become active, with a maximum of one tank and two gun carrier halftracks usable at the same time.
Sector 1
German attackers are provided two transport vehicles at each stage, although their tank and air support varies at each line of advance. Initially, two tanks and two aircraft can be deployed.
Sector 2
The Panzer arm's strength dwindles to a single tank at this point.
Sector 3
Attacking armored forces are boosted to three fighting vehicles, while all aircraft withdraw for the remaining two sectors.
Sector 4
German infantry are left to capture this final defensive line alone, as they are left with no tanks to assist.
Frontlines
| This section is a stub. It is short and in need of fortification. Why not improve this section? |
In terms of equipment, each side is allocated a lone tank, with no provision for Squad Reinforcement vehicles of any kind.
Rush
Rush was available on Twisted Steel, alongside Narvik and Devastation, between March 7 to 20 2019 as part of Tides of War chapter two Lightning Strikes.
The attackers are allocated one tank for each sector.
Sector 1
The Germans begin their assault from Overlook, at the bottom of the hill to the direct north of the Roadblock at the east end of the Bridge - the site of the sector's two objectives. Objective A is nearest to the bridge on the west side and Objective B is further to the east. The Germans must make their approach over relatively open ground, and may be exposed to fire from the well-covered roadside defenses that include concrete pillboxes, in addition to the Bridge gantries. However, attackers can flank underneath the Bridge to hit the British positions from the rear, or advance along the more rugged terrain to the east and place the defenders in enfilade.
Sector 2
In the next phase, the objectives are set up in the Village on the opposite side of the Roadblock hill. Objective A is on the north side of the settlement in the middle of the tiered gardens, while Objective B is to its rear behind two rows of buildings, in the southeast corner of a walled courtyard. The structures in the area provide adequate cover for the defenders, and again the Germans must cross uncovered terrain to reach the point. They are more limited in options for flanking as map boundaries prevent the use of the west river as a concealed approach route, which lies between the objectives and the British sector deployment on the opposite bank.
Sector 3
Sector 3 takes place around the Creek and Flooded Farm across the river to the west. Objective A is across the stone bridge between the house and shed in the Creek area, while objective B is further down the road on the northeast side of the Farm. The two objectives are much more spaced apart than previously which can prevent a consistent line of defense, especially as attacker mobility is increased due to most of the surrounding swampland becoming accessible.
A 6 Pounder gun can be constructed on the road in from the stone bridge, covering the primary route in from the east.
Sector 4
The last phase occurs in the vicinity of the Silo farm. Objective A is in an isolated compound to the south of the main area and close to the second bridge, surrounded by high perimeter walls. Objective B is in the middle of the Silo farm complex, in the same position as an objective in the Airborne gamemode.
Another 6 Pounder, this one prebuilt, is set up on the road on the defenders' side of the second bridge.
Developer Notes
Vegetation, wetness, vehicles and vegetation – Twisted Steel is built to be a veritable playground where every part of the Battlefield experience is available. Bring your shotgun to fight in close-quarters through the destroyed tank convoy on the bridge or hide in the bushes and fire your Panzerfaust into the back of a tank as it drives through the swamp – all of it in the same map." — Battlefield V Launch Notes
Gallery
")
")
")
")
")
")
")
")
")
")
")
")
")
| ||||||||||||||||||||||||||
Trivia
- The layout of the northwest section of the map where Airborne takes place was inspired by the fortifications of Brécourt Manor as seen in the TV series Band of Brothers.[5]