m (Reverted edits by 2600:387:9:9:0:0:0:49 (talk) to last version by Wuzh) |
No edit summary |
||
| Line 1: | Line 1: | ||
| − | {{Stub |
+ | {{Stub}} |
| + | {{Construction}} |
||
| + | {{RA}} |
||
{{See|''For other versions of the map, see [[Wake Island (Disambiguation)]]''}} |
{{See|''For other versions of the map, see [[Wake Island (Disambiguation)]]''}} |
||
| + | |||
{{Infobox/map |
{{Infobox/map |
||
|name = Wake Island |
|name = Wake Island |
||
| Line 25: | Line 28: | ||
===Flag Layout=== |
===Flag Layout=== |
||
| + | <div class="mw-customtoggle-CPtable wikia-menu-button" style="padding: 0.5em">show/hide</div> |
||
| + | |||
| + | |||
| + | {| border="0" cellpadding="1" cellspacing="1" class="article-table article-table-selected mw-collapsible mw-collapsed sortable" style="text-align: center; font-size: small" id="mw-customcollapsible-CPtable" |
||
| + | |- |
||
| + | ! Control Point !! Conquest Assault !! Breakthrough !! Squad Conquest |
||
| + | |- |
||
| + | |US Deployment |
||
| + | |colspan="3"|[[File:U.S. flag, 48 stars.svg|24px|link=]] |
||
| + | |- |
||
| + | |Hotel |
||
| + | |A ||1A || |
||
| + | |- |
||
| + | |Barracks |
||
| + | |B ||1B ||[[File:U.S. flag, 48 stars.svg|24px|link=]] |
||
| + | |- |
||
| + | |Hill |
||
| + | | || ||A |
||
| + | |- |
||
| + | |Hangar |
||
| + | |C ||2A ||B |
||
| + | |- |
||
| + | |Outpost |
||
| + | | || ||C |
||
| + | |- |
||
| + | |Ammo Depot |
||
| + | |D ||3A ||[[File:Japan Flag.png|24px|link=]] |
||
| + | |- |
||
| + | |Oil Tanks |
||
| + | |E ||3B || |
||
| + | |- |
||
| + | |Dock |
||
| + | |F ||4A || |
||
| + | |} |
||
==Conquest Assault== |
==Conquest Assault== |
||
| Line 33: | Line 70: | ||
===Deployments=== |
===Deployments=== |
||
====US Deployment==== |
====US Deployment==== |
||
| − | |||
====Japanese Deployment==== |
====Japanese Deployment==== |
||
===Flags=== |
===Flags=== |
||
====A: Hotel==== |
====A: Hotel==== |
||
| − | |||
====B: Barracks==== |
====B: Barracks==== |
||
| − | |||
====C: Hangar==== |
====C: Hangar==== |
||
| − | |||
====D: Ammo Depot==== |
====D: Ammo Depot==== |
||
| − | |||
====E: Oil Tanks==== |
====E: Oil Tanks==== |
||
| − | |||
====F: Dock==== |
====F: Dock==== |
||
==Breakthrough== |
==Breakthrough== |
||
| + | ===Sector 1=== |
||
| + | ===Sector 2=== |
||
| + | ===Sector 3=== |
||
| + | ===Sector 4=== |
||
| + | |||
| + | |||
| + | ==Squad Conquest== |
||
| + | Squad Conquest takes place around the Airfield at the "joint" of the Atoll, with objectives spread out in a linear fashion across the width of the airstrip. As a result most of the terrain on the south side of the map is highly open with little cover, while the north side has vegetation and uneven terrain for infantry to utilize. |
||
| + | |||
| + | Each team starts with a ticket limit of 150. Their are also allocated a single tank, as well as a light vehicle for infantry rushes across the more open sections of the map and potentially break deadlocks. It should also be noted that each deployment lacks Health, Ammo and Vehicle Resupply Stations, requiring tanks to capture the Hangar to receive ammunition and repairs. |
||
| + | |||
| + | ===Deployments=== |
||
| + | ====US Deplyoment==== |
||
| + | The Us Deployment is on the roadway between the Barracks and Hangar Conquest objectives. They spawn very close to the Hill objective, with the hill itself screening most of their deployment area from enemy view. As the US deploy from a much narrower point of the island than the Japanese, potential base exit routes are more limited, but are substantially better covered. |
||
| + | |||
| + | ====Japanese Deployment==== |
||
| + | The Japanese Deployment is within the Ammo Depot at the southern end of the Airfield, with their main spawn area being on the opposite side of the below-runway tunnel from the Outpost objective. Despite this, their protected spawn area is quite large, enabling players to exit the base anywhere along the accessible length of runway, even on the east coast of the island. |
||
| + | |||
| + | ===Flags=== |
||
| + | ====A: Hill==== |
||
| + | The Hill objective is off the north end of the airstrip. It consists of a series of forifications set into a small, foliage-covered hilltop. The trench system is arranged in a coil around the hill crest with a small, circular fighting pit located centrally. The pit contains Health, Ammo and a Flamethrower battle pickup. The capture zone extends over much of the hill surface, allowing players to fight from both the trenches and surrounding bushes. |
||
| + | |||
| + | ====B: Hangar==== |
||
| + | The Hangar objective is the middle flag, aligned with the vertically-orientated runway that forms the playable area's centerline. The capture area is largely unchanged from Conquest, and can be captured from inside, immediately outside, or from the roof. Holding the flag can be of great benefit to teams, as it gives unrestricted sightlines over the vast majority of the map, particularly towards the Japanese side. It is also the location of the map's only Vehicle Resupply Station, as well as Health, Ammo and a Katana battle pickup. |
||
| + | |||
| + | ====C: Outpost==== |
||
| + | The Outpost objective is located on the south side of the play area on the inner coastline. The flag is set around the larger of the two supply docks in the area, with the capture zone encompassing both the pier extension, the dock itself, and a small section of the waterline around it. The pier is mostly devoid of cover, while the dock is sparsely covered by supply crates and cargo trucks - the area is nontheless highly vulnerable to fire from adjacent elevated positions, such as the Hangar to the north and the Control Tower and elevated runway to the south. The pier spawns two Dinghies that mostly benefit the Japanese team, allowing them to bypass the unfavourably exposed terrain around the airstrip by skirting the coastline. The flag also provides Health, Ammo and a Flamethrower pickup. |
||
| + | |||
| + | |||
| + | ==Team Deathmatch== |
||
| + | Team Deathmatch is centered on the Ammo Depot. The widest section the island, the play area delivers a mixture of long-range combat around the flat expanse of the airstrip runway and southern coastline, and close-quarters, semi-urban combat towards the center. While the storage bunkers can be useful holdouts for groups of infantry, they can also pose a devastating explosive hazard should the ordnance inside ignite. |
||
| + | |||
==Trivia== |
==Trivia== |
||
Revision as of 02:08, 25 December 2019
| This article is a stub. It is short and in need of fortification. Why not help out? |
| Incoming! The subject of this article is a recent or unreleased addition to a Battlefield game. It may contain speculation or errors. Have new, relevant information to add? Why not help out? |
As Chapter 5: War in the Pacific continues, we’re now deploying our reimagination of what is arguably the most iconic Battlefield map ever. As you fight for control over land, air, and sea on this horseshoe-shaped classic, we hope you’ll enjoy both the nostalgia and the new improvements."
Wake Island is a map of Battlefield V that was introduced in the fifth Tides of War chapter, War in the Pacific. It was first revealed in Battlefield V – War in the Pacific Official Trailer. It was released on December 12, 2019.[1]
Overview
The map is similar to past installments but is larger to better match the real life scale of the island. The increased terrain size creates better pacing and more places to take cover such as in foliage or rock formations. Fortifications allow for the destruction and repair of bridges on the map. They can also be used to stop the advance of the enemy team due to the linear nature of the map.[2]
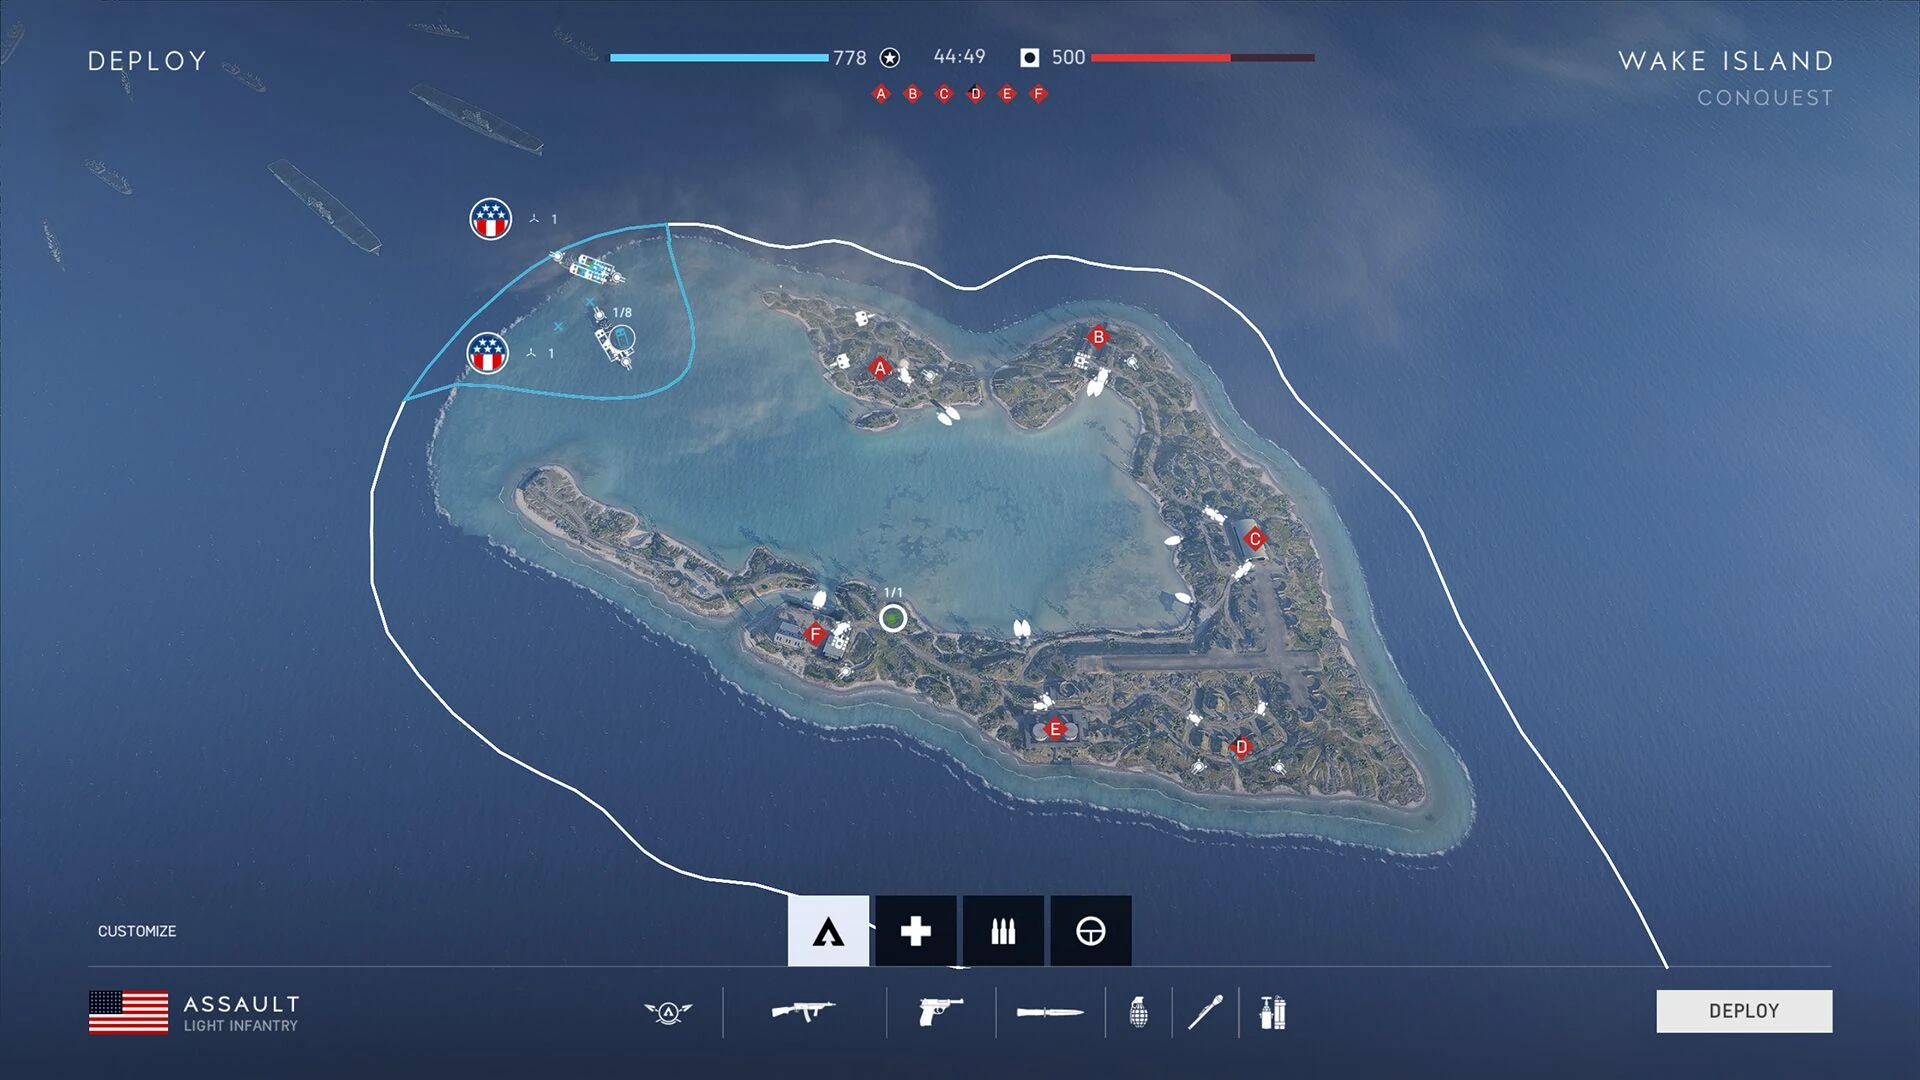
Flag Layout
| Control Point | Conquest Assault | Breakthrough | Squad Conquest |
|---|---|---|---|
| US Deployment | |||
| Hotel | A | 1A | |
| Barracks | B | 1B | |
| Hill | A | ||
| Hangar | C | 2A | B |
| Outpost | C | ||
| Ammo Depot | D | 3A | |
| Oil Tanks | E | 3B | |
| Dock | F | 4A | |
Conquest Assault

Equipment
Deployments
US Deployment
Japanese Deployment
Flags
A: Hotel
B: Barracks
C: Hangar
D: Ammo Depot
E: Oil Tanks
F: Dock
Breakthrough
Sector 1
Sector 2
Sector 3
Sector 4
Squad Conquest
Squad Conquest takes place around the Airfield at the "joint" of the Atoll, with objectives spread out in a linear fashion across the width of the airstrip. As a result most of the terrain on the south side of the map is highly open with little cover, while the north side has vegetation and uneven terrain for infantry to utilize.
Each team starts with a ticket limit of 150. Their are also allocated a single tank, as well as a light vehicle for infantry rushes across the more open sections of the map and potentially break deadlocks. It should also be noted that each deployment lacks Health, Ammo and Vehicle Resupply Stations, requiring tanks to capture the Hangar to receive ammunition and repairs.
Deployments
US Deplyoment
The Us Deployment is on the roadway between the Barracks and Hangar Conquest objectives. They spawn very close to the Hill objective, with the hill itself screening most of their deployment area from enemy view. As the US deploy from a much narrower point of the island than the Japanese, potential base exit routes are more limited, but are substantially better covered.
Japanese Deployment
The Japanese Deployment is within the Ammo Depot at the southern end of the Airfield, with their main spawn area being on the opposite side of the below-runway tunnel from the Outpost objective. Despite this, their protected spawn area is quite large, enabling players to exit the base anywhere along the accessible length of runway, even on the east coast of the island.
Flags
A: Hill
The Hill objective is off the north end of the airstrip. It consists of a series of forifications set into a small, foliage-covered hilltop. The trench system is arranged in a coil around the hill crest with a small, circular fighting pit located centrally. The pit contains Health, Ammo and a Flamethrower battle pickup. The capture zone extends over much of the hill surface, allowing players to fight from both the trenches and surrounding bushes.
B: Hangar
The Hangar objective is the middle flag, aligned with the vertically-orientated runway that forms the playable area's centerline. The capture area is largely unchanged from Conquest, and can be captured from inside, immediately outside, or from the roof. Holding the flag can be of great benefit to teams, as it gives unrestricted sightlines over the vast majority of the map, particularly towards the Japanese side. It is also the location of the map's only Vehicle Resupply Station, as well as Health, Ammo and a Katana battle pickup.
C: Outpost
The Outpost objective is located on the south side of the play area on the inner coastline. The flag is set around the larger of the two supply docks in the area, with the capture zone encompassing both the pier extension, the dock itself, and a small section of the waterline around it. The pier is mostly devoid of cover, while the dock is sparsely covered by supply crates and cargo trucks - the area is nontheless highly vulnerable to fire from adjacent elevated positions, such as the Hangar to the north and the Control Tower and elevated runway to the south. The pier spawns two Dinghies that mostly benefit the Japanese team, allowing them to bypass the unfavourably exposed terrain around the airstrip by skirting the coastline. The flag also provides Health, Ammo and a Flamethrower pickup.
Team Deathmatch
Team Deathmatch is centered on the Ammo Depot. The widest section the island, the play area delivers a mixture of long-range combat around the flat expanse of the airstrip runway and southern coastline, and close-quarters, semi-urban combat towards the center. While the storage bunkers can be useful holdouts for groups of infantry, they can also pose a devastating explosive hazard should the ordnance inside ignite.
Trivia
- North-west of the airfield on Wake Island there is a monument from DICE that says: To those who fought here in 1942 - BF2 - 2142 - 1943 - BF3 - BFV We are grateful. This is an updated version of the same easter egg that appeared in the Battlefield 3 version of the map.
- An elaborate easter egg can be discovered at the "We are grateful" plaque. The full instructions are as follows:[3]
- A crab is located in front of the plaque. Hidden around the map are multiple crabs. Approaching the crabs will cause them to make a clicking sound, burrow into the ground, and reappear in front of the plaque. If five crabs are found, the six crabs will form a circle, and a pair of headphones and a gramophone will appear in the middle of the circle.
- After picking up the headphones, the player can head to an M-COM located at D Flag, and hear morse code coming from the M-COM. The morse code decrypts to a string of code, which, when Googled, will direct to a coordinate located near the real Wake Island. By heading to the corresponding location in-game, the player can find a vinyl record hidden under the water.
- With the vinyl record, if the player interacts with the gramophone, the Battlefield: 1942 theme will start to play. The M-COM morse code will also change, pointing to a new set of coordinates, and another vinyl record can be picked up at the corresponding in-game location. Interact with the gramophone again, and the song will change to a song from Battlefield 2. The process can be repeated several times, changing the song to Battlefield 2142, Battlefield Heroes, Battlefield 1943, and Battlefield 3 songs.
- After the Battlefield 3 song, one more vinyl record can be found. By interacting with the gramophone again, crabs will begin to appear next to the plaque, and an EDM remix of the Battlefield theme, accompanied with crab clicks, will start playing. When the song reaches the climax, the crabs will begin to dance with the beat, and pyrotechnics will be fired from the plaque.
- The crab dancing, combined with the EDM music and the tropical setting, is likely a reference to the music video of EDM song Crab Rave by Noisestorm, which depicts crabs dancing on a tropical island, and is also an internet meme.
Gallery
")
")
")
")
")
")
")
")
")
")
")
| ||||||||||||||||||||||||||