Tag: Visual edit |
Tag: Visual edit |
||
| Line 88: | Line 88: | ||
==Rush== |
==Rush== |
||
| + | The map has 3 stages in Rush with the [[United States Marine Corps|USMC]] leading an amphibious assault starting from the southeastern flank of the map, pushing north against the defending [[People's Liberation Army|PLA]]. |
||
| + | === Stage 1 === |
||
| + | The assault begins as the attackers advance northweast. As they make their first push, they engage the PLA when making an beach landing at the lighthouse (objective G in Conquest Large). MCOM Alpha is located on the south side of the island, close to where the lighthouse is. MCOM Bravo, on the other hand is at the center of the island, being placed in front of the 2-story complex in between various shipping crates. |
||
| + | |||
| + | The USMC deploys from a ''Wasp''-class amphibious assault ship located southeast of the lighthouse. To start out, they are given access to several [[RHIB|RHIBs]], an [[RCB]], and a [[UH-1Y Venom]]. |
||
| + | |||
| + | The People's Liberation Army deploy from the helipad (objective F in Conquest Large) and is tasked with defending the two MCOMs stationed by the lighthouse. Despite not being given access to any vehicles in their deployment, there are multiple [[HJ-8|HJ-8s]] as well as [[.50 Cal]] emplacements to prevent the attackers from establishing a beachhead. |
||
| + | |||
| + | === Stage 2 === |
||
| + | After the first set of MCOMs have been dealt with, the PLA is forced to fall back in order to defend the new set of MCOMs placed in the area of the central island. However, when the USMC makes their assault on the second set, they are able to either mount a frontal assault through the canal with naval craft or flank the objectives from the left through the storage area (objective E in Conquest Large). MCOM Alpha is located underneath the submarine (objective D in Conquest Large), while MCOM Bravo is placed in one of the rooms in the storage area. |
||
| + | |||
| + | The USMC moves up to deploy to the island where the 1st set of MCOMs were. This time, the vehicles issued to them are multiple [[PWC|PWCs]] and [[RHIB|RHIBs]] as well as an [[RCB]]. However, due to the close-quarters setting of Stage 2, the USMC loses their [[UH-1Y Venom]]. |
||
| + | |||
| + | The PLA, being pushed back after losing the first set of MCOMs, deploys on the western side of the central island, around the area of the living quarters (objective C in Conquest Large). Just like before, they are given access to no vehicles. However, one useful tactic for defending against the oncoming attackers would be to essentially prevent them from driving their RCB into the central island by sealing off the southeast canal with the security door. This forces them to have to open it manually, and if the defenders are able to lay down a suppressive fire and not let anyone open the door, naval craft are denied entry from the southeast, forcing the attackers to assault only from the east. |
||
| + | |||
| + | === Stage 3 === |
||
| + | On the third and final set of MCOMs the Chinese are pushed back all the way to the storage docks (objective B in Conquest Large to make a last stand against the USMC. Once again the PLA is forced to defend against another beach landing to stop the attackers from reaching the northern island where the MCOMs lay. MCOM Alpha is placed in between several shipping containers, and is slightly farther inland than its counterpart. MCOM Bravo is positioned underneath a supported roof and in between various construction materials. However, the roofed area is surrounded partly by chain-link fencing. |
||
| + | |||
| + | The USMC advances to the location of the second set of MCOMs for their deployment. Considering that once again the attackers have to stage a beach landing, they are re-issued their [[UH-1Y Venom]] along with multiple [[PWC|PWCs]], [[RHIB Boat|RHIBs]], and 1 [[RCB]]. |
||
| + | |||
| + | The PLA is forced to retreat to defend their final set of MCOMs around the storage docks. Likewise, their deployment is pushed back all the way to the western side of the island, around the same general area as the naval compound (objective A in Conquest Large). Despite not being given access to any vehicles in their deployment, there are multiple [[HJ-8|HJ-8s]] as well as[[.50 Cal]] emplacements to prevent the attackers from establishing a beachhead. |
||
==Team Deathmatch== |
==Team Deathmatch== |
||
Team Deathmatch takes place inside the submarine pen. |
Team Deathmatch takes place inside the submarine pen. |
||
Revision as of 21:49, 24 January 2015
Wave Breaker (Chinese: 消波礁岸) is a map featured in the Battlefield 4: Naval Strike expansion. It is set somewhere on rocky islands in the South China Sea, and features a naval base hidden underneath a rocky hill and an interactive submarine which can be dropped onto troops under it.
Design Notes
"Wave Breaker has a unique submarine base hidden in the middle mountain which allows for tight close quarter combat, but it also has wide canals where it’s possible to do drive-bys with the attack boats to add extra mayhem to the mix. The middle area has many different Levolution possibilities. You can for instance bring down a submarine from its support and turn off the lights in the surrounding corridors. It’s also possible to stop boats from entering the area by closing the four flood gates and blocking the direct path from the bases on the two sides. The middle island will give players intense fights in Deathmatch modes."[1]
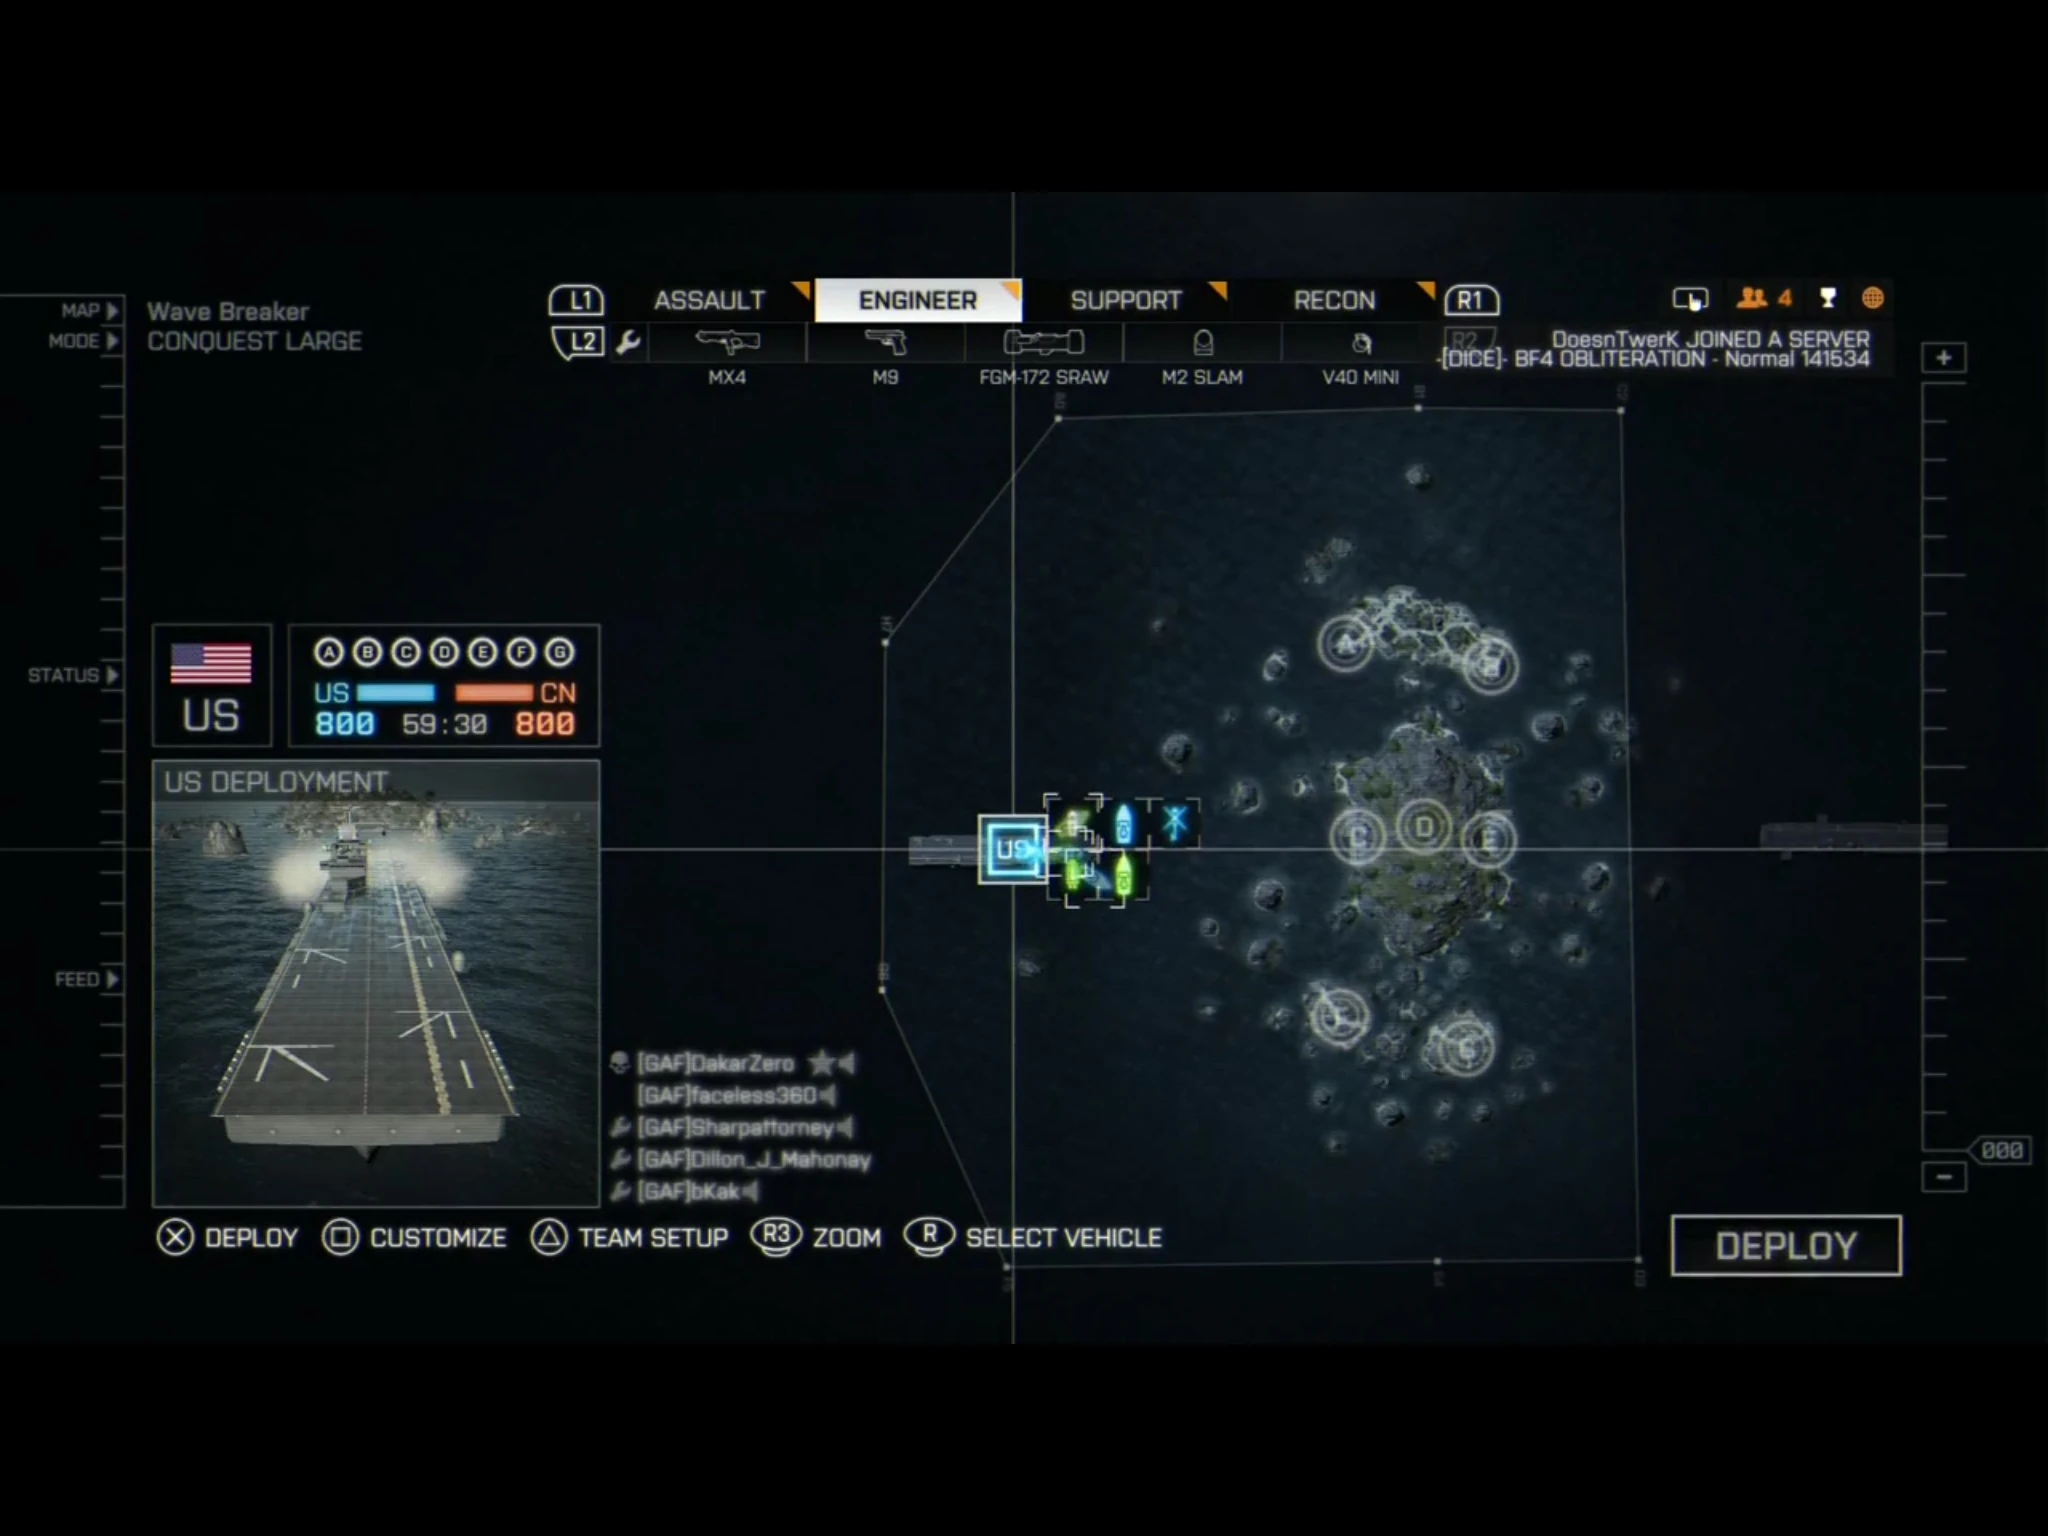
Conquest
This map has 5 flags on Conquest mode and 7 flags on Conquest Large.
Flag Layouts
| Flag | Conquest | Conquest Large |
|---|---|---|
| Naval Compound | A | A |
| Storage Docks | B | |
| Living Quarters | B | C |
| Submarine | C | D |
| Storage | D | E |
| Helipad | F | |
| Lighthouse | E | G |
Equipment
| Helicopters(s) | |
| Boat(s) | |
| Emplacement(s) | |
| Helicopters(s) |
1 Z-11W |
| Boat(s) | |
| Emplacement(s) | |
Deployments
US Deployment
Located on the western side of the map, U.S. forces have direct access to the Naval Compound, Living Quarters, and the Helipad. Like the PLA, the USMC deploys directly off of a Wasp-class amphibious assault ship.
The map for Conquest
CN Deployment
Located on the eastern side of the map, Chinese forces have direct access to the Storage Docks, Storage, and Lighthouse. Like the USMC, the PLA deploys directly off of a Wasp-class amphibious assault ship.
Bases
The Naval Compound is on the western end of the island located north of the mountain. As the name suggests, it is a naval military complex that is surrounded by chain-link fencing as well as several guard posts. Inside the actual compound, there are a few buildings as well as various shipping containers, concrete barriers, sandbags, and other objects that could serve as potential cover. The area contains many emplacements for taking out enemy watercraft. On the actual island it is on, there are a few ground trails that connect over to objective Bravo (the Storage Docks) on the east side. There are some rocks rising out of the ground around the island that also can serve as cover during a potential firefight. When captured, a PWC as well as either an RCB or DV-15 spawn there.
Storage Docks
Located on the eastern side of the island north of the mountain, the Storage Docks are only present as a capture point in Conquest Large. Here, objective B houses various containers, pipes, construction materials, docks, and a few .50 Cal emplacements in wooden towers, which can be destroyed quickly by Attack Boats. A building, similar to the one at the outpost in Nansha Strike, is here alongside some containers which can be used for cover. Other than that, this flag is exposed to watercraft. Just like the Naval Compound (objective A), the island has several ground trails that connect over to objective Alpha on the west side. There are some rocks rising out of the ground around the island that also can serve as cover during a potential firefight. When captured, a PWC as well as either an RCB or DV-15 spawn there.
Living Quarters
One of the three objectives on the central island, the Living Quarters are on the westernmost side. This objective is surrounded by some containers and is one of the infantry entrances to the sub pen. Inside the entrance, there are a number of rooms containing only a bed and two lockers. A USAS-12 can be found inside a different room. Another .50 Cal in a wooden tower here is here, surrounded by a number of explosive barrels. When captured, only a PWC will spawn.
Submarine
The central objective in the entire map, the Submarine is hidden inside the mountain base and can be accessed via watercraft as well as infantry. Naval vessels must enter through the four canals in the four corners of the island, which can be barricaded using the gate controls. Infantry can reach the objective by moving into the base via the entrances located at Living Quarters and Storage, and navigate the room using the walkways above. A square of water circles the submarine. The submarine's support poles can be destroyed by explosives and will collapse and kill anyone underneath it. It will also open up the control room which oversees most of the base. This is the main levolution event of the map of the map. When captured, only a PWC will spawn.
Storage
The last of the three objectives on the central island, the Storage Area contains multiple containers as well as other construction materials that can be used for cover and an entrance for infantry into the submarine pen. Just inside the entrance, a fuse box can be shot in order to darken one of the rooms, which holds an M82A3 MID.There is a .50 Cal machine gun inside the small wooden tower, looking out to the ocean. When captured, only a PWC will spawn.
Helipad
Located on an island southwest of the mountain, the Helipad is also accompanied by multiple structures and fortifications that are suitable for defending the island. These include sandbags, concrete barriers, and more. An AH-1Z Viper spawns on the pad when the USMC forces control the flag, and a Z-10W when the PLA does. Not only that, but a PWC will spawn, joining the attack helicopter. The island is well-fortified with stationary weapons, and is also only present as a capture point in Conquest Large.
Lighthouse
Placed on an island a bit bigger than the one that houses the Helipad (objective F in Conquest Large), it is located southeast of the main island. As the name suggests, a lighthouse is the primary focus on this island and offers a significant vantage point over the neighboring islands. The island is outfitted with a complex about as big as the one for the Helipad, as well as multiple .50 Cal machine guns and rocket launchers. When captured by either faction, both a PWC and a RHIB spawn as a result.
Rush
The map has 3 stages in Rush with the USMC leading an amphibious assault starting from the southeastern flank of the map, pushing north against the defending PLA.
Stage 1
The assault begins as the attackers advance northweast. As they make their first push, they engage the PLA when making an beach landing at the lighthouse (objective G in Conquest Large). MCOM Alpha is located on the south side of the island, close to where the lighthouse is. MCOM Bravo, on the other hand is at the center of the island, being placed in front of the 2-story complex in between various shipping crates.
The USMC deploys from a Wasp-class amphibious assault ship located southeast of the lighthouse. To start out, they are given access to several RHIBs, an RCB, and a UH-1Y Venom.
The People's Liberation Army deploy from the helipad (objective F in Conquest Large) and is tasked with defending the two MCOMs stationed by the lighthouse. Despite not being given access to any vehicles in their deployment, there are multiple HJ-8s as well as .50 Cal emplacements to prevent the attackers from establishing a beachhead.
Stage 2
After the first set of MCOMs have been dealt with, the PLA is forced to fall back in order to defend the new set of MCOMs placed in the area of the central island. However, when the USMC makes their assault on the second set, they are able to either mount a frontal assault through the canal with naval craft or flank the objectives from the left through the storage area (objective E in Conquest Large). MCOM Alpha is located underneath the submarine (objective D in Conquest Large), while MCOM Bravo is placed in one of the rooms in the storage area.
The USMC moves up to deploy to the island where the 1st set of MCOMs were. This time, the vehicles issued to them are multiple PWCs and RHIBs as well as an RCB. However, due to the close-quarters setting of Stage 2, the USMC loses their UH-1Y Venom.
The PLA, being pushed back after losing the first set of MCOMs, deploys on the western side of the central island, around the area of the living quarters (objective C in Conquest Large). Just like before, they are given access to no vehicles. However, one useful tactic for defending against the oncoming attackers would be to essentially prevent them from driving their RCB into the central island by sealing off the southeast canal with the security door. This forces them to have to open it manually, and if the defenders are able to lay down a suppressive fire and not let anyone open the door, naval craft are denied entry from the southeast, forcing the attackers to assault only from the east.
Stage 3
On the third and final set of MCOMs the Chinese are pushed back all the way to the storage docks (objective B in Conquest Large to make a last stand against the USMC. Once again the PLA is forced to defend against another beach landing to stop the attackers from reaching the northern island where the MCOMs lay. MCOM Alpha is placed in between several shipping containers, and is slightly farther inland than its counterpart. MCOM Bravo is positioned underneath a supported roof and in between various construction materials. However, the roofed area is surrounded partly by chain-link fencing.
The USMC advances to the location of the second set of MCOMs for their deployment. Considering that once again the attackers have to stage a beach landing, they are re-issued their UH-1Y Venom along with multiple PWCs, RHIBs, and 1 RCB.
The PLA is forced to retreat to defend their final set of MCOMs around the storage docks. Likewise, their deployment is pushed back all the way to the western side of the island, around the same general area as the naval compound (objective A in Conquest Large). Despite not being given access to any vehicles in their deployment, there are multiple HJ-8s as well as.50 Cal emplacements to prevent the attackers from establishing a beachhead.
Team Deathmatch
Team Deathmatch takes place inside the submarine pen.
Squad Deathmatch
Squad Rush
Domination
Domination matches are inside the sub pen. The three objectives are Submarine, Living Quarters and Storage. However, the last two are not where they are placed in conquest. Instead the flags are in rooms close to the Submarine.
Obliteration
Defuse
Carrier Assault
The Chinese carrier spawns to the east, while the US carrier spawns to the west. The launchers objectives are all at the conquest flags Submarine, Storage, Living Quarters and Naval compound. One exemption is the Helipad, which is now on a very small island with three large rocks for protection. The launcher however, is still on the helipad island.
Trivia
- Climbing to the highest point on top of the main island will unlock the "Spotted" Achievement/Trophy.
- It is the largest Naval Strike map.
- In gamemodes such as Conquest, Obliteration, and Carrier Assault, the Chinese deployment is that of a Wasp-class amphibious assault ship, which is only of U.S. origin.
- Instead, the naval vessel that possibly would fit the same role as the USS Essex (LHD-2) would be a Type 071 (Yuzhao-class) amphibious transport dock, which roughly serves the same purpose in the People's Liberation Army Navy.
Gallery
")
")
")
")
")
")
")
")
")
| ||||||||||||||||||||||||||